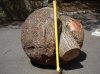
i am looking to turn a 28" outside diameter burl bowl, and i want the outside surface unturned and without screw holes. is it unrealistic of me to expect a glued waste block to hold this much weight? i probably should use screws and plug them afterwards but i thought it doesn't hurt to ask.

-
Beware of Counterfeit Woodturning Tools (click here for details) -
Johnathan Silwones is starting a new AAW chapter, Southern Alleghenies Woodturners, in Johnstown, PA. (click here for details) -
Congratulations to Keven Jesequel for "Big Leaf Maple" being selected as Turning of the Week for April 15, 2024 (click here for details) -
Welcome new registering member. Your username must be your real First and Last name (for example: John Doe). "Screen names" and "handles" are not allowed and your registration will be deleted if you don't use your real name. Also, do not use all caps nor all lower case.
You are using an out of date browser. It may not display this or other websites correctly.
You should upgrade or use an alternative browser.
You should upgrade or use an alternative browser.
suggestions for best glue for fixing waste block to wood blank
- Thread starter victortmina
- Start date
- Joined
- Jan 27, 2005
- Messages
- 12,894
- Likes
- 5,178
- Location
- Dalworthington Gardens, TX
- Website
- pbase.com
Sounds realistic to me. Just remember to keep the tailstock in place until most of the wood is turned away and the piece is well balanced. Any wood glue should be fine. Make sure that the wood is dry enough that the glue will hold and that you allow the glue to fully cure. I have used carpet tape, but do not turn really large stuff like that. I now use scroll chucks, but I understand the reason for using a faceplate in this situation.
i forgot to mention that the wood is green. the burl bark is intact. i am hoping to remove an 8 inch section and hand plane a flat section. maybe give it a chance to dry out a bit? then glue the block. does this sound like a reasonable plan.
If the burl is green, wood glue will absolutely not work; the only glue that is going to set is CA glue. You are definitely going to need a perfectly flat surface, as you indicated with the hand planes, and a fair amount of glue. If the other side is perfectly flat, you can use boards on either side as mounting surfaces for clamps while the CA sets. I've never used a glue block on anything this large, so I will defer to other turners' suggestions on how long to leave it to ensure the glue has set, and for that matter whether or not to use any accelerator on the block. I've used the glue on one surface and accelerator on the other surface method, then immediately applied tailstock pressure, which would obviously not work for this project, at least without a couple extra hands to help out.
- Joined
- Jan 27, 2005
- Messages
- 12,894
- Likes
- 5,178
- Location
- Dalworthington Gardens, TX
- Website
- pbase.com
No need to hand plane -- start off by statically balancing the piece then boring a couple shallow recesses for the drive and live centers and then turning between centers to create a flat area on one end. Given that it is green, I would create a tenon for mounting on a scroll chuck. The tenon would be about a half inch long so not much of the wood is lost. While CA glue is good, I do not trust it or any other glue to have sufficient bonding strength to glue green wood to dry wood because of the shearing force created as the green wood dries and shrinks.
- Joined
- May 16, 2005
- Messages
- 3,540
- Likes
- 15
If the piece is quite irregular you'll stress the hold - any hold - quite a bit even if you're careful with your speed. Means you MUST have a perfectly smooth surface for gluing, and a glue, such as one of the polyurethanes, which will bond wet wood. Standard carpenters' glue won't do. Have your weights ready to press the plate down tight before you spread the glue. Dry run the process, even though the glue has a good open time.
The differential shrink should not be a factor unless you're going to Turn, Dry Turn. The faceplate and block will keep the bottom pretty damp for a week or two. Besides, if it's a burl, you really can't predict what it's going to do. Sometimes it almost seems to do nothing.
I'd use a chuck, if I had it. If you have a lathe capable of swinging 28" over the bed as Bill suggests, I'm sure you do. If so, use a mortise and some big jaws.
Oneway has a 12" faceplate. That might put the screws beyond the curve of the finished bowl.
You can mount a 14" or larger piece of wood to the large faceplate and then attach your work piece to that where the screws will be beyond the final curve of the bowl.
Hand plane? Mount the blank between centers with the foot of the bowl toward the tailstock. Use the large faceplate with small sharpened bolts to drive the blank. Turn the flat at the tailstock end to whatever diameter desired. (make the base slightly concave with 1" to 2" flat at the outer diameter for the screws or for glueing).
john lucas
AAW Forum Expert
Use CA or Polyeurethane. The surface must be flat because these glues don't fill gaps. Thick CA will fill a moderate gap but I'd shoot for flat. I rough them out with an angle grinder and then smooth them with a hand plane. I haven't tried something that large but with an adequate sized piece of wasteblock I think you will be OK.
I agree on the large faceplate. You can put the screws outside the foot of the bowl so those holes will be turned away later. I've thought about building a really large faceplate just for that purpose. I just haven't had the time or need to do it yet. I had a 6" faceplate with my Nova 3000 and used it several times for larger hollow vessels.
I agree on the large faceplate. You can put the screws outside the foot of the bowl so those holes will be turned away later. I've thought about building a really large faceplate just for that purpose. I just haven't had the time or need to do it yet. I had a 6" faceplate with my Nova 3000 and used it several times for larger hollow vessels.
I would opt for a tenon or recess that can be turned away later, if you have some monster jaws. I turned a 23 inch bowl once with 5 inch jaws, and it did fine, but a 28 inch bowl??? Well, only one way to find out. With the wet wood, the only glues that will hold are the CA and urethane glues. I wouldn't really feel safe with either. I called up Franklin glues once with some questions, and talked to the guy who had been there longer than dirt. They experimented with the urethane glues by making laminated base ball bats. The ones glued up with Titebond held up fine. The urethane glue ones delaminated every time. The only other option would be the 12 inch face plate and screws. You know it will hold, but you will have to turn off some of the bottom, or make the screw holes look like worm holes.
robo hippy
robo hippy
i appreciate al the responses. thanks. i am turning on a stubby and try to get the most depth. a faceplate is the best option. yes, turning a flat spot would make the most sense. pretty obvious i guess. i was trying to avoid lifting this piece up more than once. but... that is why i bought a the chain hoist. time to set the hoist up.
i am not familiar with polyurethane glues, brands or were to get the stuff? any suggestions?
i am not familiar with polyurethane glues, brands or were to get the stuff? any suggestions?
- Joined
- Jan 27, 2005
- Messages
- 12,894
- Likes
- 5,178
- Location
- Dalworthington Gardens, TX
- Website
- pbase.com
.... any suggestions?
I think that I would go on the information obtained by robo hippy and use Titebond III rather than polyurethane glue. Wet wood makes poly glue foam and excessive foaming results in a weak bond.
Steve Worcester
Admin Emeritus
I am a big fan of flexible CA for this. Use it all the time, but nothing over 12" so far.
- Joined
- May 16, 2005
- Messages
- 3,540
- Likes
- 15
My TB says clean dry surface. Think it's because there's drying and curing required for that glue, which remains somewhat flexible, thus able to spring and fling on a baseball bat. That's a test which is no test, but a marketing ploy. White glue would do as well.
If you have a stubby and can use the tailstock, it would certainly broaden your list of available glues beyond water-curing, because you don't need a lot. Try using TB on wood at or above the FSP and see what happens. You'll know in a day.
If you have a stubby and can use the tailstock, it would certainly broaden your list of available glues beyond water-curing, because you don't need a lot. Try using TB on wood at or above the FSP and see what happens. You'll know in a day.
Last edited:
- Joined
- Apr 27, 2004
- Messages
- 8,623
- Likes
- 4,950
- Location
- Lakeland, Florida
- Website
- www.hockenberywoodturning.com
The best glue joint I've found for wet wood is thick CA.
this method was supposedly one used by Rudy Osolnik
I turn a slight concave on both blank and glue block.
I have a hole through the center of the glue block.
Mount the blank between centers turn the outside to rough shape.
make a slight concave a wee bit more in diameter than the glue block.
use a chisel to remove the tenon from the tail stock.
Mark the center of the blank as closely as you can.
make a small dimple in the center point using an awl or a twist drill tuner by hand.
I use a high tech coat hanger wire the the glue block to center it when mounting.
The glueing process is critical.
dry fit to center the glue block.
mark around it with a pencil.
run a bead of thick ca glue on the blank around the inside of the circle.
put accelerator on the glue block. put the wire in the center of the blank.
run the glue block down the wire and twist it as it makes contact.
the twist is essential. it will force that bead to flatten out toward the center of the two concaved surfaces creating a glued surface 3/4 to an inch wide.
mount the piece on the lathe and use the tails stock for support.
true up the outside. it shouldn't need much. hollow some from the bowl with the tail stock in place. remove the tail stock.
it hit the bowl lightly. if the joint is weak the bowl will come loose.
this only happens if you did not twist and spread the glue.
if it does come loose clean off the ca with a chisel re-glue and
complete the turning. Then use a flat chisel right at the glue line. tap it and move it around. The ca will fracture. maybe 10% of the time there will be a few splinters of either the bowl or the glue block torn.
This method is great for wet wood. However you must get the glue block off in about 2 hours or so. If the wet wood decides it is time to move it will fracture the glue joint.
happy turning,
Al
Last edited:
john lucas
AAW Forum Expert
I'm not convinced Titebond 111 will bond to green wood. I have not tried it however. I would run a test if I were you. Glue a block to some green wood and see how hard it is to remove it. I'm pretty sure the dry time will be extended. I probably won't have the time to do a test myself but if I do I'll let you know.
Robert Manning
member
- Joined
- Jun 16, 2009
- Messages
- 202
- Likes
- 1
- Location
- Southern California
- Website
- www.californiawoodartist.com
I have turned 27" (the same outer diameter as my bicycle's tire) and at 500 rpm, the outer edge is at 40 mph. When you dial it up to 1000 rpm to work on the center, the edge will be going 80 mph. I used stable dried wood for my pieces. If your green wood starts to warp at the glue joint as you remove material and relieve internal pressure in the wood, expect your piece to disconnect. I'm not saying it can't be done, but you might consider wearing armor.
- Joined
- Jan 27, 2005
- Messages
- 12,894
- Likes
- 5,178
- Location
- Dalworthington Gardens, TX
- Website
- pbase.com
That little thing? Chop it up and use it for firewood. 
Seriously, I think that I would go for several smaller turnings rather than one huge one. It would give you more opportunity to study what is inside of it.
Seriously, I think that I would go for several smaller turnings rather than one huge one. It would give you more opportunity to study what is inside of it.
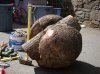
i hope to cut of one third for a couple of bowls and use the rest for a few howl forms. it is 36" at it's widest and 30 at it's narrowest. nearly a perfect sphere. lots to work with.
You didn't mention what the weight was but it doesn't really matter. If you use a slow cure epoxy like they use on the heat shield tiles on the Space Shuttle, (it takes a week to cure) you shouldn't have a problem.
Turn a tenon
I pretty much always turn a tenon on the external end of the intended bowl. On the really large and wet and heavy ones I may initially mount a faceplate on the intended center section, thus not having to worry about screwholes.
I just don't trust glued on waste blocks. I ALWAYS use the tailstock for as much support as possible and keep the speed reasonable. I also use the Stubby 750.
Good luck
Robert Manning
member
- Joined
- Jun 16, 2009
- Messages
- 202
- Likes
- 1
- Location
- Southern California
- Website
- www.californiawoodartist.com
You didn't mention what the weight was but it doesn't really matter. If you use a slow cure epoxy like they use on the heat shield tiles on the Space Shuttle, (it takes a week to cure) you shouldn't have a problem.
Hi Barry,
I remember a few of those tiles coming off in the early part of the program.
I would be very interested to hear you elaborate on the shuttle tile process. What is the substrate and how is it prepared? Is the epoxy thickened? How do they cure it? Who made the epoxy? What are the tiles composed of?
- Joined
- Jan 27, 2005
- Messages
- 12,894
- Likes
- 5,178
- Location
- Dalworthington Gardens, TX
- Website
- pbase.com
You didn't mention what the weight was but it doesn't really matter. If you use a slow cure epoxy like they use on the heat shield tiles on the Space Shuttle, (it takes a week to cure) you shouldn't have a problem.
Hi Barry,
I remember a few of those tiles coming off in the early part of the program.
I would be very interested to hear you elaborate on the shuttle tile process. What is the substrate and how is it prepared? Is the epoxy thickened? How do they cure it? Who made the epoxy? What are the tiles composed of?
That is not at all how the heat shield tiles are manufactured. I worked for the aerospace company that developed reinforced carbon-carbon over forty years ago as a heat resistant material for the earlier space programs.
Basically, the fabrication of RCC begins with building up many layers of a rayon cloth that is graphitized and impregnated with phenolic resin and then cured in a vacuum autoclave. Next, it is pyrolized which converts the resin to carbon. The result is a very porous and lightweight material without a great deal of high temperature strength at this point. The porous carbon structure is impregnated with furfural alcohol in a vacuum chamber and then pyrolized which converts the furfural alcohol to carbon. This process is repeated at least three times until the desired carbon-carbon properties are achieved and all voids are filled. At this point the RCC material is very strong even at 3000° F.
For increased wear and oxidation resistance, the exterior surface is converted to silicon carbide by packing it with a mixture of alumina, silicon and silicon carbide in a retort and heated to 3,200º F in an argon environment. The outer layers of the carbon-carbon are converted to silicon carbide which prevents oxidation. Further treatment with tetraethyl orthosilicate is necessary to deal with minute surface cracks in the silicon carbide. The final result is a material that durable from minus 250° F to about 3,000° F.
The problem with the tiles came late in the program, not early, when NASA farmed out some of the RCC fabrication to lower bidders that had no experience in this process.
Space shuttle Loose tiles
''Out sourced" to China?????? Gretch
The problem with the tiles came late in the program, not early, when NASA farmed out some of the RCC fabrication to lower bidders that had no experience in this process.
''Out sourced" to China?????? Gretch
Last edited by a moderator:
Large Burl Bowl
Is this burl balanced with a built in foot or something to rest the bowl on ??
If not and you have to do a little turning on the bottom for a foot, why not use an 6" or larger face plate, turn a recess, chuck in the recess to hollow out the inside ?? I have turned hex shaped pieces that measure 26++" in diameter with an 6" face plate and a 2 5/8++" recess sucessfully, and I don't even have a tail stock.
Ref. to the shuttle tiles, in a past life, I built the entrance chamber and doors for the vacuum heat treat furnace that the tiles were heattreated in.
Good luck and Happy turning,
Dave
- Joined
- Jan 27, 2005
- Messages
- 12,894
- Likes
- 5,178
- Location
- Dalworthington Gardens, TX
- Website
- pbase.com
That is not at all how the heat shield tiles are manufactured.
I should have been more clear since there were various types of heat shield material. Our company built the RCC components that took the brunt of the heating -- the nose cap and the leading edges of the wings and parts of the fuselage where the wing leading edge fared into the body. The program was called the LESS (Leading Edge Space Shuttle) program. One of NASA's main responsibilities was creating acronyms for program names.
.... Ref. to the shuttle tiles, in a past life, I built the entrance chamber and doors for the vacuum heat treat furnace that the tiles were heattreated in.
There were also white colored "tiles" used on other parts of the shuttle that was a separate program from the LESS program to build the RCC components (the RCC componentxs are light gray color). I do not know what company built the while tiles, but they were the ones that started peeling off during the tragic accident several years ago.