• Beware of Counterfeit Woodturning Tools (click here for details)
  • Johnathan Silwones is starting a new AAW chapter, Southern Alleghenies Woodturners, in Johnstown, PA. (click here for details)
  • Congratulations to Keven Jesequel for "Big Leaf Maple" being selected as Turning of the Week for April 15, 2024 (click here for details)
  • Welcome new registering member. Your username must be your real First and Last name (for example: John Doe). "Screen names" and "handles" are not allowed and your registration will be deleted if you don't use your real name. Also, do not use all caps nor all lower case.

Ambrosia Maple Finishing help

Joined
May 21, 2004
Messages
62
Likes
0
Location
Downeast, Maine
I am turning a piece of ambrosia maple, a bit of spalting, bee wing, birds eye and curl are in this piece also. All of my attempts to finish maple have not been "presentation quality" this piece will go to my neighbor who gave me the tree.

I need help with what will high light the distinctive character of this piece.

Thanks in advance
 
Joined
Apr 24, 2004
Messages
146
Likes
0
Location
Winston, OR
pretty stuff

Mort, I turn that type of maple quite often; the secret is in the sanding. For the ambrosia maple my last sanding is with 2,000 grit paper but don't get the piece hot. Sand in short segments (if you're sanding while the piece is on the lathe) of about 30 seconds and blow the sanding dust off the piece w/air between sandings. Once you've gotten the piece "as smooth as glass" you can put on any finish you like. Unless I am lacquering a piece I use only 2 finishes--Renaissance Wax and nothing. I like the feel of wood, I don't try to cover that feeling with finish. I'd say 70% of my bowls and vases are bare wood, 29% have Renaissance Wax, and 1% have other finishes.

You have fun, seeing the results of a fine, naturally finished, piece is well worth the effort. You'll find that you'll just want to sit there and fondle the piece. As a customer once told me, "Your pieces are so smooth they're almost erotic." That, my man, is a compliment not to be surpassed.
 
Joined
Apr 28, 2004
Messages
117
Likes
1
Location
Southwest Missouri
Website
www.hiltonhandcraft.com
Mort,

What does it appear like to you is the problem? Why isn't it up to presentation quality? Do you mean the smoothness? Depth? Color? Anything else? You mentioned "highlighting" so I assume you mean really making it stand out and not appear bland / flat.

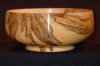
Figured, light colored wood takes on a great depth with an oil (either alone or with a film building type of finish along with it or over it) and can become quite striking. Unfortunately, it also is likely to yellow the wood a bit depending on which oil you use. Just a top wax, lacquer spray, or non-penetrating finish, for example, will often leave the piece appearing "flat" and with no depth to it.

The Ambrosia and Spalting coloration will really "pop out" when an oil is applied but may significantly darken surrounding areas.

You can always go with a penetrating finish (basically some kind of oil) to bring some depth to it and make things really "pop" then do something over the top of it depending on what you're looking for there. I mean, you can either make it plastic looking or just make it look like an "in the wood" type of finish. Gloss can be adjusted no matter what finish you decide on there.

A good, easy finish that will highlight figure and colorations (spalting, ambrosia, stains, etc.) along with a light film build on the top is what's called the Maloof Finish. There's all kinds of varieties of this general finish type but it's basically just...

1) An oil (Pure Tung, Boiled Linseed, etc.)
2) A film finish (polyurethane or varnish mainly)
3) A solvent (mineral spirits, naptha, etc.)

All in equal parts. Apply as much as the wood will take ... wait 15 minutes or so and wipe off. Allow to dry overnight. Do this 3 or 4 times and you'll have a great finish. Do it more and you'll get more of a gloss and more of an "out of the wood" finish. You can apply a wax buffing to the top of this after you're very sure it's dry to give it some more gloss and minor protection.

Hope it helps,
 
Joined
Apr 25, 2004
Messages
372
Likes
0
Location
Burnt Chimney, SW Virginia
Website
www.burntchimneystudios.com
Matte finish

Mort,

I finish a lot of ambrosia maple with Krylon Matte Finish. It is a spray that I get at Michael's, a craft supply store. As was suggested, sand it very well. For the final sanding step I like to use a 3M sanding sponge, the Ultra-fine or "green" sponge works well. I stop the lathe and use the sponge in the direction of the grain.

Once sanded and the dust is blown off the piece, spray a couple of VERY light coats on it. Let it dry and you will think it is dull as dishwater and has no finish on it. Wrong.

Then, use the Beall Buffing system and buff the piece. You will be amazed at how beautiful that dull-looking piece becomes. If you buff too aggressively with the Tripoli, and the coats were too thick, you may mess up the finish completely. In that case, take lacquer thinner and several sheets of absorbent paper towels and wipe it off. Sand when dry and try again. This time, use light coats. :D

I was told that David Ellsworth popularized the use of the Krylon matte finish. All I know is, it works well on ambrosia maple for me. And I am about to go and buff a small ambrosia bowl that I finished this morning. :D

You might want to try a small test piece before appying this on a bowl. And, the wood must be dry when the finish is applied. If you turned the bowl wet and it has not dried thoroughly, then don't expect good results
 
Joined
Apr 27, 2004
Messages
58
Likes
2
Location
Traverse City, MI
I've turned a fair amount of Ambrosia Maple, turned green/wet. My finish of choice is Watco Danish Oil Finish (Clear). I sand on the lathe through 2000 grit and apply the Watco in accordance with their instructions. This really makes the grain and figure "pop." Depending on wall thickness, I let it dry (both for water and finish) for two or more weeks. I then apply a second application of the Watco, and two or three days later, if it looks like a good idea, another Watco treatment. I then let it dry for another week or so and do a Beall buff finishing with the Carnauba wax. This produces a visually stunning and sensuous feeling finish.

Whit
 
Joined
Apr 28, 2004
Messages
117
Likes
1
Location
Southwest Missouri
Website
www.hiltonhandcraft.com
Whit said:
I've turned a fair amount of Ambrosia Maple, turned green/wet. My finish of choice is Watco Danish Oil Finish (Clear). I sand on the lathe through 2000 grit and apply the Watco in accordance with their instructions. This really makes the grain and figure "pop." Depending on wall thickness, I let it dry (both for water and finish) for two or more weeks. I then apply a second application of the Watco, and two or three days later, if it looks like a good idea, another Watco treatment. I then let it dry for another week or so and do a Beall buff finishing with the Carnauba wax. This produces a visually stunning and sensuous feeling finish.

Whit

Yep. The Watco (Varnish + Boiled Linseed Oil + Thinner/Solvent) is a Maloof type of finish.
 
Joined
May 21, 2004
Messages
62
Likes
0
Location
Downeast, Maine
A bit more information - this is my first try at ambrosia maple, lots of maple in these parts with lots of different figures and grains the majority is green or near green. Previous attempts at finishing maple result in no figure "pop" which is what I want together with a more or less natural - not plastic look finish. Said another way I want to enhance the grain and figure while leaving a more or less natural look a la the maloof style finish with a light sheen to the piece., i.e. "presentation quality". This piece of maple - as is the case with all that I have available - is green. Having said that this tree was mostly dead standing timber, the wood does feel wet to the touch however. Some drying has taken place as a result of sanding on the lathe.

If I understand - I will not get the finish I am looking for until the wood has had a chance to dry and I need to go several grits beyond 600 ensuring all sanding dust is removed then apply the finish.

FWIW I have tried 100% tung oil, a tung oil blend - MinWax, Boiled linseed oil, Bealls buffing system, beeswax disolved in gum turpentine, bees wax and mineral oil and several colors of stain. Maple appears to be a very thirsty wood. While at the same time not be willing to give up it's figure. Staining maple is a very unsatisfactory means of finishing. My usual finish method is the Beall's system. Fortunately I have a lot of this wood to play with and will try the other methods suggested.

Thanks for the input
 
Joined
Apr 25, 2004
Messages
2,560
Likes
34
Location
Annandale, New Jersey
2 Choices

Mort,

I have done Ambrosia in oil-free and oil finishes.

The first pic is of a 11" x 4" piece. Sanded to 320, then sealed with dewaxed super blond shellac, resanded to 400, top coated with Target waterborne Series 9000 poly (2 coats), wet sanded (with MS) to 800 grit, and finally rubbed out with Meguire's auto compounds at Nos. 3 & 9. The color change with this method was quite minimal.

Second pic of a 20" x8" piece just completed. Sanding was to 320 by power sanding, then 2 coats of Waterlox sealer (tung oil product), wet sanded to 400, followed by 2 coats of Waterlox high gloss. Waited 10 days for the finish to cure completely, then wet sanded with 1000 and rubbed out with the Meguire's. The oil does darken the end grain a bit, but the client really likes the color and depth.

Hope this helps.

Mark
 

Attachments

  • Ambrosia-2.jpg
    Ambrosia-2.jpg
    5.3 KB · Views: 555
  • Ambro-Big-2.jpg
    Ambro-Big-2.jpg
    25.2 KB · Views: 817
Joined
May 29, 2004
Messages
995
Likes
2
Location
billerica, ma
If you are turning the wood "green", which includes dead wet wood, you're going to need to include drying in the process somewhere. I've noticed that in pieces I turn green and finish immediatly, the finish quality does not hold as the surface alters with drying. A mirror finish becomes matte, requiring resanding and refinishing. Two options. Turn green, dry, resand, finish. Turn green to rough shape, dry, finish turn, sand and finish.

The popular combination up here (MA) is several applications of clear tung oil (which is usually just eurythane oil relabled) followed by buffing on a beall type system. The oil will darken the wood and will increase the contrast in ambrosia wood. It will also cause the grain features to jump out wonderfully. If you only use 1-2 applications of oil, the wood grain will remain somewhat open and will have a wonderful feel to the touch.

Warning: Light, highly absorbant woods like birch and aspen will take on a distinctive, irregular wet look that will remain to some degree.

enjoy,
dietrich
 
Joined
Apr 28, 2004
Messages
117
Likes
1
Location
Southwest Missouri
Website
www.hiltonhandcraft.com
dkulze said:
The popular combination up here (MA) is several applications of clear tung oil (which is usually just eurythane oil relabled)...
That should be "mis-labeled". If it's labeled a "Tung Oil Finish" then it may or may not have any actual Tung Oil in it at all. Likely, if it does have any, it's extremely little. Only if it's labeled "Pure Tung Oil" and the ingredients don't have any "Petroleum Distillates" listed, then is it actually Tung Oil.

What you are using is likely either a thinned varnish or polyurethane (also called a Wiping Varnish or Polyurethane) as you said or the wiping varnish/polyurethane with just a touch of boiled linseed oil in it at best. There are 1 or 2 biggish commercial companies actually making an actual Tung Oil type of finish but it's rare. Best to just make your own. It's easy too.
 
Joined
May 21, 2004
Messages
62
Likes
0
Location
Downeast, Maine
Thanks Mark, both of your pieces - beautiful by the way - reflect what I am attempting to achieve. The figure in the wood has popped and the wood did not yellow. Is that a function of the super blonde shellac? I have been playing with the cutoffs from the bowl blank, Boiled linseed oil and the MinWax "Tung Oil Finish" impart a yellow color to the wood, beeswax and 100% Tung Oil to a lesser degree but still some yellowing and no or little grain pop with the beeswax. The same is true for the Beall buffing system. I don't have any shellac to test nor do I have any varnish. I will correct that and try those two also a la your method.

The piece is off the lathe and sanded to 600 grit - as high as I can currently go. At 400 it began to take on a glow and polish "in the wood" which I like but also want the pop of the colors and the other grain patterns - at 400 grit an area of "quilting" showed up. The finish of pieces is really in the eye of the beholder. Ideally I will be able to achieve the grain/coloration pop with the natural "in the wood" glow and polish. There is a way and I have the will and the time to find it.

Thanks to everyone for their input. Turning is almost the most fun I have had with my clothes on.
 
Joined
Apr 25, 2004
Messages
372
Likes
0
Location
Burnt Chimney, SW Virginia
Website
www.burntchimneystudios.com
Mort,

The Krylon Matte Finish does not yellow at all. We have an ambrosia bowl that we use for napkins on the table dated 04/01 with this finish and I am pleasantly surprised at the durability and lack of color change.

I made a discus-like hollow form from ambrosia as a prototype for an Afzelia Xylocarpa burl piece for a collector. The prototype is dated 05/01 and it still looks great. The collector is a real burl lover with an incredible collection. He was ecstatic that the eyes of the burl stood out so nicely. I am attaching a picture of this bowl and two small pieces I made from AX. All have the Krylon finish.
 

Attachments

  • AX.jpg
    AX.jpg
    11 KB · Views: 356
Joined
May 21, 2004
Messages
62
Likes
0
Location
Downeast, Maine
Thanks Ed for the pics on the Krylon. I will give that a try also. Lovely pieces Sir.
 
Joined
Apr 25, 2004
Messages
2,560
Likes
34
Location
Annandale, New Jersey
Shellac

Mort,

In place of Super Blond and similar dry-to-mix shellacs, I'd recommend you pick up some Zinsser's "SealCoat" at a good paint store. It is a 100% dewaxed bleached shellac that is very pale.

I also recommend the "real deal" in tung oil finishing which is Waterlox; forget the "tung oil finishes" that you find on hardware store shelves. I use their original sealer and the high gloss formulation which has some resins added. If you can't find it locally, you can contact Waterlox direct through their website, or you can order online from Jeff Jewitt at http://www.homesteadfinishing.com/

To help control end-grain darkening with a oil finish, I mix the shellac to a 1/4 lb. cut, apply to the whole piece, then lightly sand with 320 or 400 grit before applying the oil.

Good Luck and post some pix of how you make out.

Mark
 
Last edited:
Joined
Apr 28, 2004
Messages
117
Likes
1
Location
Southwest Missouri
Website
www.hiltonhandcraft.com
Mark Mandell said:
Mort,

I also recommend the "real deal" in tung oil finishing which is Waterlox; forget the "tung oil finishes" that you find on hardware store shelves.
While Waterlox is, indeed, a good finish, it is still a "Tung Oil Finish" .... just a wiping (thinned) varnish. It's a higher quality than most commercial products in that category. It's also what's called a "soft varnish" meaning that the varnish (which is just a resin such as phenolic, urethane, or alykd cooked with a drying oil ... slight amounts of tung oil in this case at best) has more oils in it per the amount of resins. That gives it a good grain "pop"; more flexibility; penetrates slightly deeper; but makes it less durable.

Some commercial finishes go a step further than the wiping varnishes like Waterlox and include oils "outside" of the varnish. Meaning that they combine the varnish with an oil (BLO or Tung, etc.) without cooking them together. That is what I'd call a real Tung Oil Finish (no parenthesis) .... not PURE Tung Oil but still it actually has some free Tung Oil in it to give you the full properties of it. Now, whether you really want those properties is another story .... ;)
 
Joined
May 21, 2004
Messages
62
Likes
0
Location
Downeast, Maine
Mark and Andrew
Here in the back of the beyond of Downeast Maine a good paint store is defined as one having more than two colors of paint and in quarts as well as gallons :p

The tung oil I use is from Lee Valley and is marked 100% on the label as well as on the list of ingredients. At $10 a pint it ought to be the macoy.

The Zinesser products are available through Sherwin Williams in Ellsworth so will give that a try also. Great tip on sealing the end grain.

Thanks a bunch for the pointers. I am learning a great deal about finishing this wood that I am sure will apply to other timber. Keep the super information coming.
 
Joined
Apr 28, 2004
Messages
117
Likes
1
Location
Southwest Missouri
Website
www.hiltonhandcraft.com
One more thing

Mort said:
Mark and Andrew
Here in the back of the beyond of Downeast Maine a good paint store is defined as one having more than two colors of paint and in quarts as well as gallons :p
I'm with you there, too, Mort. :) Nothing locally carries much more than brown and light brown (something they think is white?). I have to mail order about everything woodturning or woodworking related. That's the main reason I started mixing my own wood finishes many years ago. By the time it got here, it was already too old to use! Which brings me to the below....

Mort said:
The tung oil I use is from Lee Valley and is marked 100% on the label as well as on the list of ingredients. At $10 a pint it ought to be the macoy.
Pure Tung Oil has, as everything does, a shelf-life. It's expensive stuff so treat it like that. Pour out what you need in the next month or so into a smaller container. The rest, you need to squeeze as much air out of it as possible (smaller container, collapsible one, put marbles in it, or displace the oxygen in the container with Bloxygen or equivalent, etc.) and keep it cool. Mixing it up into your homemade finishes (if that's what you're going to do with it anyway) right now will prolong it's shelf life a bit too. Just a little FYI in case you and the others didn't know.
 
Joined
Apr 25, 2004
Messages
2,560
Likes
34
Location
Annandale, New Jersey
Tung Oil & Air

Mort & Andrew,

Tung (pure or mixed) tends to polymerize in the can faster that others. While you can spend good money for the canned nitrogen ["Bloxygen"] product, just a shot of propane from a homeowner soldering torch (NOT lit, of course!!) into the can just before you close it up does the same thing for half a penny's worth of gas. :cool2:

Mort,

The Zinsser's is a 2 or 3 pound cut mix off the shelf (marked on the can, I think) which is way too "heavy" for your use. You will have to also get some alcohol solvent to recut it. If it's 2 lb. cut, you'll have to mix it 3 (not 4) parts solvent to 1 part product to get 1/2 lb. cut to use. It will perform far better for you if you apply thin coats (not more that 1 lb. cut) since shellac will fuse 100% with the prior application.

:( OOOPS! Said 4 parts solvent to dilute 2 to 1/2 lb. cut. That is actually 3 parts. Sorry . . . :eek:

Mark
 
Last edited:
Joined
May 29, 2004
Messages
995
Likes
2
Location
billerica, ma
Hey, Mort, are you talking about Ellsworth, Maine? If so, gonna be up there this week. Need any wood?

Dietrich
 
Joined
May 21, 2004
Messages
62
Likes
0
Location
Downeast, Maine
Hey, Detrich
Yes Ellsworth. Maine
I am in Eastport
What kind of wood you got.
Later
 
Joined
May 21, 2004
Messages
62
Likes
0
Location
Downeast, Maine
Storage

I store Tung oil like I do with CA and gorilla glue. Squeeze the air out, turn upside down and refrigerate in doubled zip lock bags - a concession for the refigerator space. The refrigerate thing is probably over kill as night time lows in the summer months are in the 50's with highs in the low low 70's. Good idea on the propane. I won't tell the LOML as I might have to give up the refrigator space for the CA.
 
Joined
Apr 25, 2004
Messages
2,560
Likes
34
Location
Annandale, New Jersey
Storage

Mort,

You can save all that squeezing with a bag of marbles. As you use the product, add more marbles to the container to take up the space. When the can's done, rinse'em off with a bit of thinner.

Mark
 
Last edited:
Joined
Apr 25, 2004
Messages
2,560
Likes
34
Location
Annandale, New Jersey
Marbles

ARE a required nonelectronic part of any happy childhood. Essential for developing small motor ability & eye-hand coordination, they also provide initial training in both quality construction techniques and inductive investigative reasoning.

You have my sympathy :D

Mark
 
Joined
May 21, 2004
Messages
62
Likes
0
Location
Downeast, Maine
Thanks For The Symphony

But I don't know I am missing anything if I don't know what it is. :D :D

Back to business - I located a can of Zinsser Shellac - 3 # cut and diluted it with denatured alcohol - doesn't smell anything like vodka - 1 part shellac 2 parts alcohol. No clue what cut that equates to - no marbles - Sanded the piece to 1500 grit, - the auto parts store up to Calais between the three had 1 piece of 800, 1 piece of 1000, 1 piece of 1200 and 2 pieces of 1500 - blew the dust off as well as used a 3M lense cleaning cloth. The shellac is on the piece now. I am really letting it dry. We have been fog bound for 2 days. I have a kerosene heater in the Carriage House that will be on all night. I will lightly sand it tomorrow and am thinking to put the Lee Valley tung oil on straight.

I did try this proceedure on some American, cuban, florida mahagony I had sitting around waiting to be finished. A very nice in the wood gleam even the LOML likes it.

Later
Tom
 
Joined
Apr 25, 2004
Messages
2,560
Likes
34
Location
Annandale, New Jersey
Sympathy

Mort,

I hope this was a typo. You stated 3 lb cut "Zinsser Shellac". THAT is not the Zinsser Seal Coat that I told you about. In fact, Zinsser Shellac is a very different product in that it's NOT dewaxed and is quite a bit darker. Please tell me that some paint-store weenie didn't sell you the "this is the same stuff, just different label" routine. Unbleached wax-bearing shellac is NOT what you want to use for finishing, unless, of course, you're a luthier making musical instruments. If you were to then use a waterborn finish like Target, you'd have a real mess because the finish would fish-eye and then crack and peel off the waxy surface. :(

If you mixed 1 part 3-pound with 2 parts alk, you've got a 1-lb cut mixed. A bit heavy for absorbtion conditioning, I prefer 1/2 lb. in that application.
 
Back
Top