Just out of curiosity I tried the "Bowl from a Board" project posted on various sites. What a nightmare! I used a brand new dovetail bit and was very precise in my set up, but it was an exercise in futility. I discovered that both carbide cutting edges had a slight curve to them and the joint had a gap at the deepest points to begin with. I figured I would proceed anyhow to see how the thing fit together and turned. Using the band saw, I cut the rings and dry fit everything before final glue up. Big mistake - I didn't have a press for gluing up the layers so I just used a stack of weights from an old exercise set. (about 100 lbs) After letting the glue dry for about 3 days I mounted it on the lathe and started to turn. I could not for the life of me get this thing trued up and after some time gave up on it and tossed it in the wood boiler. On this first attempt, one board was Black Walnut and the other Jatoba. The weights of these two species is vastly different and I have to ask if that is perhaps why I couldn't true the bowl up successfully? I am going to try another one just for something to do, but need to know the answer to this question first.

-
Beware of Counterfeit Woodturning Tools (click here for details) -
Johnathan Silwones is starting a new AAW chapter, Southern Alleghenies Woodturners, in Johnstown, PA. (click here for details) -
Congratulations to Keven Jesequel for "Big Leaf Maple" being selected as Turning of the Week for April 15, 2024 (click here for details) -
Welcome new registering member. Your username must be your real First and Last name (for example: John Doe). "Screen names" and "handles" are not allowed and your registration will be deleted if you don't use your real name. Also, do not use all caps nor all lower case.
You are using an out of date browser. It may not display this or other websites correctly.
You should upgrade or use an alternative browser.
You should upgrade or use an alternative browser.
Balancing a turning
- Thread starter Robin Thompson
- Start date
john lucas
AAW Forum Expert
Well I'm not sure how you used the dovetail bit. There is a bowl from a board video on youtube that uses 2 boards put together with a dovetail bit. You would disassemble these two boards and then cut half rings. Then glue them back together to form rings with the dovetail in the middle. I did that one and it's fun. The technique for stacking the rings and turning the bowl is the same for all the bowl from board techniques.
I tend to use the bandsaw, scroll saw or parting tool to cut my rings. If Use the bandsaw I cut the board in half and then cut half rings with the appropriate angle to make the rings stack. Then I glue the half rings together to make whole rings. Then these are stacked up and glued together. The rings must be flat so that you have a tight glue joint.
After all the rings are glued together you put them on the lathe and true them up. If your having trouble at this stage your tools must no be sharp enough or your technique needs some work. It is challenging because the bowl is already fairly thin and requires some skill to turn it without too much chatter.
Do a search for Bowl from a board on both Google and Youtube and you will find some good info.
My .02 When I do segments or bowl from board, I glue up one ring at a time. First true/flatten one side, then glue to base. When dry flatten the ring, either tool edge then sand with sandpaper on board across both sides(diameter). Then glue next ring segment etc. Have done some with just boards, and two using finger joining the boards. This is the first time I loaded a picture, so hope it worked. Finished picture is after the fix, almost looks like it was to be there, spent too much time making not to fix.
Attachments
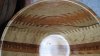
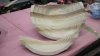
John, that is exactly how I did it. The video was from Bob Hamilton. One thing I messed up on was not gluing the rings layer by layer; why I didn't I don't know. Probably eating out of too many aluminum pots. Yes, the bowl was thin but I didn't seem to be having a lot of chatter. Tools were sharp. I just couldn't seem to get the bowl concentric and it was lop sided.
- Joined
- Apr 27, 2004
- Messages
- 8,629
- Likes
- 4,969
- Location
- Lakeland, Florida
- Website
- www.hockenberywoodturning.com
The two bowls from a board I've seen are stacked rings like john mentioned. A planed board is used. The rings are cut on the lathe with a parting tool. A ten pound weight would work well clamp these pieces. I use this technique for bird house roofs on full size turned birdhouses. I usually clamp the birdhouse roof between centers on the lathe over night.
The other technique is. To make a spiral cut is from the rim to about 3" to the center with the bandsaw after setting then at 5 or 7 degrees. The rim is is pushed down to apply the glue then pulled up to form the bowl.
Both of these bowls can bequest challenging for a beginner.
Unlike a bowl from a half log where you create a smooth surface to cut from these bowls are glued up pieces that each need truing. It is like starting over at each joint. Plus all that glue and glue squeeze out is harder than the wood. The has the same challenges all over again.
I don't turn the inside of the birdhouse roofs. I figure the birds don't care.
Have fun
Al
john lucas
AAW Forum Expert
Robin I like the finger joint bowl. May have to work on one of those. I have been turning the BFB bowls really thin. Not sure why I guess I just like them that way. They want to chatter really bad when turning the inside so what I do is add stabilizers to the outside. I cut 1/4" plywood into roughly a triangular shape. One side roughly matches the bowl outside, another side will be hot glued to the chuck so it needs to have angles cut to match that, and the other side is just kind of flat.
I hot glue these to the outside of the bowl and chuck in 4 places. It is amazing how well this works. It's scary, sounds like a propeller spinning when you turn it on so stay away from the outside.
I apply a finish to the outside before the hot glue. This makes it easier to remove the stabilizers and glue. To get the stabilizers off I use a piece of thin guitar wire with handles and sort of saw through the hot glue at the surface of the bowl. works great. then using your fingers rub off all that you can. The rest of the glue can be removed with a rag and alcohol. I've turned 12" bowls to 3/32 using this method.
John, any chance you could take a photo of these stabilizers next time you set up like that and post it or send it to me please. I am going to try another one of these bowls with the same two species of wood. (Jatoba and Black Walnut) I want to try the dovetail again with a better quality bit and then I might try the fingerjoint. I still have to wonder if the shear weight of the Jatoba on one side of the bowl is causing an imbalance that will never disappear.
john lucas
AAW Forum Expert
I suspect that is the problem. I made one of those using pine and mahogony. the weight wasn't a problem but the hardness difference of the two was. I had to really concentrate on tool control. If the imbalance is due to weight play with lathe speeds. You may find a speed that cuts down on the vibration.
I probably won't be turning one of these soon. I have blank glued up but I've gotten involved in a project to turn a bunch of bowls from a major tree they are taking down on campus and that and other commitments is going to eat up most of January.
I think I can set up a photo so you will understand what I'm doing. I still have a set of the stabilizers laying on my tool cabinet and can probably put a bowl on the lathe and sort of tape them down so you can see how they work.
Another option that is easy, cheap,safe and simple when you have some chatter while turning the inside is to wrap the outside with shrink wrap. Since the piece is wrapped when the piece is not spinning, it tends to resist centrifical forces once turned on. This can help reduce chatter that comes from thin walled turning and also dampens the vibration caused by the cutting itself. The key is to apply even pressure as you pull/wrap the piece. When turning green this also reduces the air moving over the surface of the outside causing drying and movement when you are working on the inside.
john lucas
AAW Forum Expert
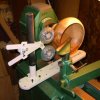
Here is a set up photo that hopefully will make it clear. I make 4 of these. They don't have to fit perfect although I try to make them fit better than this. I just cut some scrap by eye, then I lay it on the wood and using a pencil I trace the chuck and bowl. Then I cut that shape out. It's not perfect but fits close enough. I simply get close the hot glue will fill in the gaps. It is amazing how much it stabilizes these bowls.
don't forget to apply some finish to the bowl. It doesn't have to be perfect the finish is just to keep the hot glue form getting in the pores and make it easier to remove the waste hot glue later.
don't forget to apply some finish to the bowl. It doesn't have to be perfect the finish is just to keep the hot glue form getting in the pores and make it easier to remove the waste hot glue later.
Attachments

OK John I have it now. I'll give it a whirl. Thomas, Thanks for the shrink wrap idea. I am going to go with Johns idea then try another with the wrap.
Appreciate the help from all.
Appreciate the help from all.
Robin, you never said if it was the inside or outside you could not true up but i assume outside. While people getting back to you are talking inside. So i will lay out a few things. If I read wrong forgive me. If you have a heavier wood on one side you need to turn slow or it wont true up. Fast and the heavy part leans out. Slow with sharp tools. Sand the outside before going in. You may need to turn slow for the inside also. A hand on the out side will dampen vibration and help you get clean cuts on the inside. If you have not done this before its a light touch and your hand should only be warm. dont be afraid to keep going to the grinder.
odie
TOTW Team
- Joined
- Dec 22, 2006
- Messages
- 7,113
- Likes
- 9,722
Robin.......
One additional consideration is to use a Oneway bowl steady. It will improve the cut for both outside and inside turning. (With outside turning, place it on the back side.) The bowl steady isn't a cure-all, but will substantially reduce vibration and chatter. You will still need to reduce the speed, but the steady provides you with a greater range of rpm that will work......a real improvement.
BTW, I see there is a used Oneway bowl steady in the AAW want ads forum at a pretty reasonable price. The price on this item just keeps going up!
ooc
Attachments
I am on the verge of purchasing a Oneway bowl steady and I saw the used one on this site. The price is good but the shipping from that location to Whitehorse, Yukon plus brokerage fees etc. killed that option. If that isn't enough my lathe won't support the use of a bowl steady as it stands right now. Until I can upgrade my lathe I am going to figure out a way to mount a bowl steady and spindle steady to the bench my lathe sits on. The particular lathe I purchased about 13 years ago has, up to this point, done what I need it to do, but has serious limitations for some of the things I am trying now. Getting things centered and balanced correctly is often a nightmare on this critter. I am sure when I say that the lathe has double bars for a bed and a swiveling headstock it will partially explain some of the issues I am facing. That is not to say I have all the turning techniques perfected nor does it indicate I have the sharpest tools, but it doesn't help. For now I am paying close attention to all the advice being provided and will put it to good use.
Incidentally, I am contemplating shortening the bed bars from 60 to 30" as I am of the opinion that doing this might reduce vibration and thus some of the problems associated with it.I don't turn a lot of long spindles and I can't even think about deep hollowing on this lathe as there is no way the lathe bed can handle a boring system. Sometimes we have to work with what we have and do the best we can.
Incidentally, I am contemplating shortening the bed bars from 60 to 30" as I am of the opinion that doing this might reduce vibration and thus some of the problems associated with it.I don't turn a lot of long spindles and I can't even think about deep hollowing on this lathe as there is no way the lathe bed can handle a boring system. Sometimes we have to work with what we have and do the best we can.
Robin, my first lathe was an old craftsman with the double bars. The guy I got it from told me when I realised what a piece of crap it was I was ready for something else. I placed wood blocks under the bars as close to the headstock as I could to help prevent some of the movement. So now that I know the manner of lathe you have I wish to offer some advise. Save your pennies for a better lathe. Even an old Delta with steel ways and a 12 inch swing will seem like a caddilac compared to what you are working with. I also suggest you put no more money into this lathe. I now work on a oneway 2436 with the large outboard. Buts its not a hobby. I do this for a living. I still have that old lathe. Its stacked in a corner. Oneday I will set it back up and give it away with the same advise I was given when i got it. good luck.
Last edited:
Kelly, a 2436 is where I am headed and should have it within a few months. I am not going to skimp on any options either. Hind sight!
Incidentally, the only reason I don't have one now is because I want to ensure Oneway has sorted out the headstock bearing issue/s. I'm heading home to Sarnia, Ontario (from Whitehorse,Yukon) in March. Oneway Manufacturing is only 1 1/2 hours drive from Sarnia so I am going to visit them in person.
john lucas
AAW Forum Expert
Robin What roads are you taking on the return trip. I need to carjack you because that's about the only way I can afford one of those. ") Seriously though I know lots of people with the big Oneway and everysingle one of them love it. Although one guy did buy a mini lathe to sit on the Oneway Ways to turn his fishing lures. I should take a photo of that.
Seriously though I know lots of people with the big Oneway and everysingle one of them love it. Although one guy did buy a mini lathe to sit on the Oneway Ways to turn his fishing lures. I should take a photo of that.
Seriously though I know lots of people with the big Oneway and everysingle one of them love it. Although one guy did buy a mini lathe to sit on the Oneway Ways to turn his fishing lures. I should take a photo of that.Yes John, that lathe set up would be something to see and my route back will now be kept confidential.
- Joined
- Jun 5, 2009
- Messages
- 20
- Likes
- 0
My oneway 2436 has just arrived last week no power to it but what a piece of equip. can not wait to turn it on.... dreaming about it for years...
Right on and good for you Joel. Aside from dreaming about it for years did you have to wait long for it once you placed the order?