• We just finished moving the forums to a new hosting server. It looks like everything is functioning correctly but if you find a problem please report it in the Forum Technical Support Forum (click here) or email us at forum_moderator AT aawforum.org. Thanks!
  • Beware of Counterfeit Woodturning Tools (click here for details)
  • Johnathan Silwones is starting a new AAW chapter, Southern Alleghenies Woodturners, in Johnstown, PA. (click here for details)
  • Congratulations to Dave Roberts for "2 Hats" being selected as Turning of the Week for April 22, 2024 (click here for details)
  • Welcome new registering member. Your username must be your real First and Last name (for example: John Doe). "Screen names" and "handles" are not allowed and your registration will be deleted if you don't use your real name. Also, do not use all caps nor all lower case.

Drying Green Bowls.

Joined
Aug 5, 2010
Messages
14
Likes
2
Location
Dallas, TX
I know that this cannot be a new idea however.

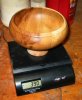
Saturday I got to spend the day in the shop turning green bowls to rough shape for drying. I got about 6 done but have a whole wheelbarrow of fresh wood to shape, so I decided to wait until I had a full bag in order to pack them up. Well as usual life got in the way, and today, Tuesday, was the next time I got out there. Evidently we had a major shift in the humidity level because most had checked to the point of being unusable. As I was emptying the dust deputy of all the shavings that I had made on Saturday, it hit me. I should put the green bowls into the Deputy and then just dump the deputy into the bag, everything would be already covered and drying in shavings from the time it comes off the lathe.

By the way what type of paper bags do other turners use to bag and dry green bowls? I was using grocery store bags but they seem too small for more than 5 or 6 bowls, I was feeding the horse and looking at the 55 Lb bag that the feed comes in, but it is coated to keep the moisture out so I would guess that they would not work as there is not much difference in keeping moisture out as keeping moisture in, I doubt that they are made of Gore-texâ„¢.
 
Joined
Apr 25, 2004
Messages
80
Likes
3
Location
San Antonio, TX
Bags?

I use cardboard boxes. I find them easier to stack and store, and easier to handle.
Bob Edwards
San Antonio
 
Joined
May 16, 2005
Messages
3,540
Likes
15
Bags complicate things a bit. If they're too slow to vent the contained moisture to the environment they can cause your roughs to mildew. I have never used feed sacks - polypropylene, I think - to create a microclimate for bowls, but I do pack wet shavings into them for delivery, and those don't make mildew. Might work. They must vent, because the oats have to breathe or mold.

Principle of the wrap with newsprint, bag, box etc is to buffer the air around the rough and keep it at a higher RH so that the surface won't start to check before the moisture from the inside can come to the rescue. If you are in a low RH situation, as we in the north are (indoors) now, or you with A/C will be in the summer, you'll want to use one of them, or the close-in alternative - sealant. The inside of the standard bowl will take care of itself. It is under mechanical squeeze, closing incipient checks before they can form. So if you coat outside endgrain or wrap outside with newsprint you are in a pretty good compromise position between splits and mildew.

Change the boxes or bag/wrap when it gets damp or you might mildew, and the same applies to shavings. I use dry shavings because I'm interested in drying the rough, not keeping it wet. They adsorb the water up to ~30%, and can be changed/discarded as well. Let's face it, paper was wood and still behaves like it in how it handles moisture.

Guess I should say I did use in experiments. Don't have to now that I realized that the garage in fall, winter and spring is a great place to reproduce the conditions of my basement in summer. Still air and high RH allow me to toss the roughs on the floor or shelf and let them do their own thing. A REALLY big cardboard box.
 
Joined
Nov 4, 2009
Messages
126
Likes
2
Location
Southern Wisconsin
Drying Green Bowls

Hi Cliff - I dry my green bowls in paper bags, but I put only one in the bag. I live up in Wisconsin so our RH is very low right now. After I bag the bowl I put it up on top of the ducts in the basement. I have not lost a bowl yet.

If I'm thinking that the blank will crack I'll seal at least the end grain, if not the entire bowl, then stick it in a regular paper grocery bag.
 
Joined
May 14, 2004
Messages
445
Likes
1
Location
Middlesex County, Virginia
Website
www.velvitoil.com
I usually put a coat of Anchorseal on the end grain and put one bowl per bag. I store them in a area of the shopnthat never is heated. Our humidity here in eastern Virginia goes from over 90% to 16%. I have very few bowls that crack or mildew.
 
Joined
May 4, 2010
Messages
2,449
Likes
1,876
Location
Bozeman, MT
I just use grocery sacks for my small cache of small blanks but a couple friends with bigger lathes use brown paper lawn and leaf bags from the hardware store.
 
Joined
Feb 8, 2011
Messages
27
Likes
0
Location
Orlando, FL
I don't do much of the grocery shopping, and our shopper never remembers to get paper bags...

So I use a 36"(ish) roll of paper I picked up at Lowe's. It's very similar to the brown paper bag paper. I think it's called 'Contractor's Paper', but I'm not sure.

I cut a piece off the roll a bit bigger than the piece then 'roll' the edges to seal them (like you'd roll the top of a paper bag) and use a couple binder clips to hold it closed.
 
Joined
Oct 2, 2006
Messages
1,049
Likes
35
Location
Tallahassee FL
A good source of clean newsprint paper is your local newspaper printing plant. New rolls are installed automatically at full speed (~30mph), and there's usually about 50 feet of blank paper on the discontinued roll. Often free, but sometimes a nominal fee for the core. Our local rag leaves about 30-40 tail-end rolls each day on the loading dock. Check for protocols and timing - kindergarten teachers sometimes have first dibs. The cores themselves are convenient for jam chucks and such; standard diameter and about 1/2" walls, really tough.
 

odie

TOTW Team
Joined
Dec 22, 2006
Messages
7,116
Likes
9,817
Location
Panning for Montana gold, with Betsy, the mule!
Just a quick comment about paper bags........

Wouldn't plastic bags tend to dry roughed bowls slower? ......and, wouldn't this be more desirable? I can see where paper would be more "breathable" a medium for the process. For me, I have been a follower of the "slower, the better" philosophy......The slower the process, the better the overall results.

(I haven't used either plastic, or paper bags for many years. Once I started completely covering roughed bowls in anchorseal, that's the way I've done it since. My results have been very satisfactory using this method.)

ooc
 
Joined
May 16, 2005
Messages
3,540
Likes
15
Close the plastic tight and you'll not dry at all. You'll have a perpetual 100%RH microclimate for the growth of whatever spores find food in there.

Paper, especially paper with some dry shavings changed periodically, provides protection against air currents carrying moisture away too fast, and buffers a bit because it takes up some and holds it longer than free air would. Hold high too long and the black mildew will spot everything.
 

odie

TOTW Team
Joined
Dec 22, 2006
Messages
7,116
Likes
9,817
Location
Panning for Montana gold, with Betsy, the mule!
Just a quick comment about paper bags........

Wouldn't plastic bags tend to dry roughed bowls slower? ......and, wouldn't this be more desirable? I can see where paper would be more "breathable" a medium for the process. For me, I have been a follower of the "slower, the better" philosophy......The slower the process, the better the overall results.

(I haven't used either plastic, or paper bags for many years. Once I started completely covering roughed bowls in anchorseal, that's the way I've done it since. My results have been very satisfactory using this method.)

ooc
Close the plastic tight and you'll not dry at all. You'll have a perpetual 100%RH microclimate for the growth of whatever spores find food in there.

Paper, especially paper with some dry shavings changed periodically, provides protection against air currents carrying moisture away too fast, and buffers a bit because it takes up some and holds it longer than free air would. Hold high too long and the black mildew will spot everything.

Hello MM........

It's been a long time since I've used plastic, or paper......and you are correct that plastic acts as a barrier, if it's tight without any air escape over a period of time. If the turner is regularly checking on his roughed bowl, moisture will indeed leave the bowl and collect on the interior surface of the plastic bag and/or ambient atmosphere. At that point, it's a simple matter to turn the bag inside out, and moisture release progress is unaffected. If not a tight seal, and the bag is loosely inserted into the bag, there is an avenue of escape to the moisture leaving the bowl.

Since the late 1980's, I have not used plastic, or paper, and my method was to use a moisture meter at regular intervals. If I were using the bagging method now, I'd open the bag to weigh month by month.....instead of exclusively using the moisture meter, as I was doing. At the point where I switched to anchorsealing the entire roughed bowl, I did so because my results were better for me. I could now see, and inspect the entire bowl anytime without the need to remove it from a covering surface......it was a matter of convenience to me from the start, but I could see certain advantages to a wax solution that was breathable, but restrictive to moisture release. Anchorsealing slows down the whole seasoning process from that of using bags.......unless one permanently keeps roughed bowls in bags without removing them to inspect.....which won't happen!

If I had been using a scale back then, my results would have improved immesurably.....but, my methods were as they were as a result of my experiences at the time. This was also long before I had a computer, and I hadn't the benefit of communication with other turners.....another thing that has been of extremely useful value to my knowledge of turning! :D

I wouldn't go back to bagging, or boxing in shavings because I've grown accustomed to the convenience of anchorseal, and the accurate results of the scale. The moisture meter, for now, has become the least important of the three components of my drying process......but, it does give me an instantaneous moisture content at the start of the process, which gives me a good idea of what to expect during the drying process.

The scale gives me a knowledge of when stabilization has occurred, when three consecutive months of unchanged weight happens. If a scale isn't included in the formula, then there is no real positive way to determine stabilization.....without guesswork.

Anchorsealed bowls are not stacked one inside the other, as this restricts the air circulation. The best method is to stack, using "stickers" like one would used to facilitate air circulation around bulk lumber being prepared for a commercial kiln operation at a lumber mill.

I am, in no way, saying plastic and paper bags won't work for anyone else......only giving some reasons why I've abandoned that process in favor of anchorseal and periodic scale use.

ooc
 

Attachments

  • Postal scale (2).jpg
    Postal scale (2).jpg
    78.1 KB · Views: 22
  • Mini Ligno E moisture meter (2).jpg
    Mini Ligno E moisture meter (2).jpg
    96.9 KB · Views: 21
  • bowl seasoning (2).jpg
    bowl seasoning (2).jpg
    79.3 KB · Views: 29
Last edited:
Joined
May 16, 2005
Messages
3,540
Likes
15
Well, I answered your question, don't recall asking one.

But, since you mention it, I put my roughs near the floor in a quiet place in the basement for a week or two, or until I trip over them too many times. Then I put them on a shelf. I look at the mortise shrink and the shoulder drop to know when they're ready. No moisture meter required. Stability's a matter of equilibrium. Just as bad to cut when things are too dry and let them warp on the way back up the moisture scale as to do the other, as I see it. 10% is probably a good midpoint for fluctuations here. Other places want less, few might want more. Anyway, that's pretty much 50% RH.

http://i35.photobucket.com/albums/d160/GoodOnesGone/IMG_1454.jpg

I could weigh if I were pushing. Then it takes about 60 days for a ~3/4" thick walled turning to reach equilibrium.
 
Joined
Nov 27, 2004
Messages
179
Likes
1
Location
Ephrata, Pa
Hi Michael,
I noticed that some of your bowls in the photo have a tenon on the inside of the bowl.
Do you always leave a tenon like this when they are drying ?
Thank you, Jim
 
Joined
May 16, 2005
Messages
3,540
Likes
15
My first chuck - Masterchuck - was a good news-bad news item, James. Good news in that it had a pin chuck capability standard, bad news in that it was a bowl-thrower of some regularity, since the jaws were more or less loose and wedged from below. I got in the habit of leaving the pillar in so I could turn between centers until the bowl was was pretty much as light as it would get, to protect myself.

Along the way I discovered that I could take a freshly dried blank, run a Forstner down the middle to reestablish the circularity of the original hole, and turn the dry blank as I had the wet. It allowed me to take advantage of the mortise hold underneath because I could remove the tailstock to clean and round it after the dry blank was round as well. With tremendous accuracy, because the remount rarely has more than a sixteenth or so of runout.

http://i35.photobucket.com/albums/d160/GoodOnesGone/Method-One.jpg
http://i35.photobucket.com/albums/d160/GoodOnesGone/Method-Two.jpg

I almost didn't buy my new lathe because the old Masterchuck was purpose-bored for 1" 8 TPI, but a talk with bestwoodtools.com produced an offer to make one for me for a modest $70 dollars. I jumped at both offers.

Virtually every piece which is to be twice-turned has the pillar, which fits either my pin chuck or my pin jaws as I choose. I even use it when turning smaller pieces because I'm accustomed to it, and have my smallest bowl gouge ground nearly straight across so I can work in narrow.

Highly recommend it for heavy work if you can swing over the bed. Keeps you safe and makes re-truing a breeze after drying.
 
Joined
Apr 27, 2004
Messages
117
Likes
2
Location
Indianapolis, IN
Website
www.dickgerard.com
Drying roughed out green bowls

For many many years I used plastic bags (black) one bowl per bag. Twist tied shut or use a plastic slide tie. Set the bag/bowl in the west past of the yard or on a deck if you have one. The sun acts as a heat source (yes, even in winter though it takes longer). But, you must check for moisture inside the bag each day. If there is moisture, reverse the bag so you have a dry surface, reseal and repeat daily. There will come a time (usually about day 20-30 when you will not feel or see any moisture inside the bag. Safe to take back into the shop. Let the blanks acclimate to the new environment. Then turn away!

I did this with a large load of freshly cut red oak and my losses were zero.

Just another option.

Or, build a refrigerator kiln.:D
 
Joined
Jun 28, 2010
Messages
361
Likes
2
Location
Hawi, Hawaii
Website
www.kellydunnwoodturner.com
Fred, its one of those closely held secrets. Passed down from one turner to next. Kidding. This is very low tech using light bulbs to create a convection current of heated air. Get an old fridge and gut it. Free from repair shops. Cut out the section between the fridge and freezer. Drill a few half inch holes about four to six inches apart in the top and bottom. Get a ceramic light bulb holder. Get a thin electric box to mount it with the electric wire. You could use the plug and wire from the fridge. Put it at close to center bottom as you can. If you cut out any thin aluminum make a cowling that goes over the light fixture and light bulb. For me this is just in case a bowl whacked the bulb and caused a spark. Nothing may happen but just to be safe make a cowling. You can start the wire shelving right above the light. You can cockroach wire shelves from other fridges. If you had a cooler unit on the back you could use some of that to cover the hole you cutout from the fridge to freezer.
Ready to dry. Coat at least all end grain with log seal. I coat the outside except for the very bottom of side grain bowls and all the outside of end grain bowls. Stack as many as you like leaving at least some room for a bit of air to get in the bowl. put your most stable woods in the bottom near the light.
Start with a 40 watt bulb. Do not think a 100 watt will be better. It will split your work to pieces overnight. If you are not in a hurry and have a moisture meter rotate work up and down till you get what you want. Say 6%. If you have a kiln load of wet work leave the 40 till about 16% then go to a 60 watt. It takes less than a week for that to push most all to around 12%. Pop in a 75 watt and that should take under a week to get around 6 to 8%. If no moisture meter wait a week till no more dripping of moisture droplets are happening then do two weeks with the 60 and one with the 75. If its cold and windy you may actually have to go to a hundred watt. At any time a bulb burns out and the bowls are cold and the load is not finished start with a 40 for a day and move up to where you were. Do not unload a hot kiln full of bowls. Let the load cool down. If only a 40 watt bulb no big deal.
Common questions. Why not build an insulated box from plywood? Answer. The fridge is free and built better than anything your going to make.
Cant you speed it up by putting a fan in the fridge? Answer. The convection current works 24/7. A load of wet roughed bowls takes about six weeks to get down to 6%. A load is more bowls than you are able to finish turn in a long time so take it easy and simple.
Do I have to end coat the bowls? Answer. Only if you want solid unsplit work when they are dry.
Do you lose some bowls? Answer. Sure do. Some woods move so much you might as well have turned them start to finish green. If You challenge a wood, like leaving the log center in the side of a bowl expect some of the wood to win and split to the log center.
Can I put in end grain work? Answer. I do it all the time but its woods I know are more stable and can handle having the pith in the work. End grain no pith a much better chance.
Why use a kiln to dry at all? Answer. Besides drying much faster than air drying, kiln drying gets out the bound cellular moisture that air drying takes years to do. Unless you live in a very dry climate. Hawaii is not that.
Cant I just cutout one four inch hole in the center bottom and one in the top? Answer. Sure. If you want to lose air being pulled up work not exactly in the center. Do as I say and space the holes around the top and bottom.
I have close to 25 years using these. They work very well. I have a mini Ligno moisture meter. I am told you can find good buys on moisture meters on ebay.
I probably have fielded other questions. I have taught this as a class a number of times so a google search may even bring up some diagrams from my classes if the words were not good enough to get you rolling.
There is at least one article in Woodturning design based on my kiln and another persons. The author put together two concepts to come up with what he did. And he did give me credit. There are others with folks who have way to much time on their hands.
KISS! And have fun.
 
Back
Top