Recently I finished a woodturning class with Trent Bosch at Al Hockenbery’s shop in Lakeland, Fl. I transported my Jet 1220 lathe and used it during the class. Normally this lathe is my demo and or pen / small parts lathe and consequently does not see a lot of use. During the course of the 3 days, I again found one of the small issues I have with this lathe and that is the locking handle on the tool rest and tail stock, while adequate, requires the user to really think about gripping and locking down these two important areas. My large lathe has big handles and one can get plenty of leverage without repositioning oneself. I have read the article that J. R. Beall did, wood handle and tail stock wheel, upgrade to a mini lathe and while I thought it was cool, I did not like the idea of using CA or epoxy to attach the extension handles. As I make most of my own tool handles, I decided to put my knowledge to work on this annoying feature.
I used the following supplies:
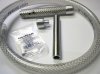
5†Stainless Steel (370) pipe schedule 40 with 3/8 wall (wall thickness is important) and ½†Inside diameter (Why this special pipe, because that’s what I had on hand)
1 ¼†(length) x 1†aluminum round stock
2 – 10-32 x ¼†set screws (uses 3/32†Allen wrench) at any big box store
6†of 5/8†I.D. Braided PVC hose – at any big box store
No. 21 drill bit or 5/32†bit can be used and a 5/32†tap
The 5†pipe after cutting was cleaned with a scotch pad while spinning on my wood lathe and the ends trued up from the hacksaw blade. The first one I did on my wood lathe the rest I took over to Danny H.‘s house and used his metal lathe. The 1†aluminum round stock was cut 1 ¼†long and a ½†tenon was turned so it will pressure fit inside the pipe. For those who care the inside of the pipe is ~.502 and the tenon I turned is ~.507. This leaves ¾â€, which I divided into thirds and brought the inside and outside edges down to meet the PVC hose on the SS pipe. ~.950â€. The first cap again was turned on my wood lathe using a crown 1/4â€parting tool, the rest were done on the metal lathe. Then I drilled and taped two holes about a 1†and 1 ½†up from one end of the SS pipe. The drill bit was a 21 or you can use a 5/32†drill bit. Next, I pressed the turned aluminum piece into the pipe (on the end away from the taped holes) using my bench vise. Heated the braided PVC hose in the oven at 225 deg. for about 20 minutes, then slid it on the pipe, trimmed up the hose and pierced the hose and inserted the setscrews.
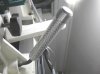
Next I installed it. I also took it over to the Wednesday night crew at Danny’s house for evaluation and input. The cool thing is this was made for my lathe but fits most mini lathes, Jet 1014 and the Penn State lathes for sure.
I used the following supplies:
5†Stainless Steel (370) pipe schedule 40 with 3/8 wall (wall thickness is important) and ½†Inside diameter (Why this special pipe, because that’s what I had on hand)
1 ¼†(length) x 1†aluminum round stock
2 – 10-32 x ¼†set screws (uses 3/32†Allen wrench) at any big box store
6†of 5/8†I.D. Braided PVC hose – at any big box store
No. 21 drill bit or 5/32†bit can be used and a 5/32†tap
The 5†pipe after cutting was cleaned with a scotch pad while spinning on my wood lathe and the ends trued up from the hacksaw blade. The first one I did on my wood lathe the rest I took over to Danny H.‘s house and used his metal lathe. The 1†aluminum round stock was cut 1 ¼†long and a ½†tenon was turned so it will pressure fit inside the pipe. For those who care the inside of the pipe is ~.502 and the tenon I turned is ~.507. This leaves ¾â€, which I divided into thirds and brought the inside and outside edges down to meet the PVC hose on the SS pipe. ~.950â€. The first cap again was turned on my wood lathe using a crown 1/4â€parting tool, the rest were done on the metal lathe. Then I drilled and taped two holes about a 1†and 1 ½†up from one end of the SS pipe. The drill bit was a 21 or you can use a 5/32†drill bit. Next, I pressed the turned aluminum piece into the pipe (on the end away from the taped holes) using my bench vise. Heated the braided PVC hose in the oven at 225 deg. for about 20 minutes, then slid it on the pipe, trimmed up the hose and pierced the hose and inserted the setscrews.
Next I installed it. I also took it over to the Wednesday night crew at Danny’s house for evaluation and input. The cool thing is this was made for my lathe but fits most mini lathes, Jet 1014 and the Penn State lathes for sure.