• Beware of Counterfeit Woodturning Tools (click here for details)
  • Johnathan Silwones is starting a new AAW chapter, Southern Alleghenies Woodturners, in Johnstown, PA. (click here for details)
  • Congratulations to Keven Jesequel for "Big Leaf Maple" being selected as Turning of the Week for April 15, 2024 (click here for details)
  • Welcome new registering member. Your username must be your real First and Last name (for example: John Doe). "Screen names" and "handles" are not allowed and your registration will be deleted if you don't use your real name. Also, do not use all caps nor all lower case.

"First blood".....and Veritas discussion update

odie

TOTW Team
Joined
Dec 22, 2006
Messages
7,113
Likes
9,729
Location
Panning for Montana gold, with Betsy, the mule!
Since my scrapers are ground at 75°, and right in-between the recommended ranges of the two supplied Veritas carbide pins, I'm not seeing much practical difference between the burrs I'm getting with them. I am generally using the more stout pin, simply because it's less likely to break......if that's possible! Anyone ever hear of a Veritas carbide pin breaking?

I'm applying a great deal of pressure between pin and scraper top edge, because I'm finding the usefulness of the burr is better, the more pronounced the distortion. So far, I haven't been able to detect any "curl" to the burr......must be that the angle I'm using for the grind is more applicable to this raised burr process.

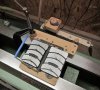
I'm now using a ceramic honing stone to remove the ground burr, in preparation for the Veritas burr......seems to be doing a great job of this. This is a very fine stone, used primarily for medical cutting instruments. My theory is, the finer the stone, the finer the top edge will be in its intersection with the ground edge. Thus, the finer the cutting edge of the burr will be after raising on the Veritas.

The burr, straight from the grinding wheel, is still the preferred method for all my roughing cuts. The Veritas burr is now my preferred method for finishing cuts. All these years, I had been using a ground burr for finishing cuts, and that may have been an advantage in learning tool handling to get the best cut from a less than perfect burr. The Veritas burr leaves, maybe, 5% better of a finishing cut, and that small difference is golden, when it comes to eliminating sanding, and geometric distortion. Since I've been using a raised burr, I'm noticing my perceived average start sanding grit is about one grit finer than before. I've been able to start sanding much more often at 320.....but, you know this is also dependent on other factors, like species and shape, and the like.......

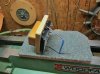
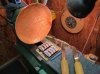
This mount jig I made up for the two Veritas burnishers is working out great, because it's so quick to put into use, and remove again.

I drew "first blood" the other day, when a scraper slipped in the Veritas. I'm applying a great deal of pressure, so the force which the tool hit my hand was great......went to the bone on one of my fingers, and lots of bleeding! Since then, I'm now slipping a Kevlar coated glove on my left hand when I raise a burr. Only takes one episode like that to shine a light on the proper safety measures! :p

ko
 

Attachments

  • IMG_1599.jpg
    IMG_1599.jpg
    304.2 KB · Views: 109
  • IMG_1598.jpg
    IMG_1598.jpg
    259.3 KB · Views: 114
Last edited:

Bill Boehme

Administrator
Staff member
Beta Tester
TOTW Team
Joined
Jan 27, 2005
Messages
12,896
Likes
5,179
Location
Dalworthington Gardens, TX
Website
pbase.com
You are using the ceramic hone to remove the grinding wheel bur, but I am wondering if you also are honing the bevel before raising the bur with Veritas jig. The difference in results might not be noticeable but the bur ought to be cleaner.

I have the Veritas tool but I use my handheld "steel" to raise the bur. I'm only using a few ounces of force and, of course, the bur I'm getting is smaller than what you are getting. I have been concerned about curling the bur from using too much force so your results are good to know. Perhaps the difference between the carbon steel of cabinet scrapers and high speed steel of turning took accounts for your results. It may also be that a curled bur is the result of overworking the raised bur with multiple wipes with the Veritas tool or too steep an angle.

I have one scraper that has a bevel angle of about 55° and I put a very aggressive bur on it. That tool has also given me a very nasty cut on my hand, but not as bad as what you experienced. Maybe there is a lesson to be learned about sharp tools.
 

odie

TOTW Team
Joined
Dec 22, 2006
Messages
7,113
Likes
9,729
Location
Panning for Montana gold, with Betsy, the mule!
You are using the ceramic hone to remove the grinding wheel bur, but I am wondering if you also are honing the bevel before raising the bur with Veritas jig. The difference in results might not be noticeable but the bur ought to be cleaner.

I have the Veritas tool but I use my handheld "steel" to raise the bur. I'm only using a few ounces of force and, of course, the bur I'm getting is smaller than what you are getting. I have been concerned about curling the bur from using too much force so your results are good to know. Perhaps the difference between the carbon steel of cabinet scrapers and high speed steel of turning took accounts for your results. It may also be that a curled bur is the result of overworking the raised bur with multiple wipes with the Veritas tool or too steep an angle.

I have one scraper that has a bevel angle of about 55° and I put a very aggressive bur on it. That tool has also given me a very nasty cut on my hand, but not as bad as what you experienced. Maybe there is a lesson to be learned about sharp tools.

Hi Bill......

I thought exactly the same thing at first, but what I've found is the act of raising the burr on the carbide pin is actually leaving a surface very much like it's been polished.....no need to hone the front edge prior to raising the burr on the carbide pin. The carbide pin is altering the surface, to a similar shape that a hone would do......the hone removing material, while the carbide is bending it sideways to smooth it out. There is no jagged edge left at all.....you can see it, as well as feel it with your fingers.....very smooth.....check it out!

I'm not creating my Veritas burrs with a single pass, but using several passes. First pass is light, and subsequent passes are heavy, using the leverage the steel pin affords. This allows enormous pressure to be applied, and creating a very significant burr that is very clean on the tip of the cutting edge. The steep 75° angle I'm using for my scraper grind requires this kind of pressure to create the kind of burr I want to have.....without curling it over.

With a smaller, or less steep grind angle (such as your 55°), the more likely a curl on the burr tip can/will occur.....and, also the less pressure it takes to create the burr.

ko
 
Joined
Aug 14, 2007
Messages
5,479
Likes
2,832
Location
Eugene, OR
This is where I would like to see micro photos of the edges. Just curious. I agree that the steeper bevel will make it a lot harder to turn the burr into a breaking wave, and probably as important as the angle the burnishing rod is to the bevel edge, I figure it should be in the range of 10 degrees off the bevel angle, so 70 degree bevel = 80 to 90 degree burnishing rod angle. Get it any steeper than that, and you will get curl, so 55 degree scraper bevel and 90 degree burnishing rod = curl. I would still think that many light strokes would work better to turn a steady consistent burr, as a few heavy strokes, but since I don't burnish, I would have to test this out. This brings up the 3rd type of burr, the honed burr. I have always thought, again no tests to compare, that if you hone a burr with a fine, say 1200 grit card, you can get a burr that is almost identical to a lightly burnished burr, which is similar to what I think happens when you use a grinder burr from a fine and well broken in CBN wheel. If I had the camera, I would take this on, then take them all for a test run.....

robo hippy
 

Bill Boehme

Administrator
Staff member
Beta Tester
TOTW Team
Joined
Jan 27, 2005
Messages
12,896
Likes
5,179
Location
Dalworthington Gardens, TX
Website
pbase.com
I agree that photomicrographs would be useful. Several years ago, Alan Lacer published an article on sharpening along with photomicrographs, but I don't recall what it may have said about burs raised by burnishing.

I also agree that an angle of about 10° between the bevel and burnishing tool is about "right". It's pretty obvious that increasing the angle to the point where the angle between thr top of the scraper and the burnishing rod is pointing back towards you then the bur will be curled backwards.

Some steel alloys are easily work hardened and that is why I would favor one or two heavier strokes with the burnishing tool rather than many light strokes. A work hardened edge is more likely to break off before it wears away.

... This brings up the 3rd type of burr, the honed burr. I have always thought, again no tests to compare, that if you hone a burr with a fine, say 1200 grit card, you can get a burr that is almost identical to a lightly burnished burr, which is similar to what I think happens when you use a grinder burr from a fine and well broken in CBN wheel. If I had the camera, I would take this on, then take them all for a test run.....

According to what Tormek says about sharpening and honing on their machine, I think that is more like a "wire edge" than a true bur.
 

odie

TOTW Team
Joined
Dec 22, 2006
Messages
7,113
Likes
9,729
Location
Panning for Montana gold, with Betsy, the mule!
Bill and Robo.......

To tell you the truth, I'd like to see microscopic photos, too......but, I just don't have that capability. As I said, I can run my finger along the raised burr sideways, and can feel that the tip of the burr is very smooth, or without noticeable variation.....not like the jagged edge you can feel with a ground burr. I suppose if the magnification were strong enough, there would be, at some point, some noticeable microscopic variation.

This is not to say there isn't some better way of forming a burr, but in my little world, this new-found method of mine is a marked improvement over anything I've experimented with in the past......and, to be the "broken record" once more......the only thing that really matters, is the results I'm getting. There is more to the equation than how my burr looks, feels, or is acquired. Other major factors include, but are not limited to species, grain direction, tool handling and presentation.

ko
 
Joined
Aug 14, 2007
Messages
5,479
Likes
2,832
Location
Eugene, OR
My guess on the 'wire' burr is that there are several variations. For sure, huge difference in durability between upside down where the 'wire' is dragged off the top, and right side up where the burr is pushed into the top of the tool, with the right side up being much stronger. I would guess the same with a hand honed burr. You can push up towards the top of the tool/cutting edge which would be the same as upside down sharpening. Most of the time, you hone across the bevel, so this would be more of a burnishing type honing job. Any one have a microscopic photo set up????

robo hippy
 
Joined
Aug 14, 2007
Messages
5,479
Likes
2,832
Location
Eugene, OR
My guess on the 'wire' burr is that there are several variations. For sure, huge difference in durability between upside down where the 'wire' is dragged off the top, and right side up where the burr is pushed into the top of the tool, with the right side up being much stronger. I would guess the same with a hand honed burr. You can push up towards the top of the tool/cutting edge which would be the same as upside down sharpening. Most of the time, you hone across the bevel, so this would be more of a burnishing type honing job. Any one have a microscopic photo set up????

I do remember the Alan Lacer article. I think it was before CBN wheels were available.

robo hippy
 

Bill Boehme

Administrator
Staff member
Beta Tester
TOTW Team
Joined
Jan 27, 2005
Messages
12,896
Likes
5,179
Location
Dalworthington Gardens, TX
Website
pbase.com
I have a macro lens that I have been thinking about using to find out what level of detail I might be able to see on scraper edges. The 18 Megapixels resolution has been great for showing detail in nature shots. Maybe it would show some detail on scraper edges.

Along the lines of how Odie feels the bur, I run my fingernail along the back side of the bur to judge its size ... less bloodshed that way.
 
Joined
Mar 17, 2013
Messages
485
Likes
3
Location
Roseland, LA
just playing

I have a macro lens that I have been thinking about using to find out what level of detail I might be able to see on scraper edges. The 18 Megapixels resolution has been great for showing detail in nature shots. Maybe it would show some detail on scraper edges.

Along the lines of how Odie feels the bur, I run my fingernail along the back side of the bur to judge its size ... less bloodshed that way.


Bill,

I was just playing years ago and put a four hundred mm lens, a 1.4 teleconverter, a 2.0 teleconverter, and macro tubes on my camera. I was able to print or post images of a less than half inch cartridge head at the size of a large plate or small platter with excellent quality. The smooth chrome of the primer cup looked rough as a cob! Looks like they may tumble the cups somewhere along the line or they just have a rough trip. That was with a little eight megapixel camera.

The digital cameras make some mighty fine microscopes!

Hu
 

odie

TOTW Team
Joined
Dec 22, 2006
Messages
7,113
Likes
9,729
Location
Panning for Montana gold, with Betsy, the mule!
Along the lines of how Odie feels the bur, I run my fingernail along the back side of the bur to judge its size ... less bloodshed that way.

Heh,heh,heh......gently, Bill, gently! :rolleyes:

ko
 

Bill Boehme

Administrator
Staff member
Beta Tester
TOTW Team
Joined
Jan 27, 2005
Messages
12,896
Likes
5,179
Location
Dalworthington Gardens, TX
Website
pbase.com
Bill,

I was just playing years ago and put a four hundred mm lens, a 1.4 teleconverter, a 2.0 teleconverter, and macro tubes on my camera. I was able to print or post images of a less than half inch cartridge head at the size of a large plate or small platter with excellent quality. The smooth chrome of the primer cup looked rough as a cob! Looks like they may tumble the cups somewhere along the line or they just have a rough trip. That was with a little eight megapixel camera.

The digital cameras make some mighty fine microscopes!

Hu

Hu,

I have stacked both my 1.4X and 2.0X teleconverters onto my 400 mm telephoto lens to get a focal length of 1320 mm to do astrophotography mainly of the moon. Without a tracker, I can't really do DSO's because of the exposure times needed.

My teleconverters can't be fitted directly onto my macro lens because there isn't enough space between them and the rear optic of the macro lens, but I hadn't thought about putting an extension tube or two between them. The extension tubes might even allow me to get much closer with my 400 mm telephoto lens, but it would be hard to say since the teleconverters would push the minimum focus distance away.
 

john lucas

AAW Forum Expert
Joined
Apr 26, 2004
Messages
8,333
Likes
3,585
Location
Cookeville, TN
Bill Extension tubes always work better than teleconverters because you aren't adding any optics so you get better resolution. You could as I have done in the past put a cardboard tube inbetween 2 extension tubes to get a really long extension. However when you do that the working distance between the front element and the subject gets too small. To handle that you have to mount the lens backwards with the rear element out. I had an adaptor to do that with my Nikon's but don't know if I still do. The one advantage of using the teleconverter is you increase magnification without decreasing that working distance between the front element and the subject.
 
Joined
Feb 6, 2010
Messages
2,976
Likes
1,939
Location
Brandon, MS
Bill I remember the Lacer article and I believe it was about honing a gouge grind vs the off the grinder edge. I think the effort was to show how smooth and therefore sharpe the honed edge was. John was going to do some photos before he got sidetracked by matrimony and moving, on the photomicrographic difference in ground edge off the ceramic or norton stone vs CBN wheel. That is what I would like to see also(hint,hint) as his next AAW article.
 

Bill Boehme

Administrator
Staff member
Beta Tester
TOTW Team
Joined
Jan 27, 2005
Messages
12,896
Likes
5,179
Location
Dalworthington Gardens, TX
Website
pbase.com
John,

The problem that I see is getting sufficient depth of field. I haven't tried it myself, but some macro photographers use software for "focus stacking" ... taking multiple shots and creating focus circles that are blended together to create a composite image that has greater depth of field.

I think that I got lucky and got some incredibly sharp optics in my 400 mm lens and two teleconverters. Since it was a total eclipse of the moon earlier this evening (about 9:30 PM CDST), here is a shot of the moon using that lens and teleconverters. The mountain range is the Montes Apenninus (Lunar Alps). This shot wasn't made tonight because the night sky in the summer isn't the best for astrophotography ... too much haze and convective currents that create a shimmering mirage-like effect.

original.jpg
 
Joined
Jan 9, 2011
Messages
63
Likes
31
Location
Englishtown, NJ
As one who normally is prone to detail I wonder if we are over analyzing the matter of the burr and the bevel. I got the Veritas burnishing jig some years ago, my aging body wasn't doing as good a job with my hand burnisher as I would have liked. All instructions I've seen for the hand burnisher involve burnishing at a "back angle" of about 10 degrees (give or take) in a similar fashion to the way I burnished my furniture scrapers when I was making instruments. That angle makes a hook burr, in effect, and that is appropriate to the way one holds a furniture scraper. I looked at the Veritas and realized that the burr could never be more than the equivalent of an 85 dg. bevel - it could never be the "back angle" one can get with a hand burnisher.

A bit of thought, and a review of the Veritas instructions (in my old computer design days in the Sixties we had a saying - when all else fails read the manual) brought me to my own conclusions on scrapers and burrs and bevels and the "angle of the dangle". Veritas points out that traditionally scrapers are presented to the wood at a negative angle so the burr can cut (this assumes that back angle on the burr), but that the Veritas burnished burr can be presented with the bevel rubbing then the handle lifted more horizontal to engage the burr.

OK, I did it again - Murph Says comes through with detailed analysis, but this time it leads to a simple conclusion. The angle that counts is the angle of the burr to the wood, not of the burr to the tool (or tool bevel). It is easier to maintain a fine angle to the wood for finishing if the burr is just a bit steeper than the bevel, conversely it is easier to take deeper roughing scraping cuts if the burr is a lot steeper than the bevel. The 5 dg. pin gives you a burr equivalent to 85 dgs., the 10 dg. pin is 80 dgs (to the tool). If your bevel is 80 dgs and you use the 5 dg pin you have the same burr as if your bevel is 75 dgs and you use the 10 dg pin - the burr is relative to the bevel if you approach the wood in the "Veritas way". I have found this approach to be quite successful over the years, and, more importantly, consistent.

As to the pressure of the tool on the jig, or the number of passes, the difference is not the shape of the burr but the size of it. I prefer medium pressure and two passes (sometimes in opposite directions) as I always slip a bit on the first pass. Good sense and that "oops, missed that part", applies. I grind a 50 dg. "chin" on my scrapers so I can go back to the grinder often to refresh my main bevel (and I'm often reshaping it) without losing too much steel. My "go to" grind is a 75 dg. bevel and the 5 dg. pin giving me a 10 dg. burr - but it is easy to shift.

I'm not sure what all the talk about "wire" is, of the micro details (although I have often reread Alan's article and microphotos). I don't spend a lot of time using scrapers, but when I do I rehone often with my Lacer 600 grit diamond hone and go to the Veritas with light passes.
 

odie

TOTW Team
Joined
Dec 22, 2006
Messages
7,113
Likes
9,729
Location
Panning for Montana gold, with Betsy, the mule!
Jon......

I'd have to agree that the particulars about shape, size, angles, and whatnot, is much less important than what can be done with it. There is, I believe, a great variation on what one can accomplish with any particular burr, over someone else. Of course, there is some overlap of the group experience, but when one individual can achieve improvement through time and experimentation, then the results will be different than what the general consensus of the group will indicate.

ko
 
Joined
Aug 14, 2007
Messages
5,479
Likes
2,832
Location
Eugene, OR
Well, I will disagree with Veritas about why the scraper is angled down when cutting with it. If you have to raise the handle, then your burr has curled over too much. The cutting edge is presented at a 0 or slightly negative angel so when and if it catches, it 'falls' out of the cut, rather than digging in deeper. Same reason why on the outside you cut at or slightly below center, and on the inside, you cut slightly above center. Most of the time when I use scrapers, which is for all of my bowl roughing, I am holding the tool pretty much level.

As for the wire burr, I can remember using scrapers for cleaning off welding splatter many years ago in my dad's shop. When the edge dulled, I would take it to the grinder and grind a new edge. Of course, I way over ground, but there would be a 'wire' about 3/32 high, and you wiggle it back and forth a couple of times and it fell off. I would almost compare it to slag or drip in that it had no strength, or hardness.

robo hippy
 
Joined
Mar 17, 2013
Messages
485
Likes
3
Location
Roseland, LA
"faster than a speeding bullet"

Hu,

I have stacked both my 1.4X and 2.0X teleconverters onto my 400 mm telephoto lens to get a focal length of 1320 mm to do astrophotography mainly of the moon. Without a tracker, I can't really do DSO's because of the exposure times needed.

My teleconverters can't be fitted directly onto my macro lens because there isn't enough space between them and the rear optic of the macro lens, but I hadn't thought about putting an extension tube or two between them. The extension tubes might even allow me to get much closer with my 400 mm telephoto lens, but it would be hard to say since the teleconverters would push the minimum focus distance away.


Bill,

Nice shot of the moon! Funny, I never thought it was moving fast but when I was shooting moon rise a few years back I danged near needed to swing the camera for tracking to get clear exposures with I think 1320mm of effective glass too. Was just being silly but I got some pretty good shots out away from town. Lots of light pollution where I was at then. Not as bad where I am at now but I sold my camera gear when I got into specialty wood turning. I was either going to invest more heavily in photography or move in another direction. I was led down the garden path a bit concerning billiard cues, with perfect hindsight I wish I had stayed with photography. I still miss it a lot. Few things I liked better than setting up a few hours before daylight and just listening to the night sounds and then the world waking up around me.

Hu
 

hockenbery

Forum MVP
Beta Tester
TOTW Team
Joined
Apr 27, 2004
Messages
8,629
Likes
4,970
Location
Lakeland, Florida
Website
www.hockenberywoodturning.com
Bill, Nice shot of the moon! Funny, I never thought it was moving fast but when I was shooting moon rise a few years back I danged near needed to swing the camera for tracking to get clear exposures with I think 1320mm of effective glass too. Was just being silly but I got some pretty good shots out away from town. Hu
Long exposures things move. :) Actually the moon isn't moving fast enough. -:)
The earth turns about 28 times for each time the moon goes around it.

Makes life interesting.
Al
 

Bill Boehme

Administrator
Staff member
Beta Tester
TOTW Team
Joined
Jan 27, 2005
Messages
12,896
Likes
5,179
Location
Dalworthington Gardens, TX
Website
pbase.com
Long exposures things move. :) Actually the moon isn't moving fast enough. -:)
The earth turns about 28 times for each time the moon goes around it.

Makes life interesting.
Al

Well, that movement may be a nit, but you overlooked the large movement -- the Earth's rotation which is 15 arc seconds per second plus the small contribution from the moon orbiting the Earth plus the contribution due to the Earth orbiting the sun plies Earth's precession which has a period of 26,000 years (give or take) the sum total of which is NOT a small amount. This is especially true when you consider that the camera's field of view is approximately one degree and that the size of the moon in the viewfinder is about 30 arc minutes (half of the total FOV). Since I don't have a celestial mount, I'm lucky if I can get ten seconds with the whole moon in the frame. My camera's sensor can resolve angles down to about 0.7 arc seconds and all of this boils down to say that for best sharpness, the exposure time should be no longer than 0.01 second (or 1/100 second or faster as a photographer would say). If I don't need to zoom in to a 100% view, I can get away with a shutter speed of 1/50 second and accept a small amount of motion blur.
 
Joined
Jan 9, 2011
Messages
63
Likes
31
Location
Englishtown, NJ
Comiing back from the moon to the scraper

For Robo Hippy, yes - Veritas does overdo it a bit in their angle of attack instructions, but I give them some leeway as as it is sort of a sales pitch for what I find to be a good product. Good point on the burr falling out of the cut on a catch, an advertisement for a neutral or slightly negative angle of attack. Personally I find that the consistency of the burr angle to the horizontal that I get from the Veritas jig allows me to avoid catches enough that I don't need to fall out of them - and this leads to Odie's (KO) point on individual usage.

Robo, just went back to your message, note your explanation of the wire burr. I concur, now that I know the term. If I understand you correctly we can never get rid of the wire burr, even a hone will raise that little "edge" - but it will immediately break off. As a man of advanced years (80 on 10 September) I am familiar with that wire burr, if the barber didn't give the straight razor that final strop (away from the edge and on leather) trim of the hair cut could scratch the surface - and the surface was my skin. I wear a leather apron as it is a convenient gentle strop for my skews and gouges after honing.
 

odie

TOTW Team
Joined
Dec 22, 2006
Messages
7,113
Likes
9,729
Location
Panning for Montana gold, with Betsy, the mule!
For Robo Hippy, yes - Veritas does overdo it a bit in their angle of attack instructions, but I give them some leeway as as it is sort of a sales pitch for what I find to be a good product. Good point on the burr falling out of the cut on a catch, an advertisement for a neutral or slightly negative angle of attack. Personally I find that the consistency of the burr angle to the horizontal that I get from the Veritas jig allows me to avoid catches enough that I don't need to fall out of them - and this leads to Odie's (KO) point on individual usage.

Robo, just went back to your message, note your explanation of the wire burr. I concur, now that I know the term. If I understand you correctly we can never get rid of the wire burr, even a hone will raise that little "edge" - but it will immediately break off. As a man of advanced years (80 on 10 September) I am familiar with that wire burr, if the barber didn't give the straight razor that final strop (away from the edge and on leather) trim of the hair cut could scratch the surface - and the surface was my skin. I wear a leather apron as it is a convenient gentle strop for my skews and gouges after honing.

Thanks for the input, and bringing this thread back on topic, Jon......

Congratulations on making it to the 80 mark. I'm about 13 years behind you, and doing what I can to do the same......maybe in ten years, I'll be able to congratulate you on making it to ninety.....and, still turning! :D

I agree......the Veritas is a wonderful product, and until recently, I'm seeing major improvements in my tool finishes that are enabling me to start sanding at least one grit higher than I was experiencing previously. This is a major improvement. The last 5% of the work is 95% of the effort, and the Veritas has improved that average for me.

I'm still doing experimenting with the Veritas, and I'm currently doing my burnished scraper edges in four steps:

1) Remove ground burr from top edge. I'm currently using a ceramic stone for this.
2) Instead of leather, I'm using the same ceramic stone to remove the wire edge from the front of the grind. This is done with a very light pass, and seems to be working satisfactory for the purpose. However, it's in the plans to use leather, and am currently visualizing a hand held jig that I'll be experimenting with.....very soon!
3) One very light pass with the scraper held at an angle to the flat Veritas surface. This appears to smooth, and improve the very tip of the cutting edge. This is done with a very light sweep of the tool across the carbide, without using any leverage from the steel pin.
4) Two or three heavy passes with the scraper held flat to the Veritas surface, using the steel pin to leverage the action.

Those following this thread know I cut myself rather severely trying to steady the Veritas jig between the lathe bedways. I used the Kevlar gloves for a few days, and that worked.....but tried using a C clamp to keep my hand out of the way entirely. I don't know why I didn't think of this, because it's so simple, but the act of using the C clamp inadvertently led to another improvement in using the Veritas jig. Having the Veritas solidly mounted allows a much better controlled sweep of the tool across the carbide pin. I have since then, modified my Veritas jig to permanently allow convenient use of the C clamp when burnishing. The C clamp with wooden foot came in handy for this, and is taken from a jig I made long ago, which I never use anymore.

See photos for before and after shots of the Veritas jig, for this modification.

ko
 

Attachments

  • IMG_1598.jpg
    IMG_1598.jpg
    259.3 KB · Views: 21
  • IMG_1713.jpg
    IMG_1713.jpg
    269.6 KB · Views: 21
Back
Top