• We just finished moving the forums to a new hosting server. It looks like everything is functioning correctly but if you find a problem please report it in the Forum Technical Support Forum (click here) or email us at forum_moderator AT aawforum.org. Thanks!
  • Beware of Counterfeit Woodturning Tools (click here for details)
  • Johnathan Silwones is starting a new AAW chapter, Southern Alleghenies Woodturners, in Johnstown, PA. (click here for details)
  • Congratulations to Dave Roberts for "2 Hats" being selected as Turning of the Week for April 22, 2024 (click here for details)
  • Welcome new registering member. Your username must be your real First and Last name (for example: John Doe). "Screen names" and "handles" are not allowed and your registration will be deleted if you don't use your real name. Also, do not use all caps nor all lower case.

How would you split up this burl?

Joined
Feb 21, 2010
Messages
2
Likes
0
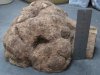
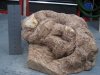
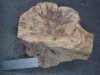
I acquired this maple burl about 8 years ago and I think its about time to do something with it.
So I am looking for some advice as to how to break it up into usable pieces other than just cutting it into 3 inch thick "cookies".
I am a bowl and vessel turner just to give you some insight as to what I may wish to do with it.
I think this burl is of the swirl variety.
I have attached some pics to help.
(p.s. I know where the other half is, it belongs to a friend of mine.)
Thanks, Dave
 

Attachments

  • burl-top.jpg
    burl-top.jpg
    403.3 KB · Views: 125
  • burl-side.jpg
    burl-side.jpg
    445.1 KB · Views: 90
  • burl-end.jpg
    burl-end.jpg
    443.6 KB · Views: 88
  • burl-bottom.jpg
    burl-bottom.jpg
    427.1 KB · Views: 102
Joined
Aug 21, 2007
Messages
50
Likes
0
Burl

I'd consider trimming it and turning a single piece, probably a hollow form. There will be cracks that will need to be filled so it won't fly apart on the lathe. You may need to strap it up with clear packaging tape, after you get the outside shaped, for the same reason. It could be a great piece!
Tim Carter
 
Joined
Jan 19, 2010
Messages
64
Likes
0
It's very difficult to give meaningful advice from pictures only, especially on a piece like this that is odd-shaped. I would have to take it in my hands, turn it over and over in several different directions, and keep looking and thinking until something came to me. Even then it might not be something that someone else would agree with.
 
Joined
Feb 21, 2010
Messages
2
Likes
0
Additional info on splitting up burl

To help provide a better picture of the burl I posted, here are some more details:
The clefts seen are approximately 2 to 3 inches deep.
Each nodule is about 5 inches in overall diameter.

I guess the questions I should have asked are:

1. Because of the numerous nodules, would it be prudent to attempt to band saw out each one individually? or,

2. Does the idea of separating the piece using a splitting wedge sound feasible?
Would it be expected that this could result in a running crack that could go through the middle of one of the nodules?

Is it possible that they could cleanly separate from each other?

Dave
 
Joined
Jan 31, 2006
Messages
255
Likes
1
Location
Gaston, Oregon
Maple Burl

IMHO, it would be best to saw it, but be VERY careful with the bandsaw! You could come out with some very fine bowls, although small. Good luck, and post some pix of the finished product(s).:cool2:
 
Joined
Mar 11, 2009
Messages
180
Likes
0
. . . Does the idea of separating the piece using a splitting wedge sound feasible?
Would it be expected that this could result in a running crack that could go through the middle of one of the nodules?

Is it possible that they could cleanly separate from each other?

Dave
Just my opinion, but it doesn't sound feasible to me, since a burl doesn't consist of extended lengths of parallel grain. Any splitting accomplished would be just as random as the directions within the burl.
 
Joined
Feb 24, 2010
Messages
1
Likes
0
Lidded Surprise

If you don't own a bowl saver device I'd borrow one.
1. Trim the corners on the band saw.
2. Mount it one the lathe and make your tenon.
3. Cut the center out with the bowl saver.
4. Take it off the lathe.
5. Make a false bowl rim out of a contrasting, but beautiful wood.
6. Turn your bowl and fit it with the false bowl rim.
7. Make another rim to fit on your false bowl rim, attached it to your "lid" (the saved bowl).
8. Make a very creative finial.
9. Fit it all together and pat yourself on the back for being so creative.
10. Have a great time!!
 
Back
Top