My shop has to be adaptable by project type. Machines are mobile and tuck-up under wall shelves and cabinets. The easel allows easy tool access while turning and has the capability to fold up vertically to relocate. A quick blast of air clears the rack of shavings. I suppose a plexiglas U-guard could be added to cover the tips, if one were so inclined. I've had it a couple of years and it's worked out well.

-
Beware of Counterfeit Woodturning Tools (click here for details) -
Johnathan Silwones is starting a new AAW chapter, Southern Alleghenies Woodturners, in Johnstown, PA. (click here for details) -
Congratulations to Keven Jesequel for "Big Leaf Maple" being selected as Turning of the Week for April 15, 2024 (click here for details) -
Welcome new registering member. Your username must be your real First and Last name (for example: John Doe). "Screen names" and "handles" are not allowed and your registration will be deleted if you don't use your real name. Also, do not use all caps nor all lower case.
You are using an out of date browser. It may not display this or other websites correctly.
You should upgrade or use an alternative browser.
You should upgrade or use an alternative browser.
Ideas for a tool rack
- Thread starter Timothy Rowe
- Start date
I'll try to post a PDF of what I built as to a turning tool rack.
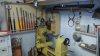
I have this cabinet hanging on the wall just to my right at the tailstock end of the lathe. I never need to reach over the lathe to grab a tool, or do I ever subject myself to piercing my hands on a sharp tool.
When finished with one tool I will generally replace it in the cabinet before grabbing the next, though I must admit that is not always the case such as when working on small detailed turnings then I may switch between different tools leaving one or two on the bed of the lathe as I turn. But when turning larger items such as bowls I tend to have only one tool out at a time and will always keep the doors of the cabinet closed while turning.
John
Attachments
Last edited:
Goodness Capt, can I come play in your shop.
Though I would not know how to work without digging through the piles.
Great looking shop, and by golly maybe it is possible to build a shop big enough
Jerry
Though I would not know how to work without digging through the piles.
Great looking shop, and by golly maybe it is possible to build a shop big enough
Jerry
What can I say Jerry. The shop came with the house. Of course, my wife says the house came with the shop. I get most of my exercise walking around looking for stuff.
Thanks Odie.
By the way the spalted red elder and the spalted maple bowls on your site are the classic shape for the Hawaiian calabash, a tough form to create. Very nicely done.
By the way the spalted red elder and the spalted maple bowls on your site are the classic shape for the Hawaiian calabash, a tough form to create. Very nicely done.
I built a wall rack with PVC pipe to hold my lathe tools. I built a second rack soon after. I hate them both! The rack for my bowl tools is across from me at the lathe. The spindle tool rack is next to it. Even when a tool is in the tube, the tubes fill up with cuttings. Every so often i need to vacuum them clean since the tools start to sit only 2 inches deep as the rest of the tube is filled and the tool is only 4 inches down.
I think the open style of rack where the tools are at a slight angle, 75 or 80degrees is the better plan. But taking the time to build something better means less time at the lathe. And time isnt something I have a lot left.
So I grab the vacuum and clean them out every so often.
I think the open style of rack where the tools are at a slight angle, 75 or 80degrees is the better plan. But taking the time to build something better means less time at the lathe. And time isnt something I have a lot left.
So I grab the vacuum and clean them out every so often.
odie
TOTW Team
- Joined
- Dec 22, 2006
- Messages
- 7,113
- Likes
- 9,729
Thanks Odie.
By the way the spalted red elder and the spalted maple bowls on your site are the classic shape for the Hawaiian calabash, a tough form to create. Very nicely done.
Thanks captjim.......

I've done some snooping around at a few online Hawaiian exhibits, just to see what "style" is being done there. A lot of very fine artisans on the islands!
ooc
Last edited:
I have a stand alone shelfing unit that when working inboard I have a long magnet mounted on and tools up high with tips pointed up. Mostly finishing tools. On the out board side I screwed a 2by4 flat side up and drilled holes. So all the points are down. But its lower. I can see the tips but even when I back into it when doing the backside of a bowl I dont touch the tips. When working bowl insides on the outboard the tools needed are put on the ways. I have the large outboard on my oneway. Tools I never want to hit the floor are put behind the banjo. Hunter, termite. One tip I got here I think I will use is one where a hinge is used. I like it.
My personel winner...
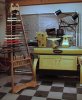
I'm going to copy this one as it will meet my needs for the time being. My shop is being set up and organized, so I'm not sure if things will stay where I initially think they belong. This way I can move it around, and if the machines stay put, then a cabinet might be in order. I've had a new Powermatic for over a month now and still have not used it! Won't until the shop is done. That is very unlike me!
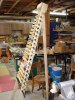
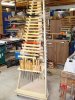
My shop has to be adaptable by project type. Machines are mobile and tuck-up under wall shelves and cabinets. The easel allows easy tool access while turning and has the capability to fold up vertically to relocate. A quick blast of air clears the rack of shavings. I suppose a plexiglas U-guard could be added to cover the tips, if one were so inclined. I've had it a couple of years and it's worked out well.
I'm going to copy this one as it will meet my needs for the time being. My shop is being set up and organized, so I'm not sure if things will stay where I initially think they belong. This way I can move it around, and if the machines stay put, then a cabinet might be in order. I've had a new Powermatic for over a month now and still have not used it! Won't until the shop is done. That is very unlike me!
My standard rack is to the left, the one in the corner to the right is actually a pocket door. There's a whole other set of Glaser tools in the pocket. It comes out in front of the window. To the right of the window is a rack for my Glaser Mini tools. I use those just as much as everything else.
Attachments
Bill,My standard rack is to the left, the one in the corner to the right is actually a pocket door.
How much do your tools 'lean back' in the racks? It looks like they're vertical, but then how would they stay in?
My Solution to Organization
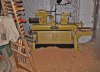
I finished up this cart a while back. Full extension drawer glides, tool rack, and a grinder. I think I'm pretty well set.


I finished up this cart a while back. Full extension drawer glides, tool rack, and a grinder. I think I'm pretty well set.
- Joined
- Apr 27, 2004
- Messages
- 8,629
- Likes
- 4,970
- Location
- Lakeland, Florida
- Website
- www.hockenberywoodturning.com
There are magnets behind them. I forgot all about that.
Bill,
I try keep my tools away from magnets. I think it is personal preference thing
One of my favorite spindle gouges got magnetized and I had to stop using it.
It would not float over the tool rest and kept resisting every move by sticking to the tool rest.
I can't stand using magnetized tools. Just too much resistance.
I don't know which magnets will ruin my tools so I just avoid all of them.
Al
- Joined
- Jan 27, 2005
- Messages
- 12,896
- Likes
- 5,179
- Location
- Dalworthington Gardens, TX
- Website
- pbase.com
I have one tool that is magnetized and it is really annoying because it is a chore to get the metal filings off of it. I also made another mistake by putting a supermagnet on the anvil of my bench vise. Now it is magnetized and collects metal filings because it is near the grinder.
Last edited:
- Joined
- Nov 1, 2013
- Messages
- 325
- Likes
- 733
- Location
- Gulfport, MS
- Website
- www.woodtreasuresbybreck.com
Some have complained about tools being magnets so I looked in McMaster catalog on line, demagnetizer, and they seem pricey for the standard units.
However they sell one that seems to use permanent magnets and is a lot cheaper. At least cheaper then a new tool.
I do not know if they are any good, but the company is good.
See:
Pocket-Size Magnetizer/Demagnetizer
Compact 2" Lg. x 1" Wd. x 2" Ht. unit works without electrical power to quickly magnetize or demagnetize small tools. Simply pass tools through one of the openings. Openings are approximately 1/2" Wd. x 1" Ht.
Each
5863K49 $5.97.
Stu
- Joined
- Jan 27, 2005
- Messages
- 12,896
- Likes
- 5,179
- Location
- Dalworthington Gardens, TX
- Website
- pbase.com
Some have complained about tools being magnets so I looked in McMaster catalog on line, demagnetizer, and they seem pricey for the standard units.
However they sell one that seems to use permanent magnets and is a lot cheaper. At least cheaper then a new tool.
I do not know if they are any good, but the company is good.
See:
Pocket-Size Magnetizer/Demagnetizer
Compact 2" Lg. x 1" Wd. x 2" Ht. unit works without electrical power to quickly magnetize or demagnetize small tools. Simply pass tools through one of the openings. Openings are approximately 1/2" Wd. x 1" Ht.
Each
5863K49 $5.97.
Stu
The PM demagnetizer is a joke and is overpriced by $5.97.
OK, I had not used this type of item, only the plug in kind where you slowelly pull the item thru a magnetic field , the expensive type.
There are a number of home made types shown on the web but I would recommend that any one needing a tool demagnetized find a local shop that has a unit and lets them use it.
Stu
There are a number of home made types shown on the web but I would recommend that any one needing a tool demagnetized find a local shop that has a unit and lets them use it.
Stu
Use a Bulk Magnetic Tape Eraser
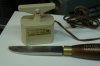
I routinely use magnet bars to hold most of my hand-held turning tools, and occasionally have the tools become mildly magnetized to the point where it becomes annoying with the tool sticking to the rest and providing some resistance to movement. After sharpening, metal filings sometimes stick to the tools, which is also annoying!
The tool demagnetizers that are most effective are simply wire coils (usually around some sort of ferrous core) similar to a transformer, which create an intense magnetic field when energized with electric current. Back in the day, when audio was recorded on magnetic particles in "tapes" (reel-to-reel, cassette, cartridge, or the bizarre "8-track" format), one could readily scramble the magnetism in the tape by using a "bulk tape eraser" that does exactly what we need it to do to demagnetize turning tools. This is essentially a hand held, switched electomagnet coil. I routinely used these bulk tape erasers years ago when I was the station engineer for my college FM radio station, WCLH, in Wilkes-Barre, PA.
Energizing the tape eraser and then passing the electromagnet past the tool for about 20-30 seconds while moving the tape eraser randomly across the magnetized tool effectively de-magnetizes it very efficiently. Thicker tools sometimes need a second treatment, but in general, most tools can be de-magnetized with a single 20 - 30 second treatment, perhaps only once or twice per year, if that. Be sure to "rest" the tape eraser often to allow it to dissipate heat generated in the coils while in use.
You can sometimes find bulk tape erasers at garage sales, eBay, surplus sales, etc. usually for around $30 to $50 - far less than buying a new commercial demagnetizer unit. I have been using my demagnetizer on turning tools for over 10 years, and it still works superbly. (Mine is of the ca. 1978-1980 vintage - still going strong.) This is one of the tips included in my "Woodturning Gizmos and Gadgets" presentation that gets the most questions on how to get one of these units!
Rob Wallace
Attachments
Last edited:
- Joined
- Jan 27, 2005
- Messages
- 12,896
- Likes
- 5,179
- Location
- Dalworthington Gardens, TX
- Website
- pbase.com
Rob, in addition to bulk tape erasers, tape heads also needed periodic demagnetizing because they operated with a magnetic bias offset to avoid operating in the nonlinear zero crossover region of the tape. For that purpose there was an electromagnetic coil with a small wand that could be close to the tape heads. It resembled a short screwdriver with a very fat handle and a power cord. It would be a slower go, but I suppose that this tool could be used to demagnetize a tool provided that it was only weakly magnetized.
I still have my old reel to reel -- do you know where I might find reels of tape?
I still have my old reel to reel -- do you know where I might find reels of tape?
odie
TOTW Team
- Joined
- Dec 22, 2006
- Messages
- 7,113
- Likes
- 9,729
I routinely use magnet bars to hold most of my hand-held turning tools, and occasionally have the tools become mildly magnetized to the point where it becomes annoying with the tool sticking to the rest and providing some resistance to movement. After sharpening, metal filings sometimes stick to the tools, which is also annoying!
The tool demagnetizers that are most effective are simply wire coils (usually around some sort of ferrous core) similar to a transformer, which create an intense magnetic field when energized with electric current. Back in the day, when audio was recorded on magnetic particles in "tapes" (reel-to-reel, cassette, cartridge, or the bizarre "8-track" format), one could readily scramble the magnetism in the tape by using a "bulk tape eraser" that does exactly what we need it to do to demagnetize turning tools. This is essentially a hand held, switched electomagnet coil. I routinely used these bulk tape erasers years ago when I was the station engineer for my college FM radio station, WCLH, in Wilkes-Barre, PA.
Energizing the tape eraser and then passing the electromagnet past the tool for about 20-30 seconds while moving the tape eraser randomly across the magnetized tool effectively de-magnetizes it very efficiently. Thicker tools sometimes need a second treatment, but in general, most tools can be de-magnetized with a single 20 - 30 second treatment, perhaps only once or twice per year, if that. Be sure to "rest" the tape eraser often to allow it to dissipate heat generated in the coils while in use.
You can sometimes find bulk tape erasers at garage sales, eBay, surplus sales, etc. usually for around $30 to $50 - far less than buying a new commercial demagnetizer unit. I have been using my demagnetizer on turning tools for over 10 years, and it still works superbly. (Mine is of the ca. 1978-1980 vintage - still going strong.) This is one of the tips included in my "Woodturning Gizmos and Gadgets" presentation that gets the most questions on how to get one of these units!
Rob Wallace
Hiya Rob.......
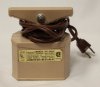
I read your post on this demagnetizer just before leaving for work this morning. Just for grins, I ran a quick search for a tape demagnetizer, and came up with the exact same unit as you have. Price was $15 plus $13.90 shipping.......so, I bought it! Mine is a Radio Shack model, but the technical information on the label matches your Robbins Industries model, so it looks like it's exactly the same model. The only difference is this one was sold through Radio Shack.
The magnetizing problems I've had are pretty much metal particles on the lathe tools while sharpening. Haven't noticed much, if any, sticking to the tool rest.......but, now that the subject is brought up, I'll pay more attention to the latter.
I assume you run the tool over the top of the triangular platform?......or can the sloped bottom of the platform be used in the same manner?
Anyway......thanks for the tip, and I look forward to using the demagnetizer very soon!
Very cool! :cool2:
ooc
Attachments
- Joined
- Jan 27, 2005
- Messages
- 12,896
- Likes
- 5,179
- Location
- Dalworthington Gardens, TX
- Website
- pbase.com
Odie, If I am not mistaken, the top is a T handle and the bottom is what passes over the reel of tape. If I am wrong, I'll eat my hat.
Does maple syrup go with hat?
Does maple syrup go with hat?
- Joined
- Jan 27, 2005
- Messages
- 12,896
- Likes
- 5,179
- Location
- Dalworthington Gardens, TX
- Website
- pbase.com
If you are pfrugal like me, you can make your own bulk eraser by using an old power transformer from an old TV. It woulds have to be a really old TV to have a power transformer. Really really old.
Odie:
Bill is correct. You hold the bulk eraser with the top 'triangular' handle, and press-in the silver pushbutton switch with your thumb. You'll hear a low hum when the unit is energized.
The business end is the flat part that is resting on the table - the bulk of the magnetic field is generated out from that end. You move the unit over the tool, not the other way around - I think it is easier (and safer) that way. Move the eraser side to side or in loops along the metal - you want to try to avoid running the electromagnet in a path parallel with the tool's axis. The idea is to disrupt the polarizing dipoles in the metal which set-up the magnetism in the tool created by storing the tool against a permanent magnet. You can use metal filings near your grinder to see how well you are progressing with your demagnetization. I also have used a paper clip or small hardware (machine screws, washers, small nuts, etc.) to test for remaining magnetism. As I said above, it takes only about 20 - 30 seconds for typical tools; for my 3/8" thick and wide scrapers, two or three "treatments" may be necessary.
Bill: I had one of the smaller tape head demagnetizers too - mine looked more like a "pencil" soldering iron than anything else. Part of my normal PM schedule was to demagnetize the heads (both play and record) on the 5 reel-to-reel machines we had, as well as a bunch of cart machines too, usually done every other month. We had three on-air studios and one production studio at the station; each had its own R2R machine, with 2 units in the production studio. All studios were interconnected with lots of bypassed, shielded twin conductor AF cable so you could broadcast from any studio if necessary (with a mixing panel in each room), or easily feed audio from one room to another. I learned a lot from our chief engineer when we re-wired the studios in my junior year of college. I kind of miss those days in broadcast radio from the tech-side. My own on-air show was "Sunday at Symphony", from noon to five pm each week, broadcasting and announcing classical music - it ran for the entire 3 years I worked at the station, with the exception of 8 weeks each summer, and 1 week between Christmas and the New Year.
I don't think it would generate enough gauss in such a small cross sectional area from the tip of one of these head demagnetizer units to efficiently de-magnetize turning tools, although I suspect with enough time and patience I suppose it could be done....
Rob
Last edited:
- Joined
- Jan 27, 2005
- Messages
- 12,896
- Likes
- 5,179
- Location
- Dalworthington Gardens, TX
- Website
- pbase.com
That's a relief. Now, I can put the butter and maple syrup up and not worry about the hat. BTW, the hat is also maple, but I doubt that would make it taste any better than a felt or straw hat.
odie
TOTW Team
- Joined
- Dec 22, 2006
- Messages
- 7,113
- Likes
- 9,729
OK, Rob......I think I've got the concept now! Thanks.
Bill, I would have suggested some crunchy peanut butter with that maple hat......but, it looks like your intuition serves you well!
ooc
Bill, I would have suggested some crunchy peanut butter with that maple hat......but, it looks like your intuition serves you well!
ooc