Does the inside shape of a bowl "almost always" follow the outside shape? I'm starting to experiment with more than a basic symmetrical shape, and not sure how strictly the two are tied together.

-
Beware of Counterfeit Woodturning Tools (click here for details) -
Johnathan Silwones is starting a new AAW chapter, Southern Alleghenies Woodturners, in Johnstown, PA. (click here for details) -
Congratulations to Keven Jesequel for "Big Leaf Maple" being selected as Turning of the Week for April 15, 2024 (click here for details) -
Welcome new registering member. Your username must be your real First and Last name (for example: John Doe). "Screen names" and "handles" are not allowed and your registration will be deleted if you don't use your real name. Also, do not use all caps nor all lower case.
You are using an out of date browser. It may not display this or other websites correctly.
You should upgrade or use an alternative browser.
You should upgrade or use an alternative browser.
Inside shape follows outside... always?
- Thread starter Jamie Straw
- Start date
-
- Tags
- bowl form bowl shape
The only rule is that the inside should be smaller than the outside.
odie
TOTW Team
- Joined
- Dec 22, 2006
- Messages
- 7,113
- Likes
- 9,747
The only rule is that the inside should be smaller than the outside.
^^^^^ Ha,ha......I like that!

The profiles of my bowls are so erratic, that the inside and outside seldom conform.....but, where the shapes allow it, they normally do.
ko
- Joined
- Apr 27, 2004
- Messages
- 8,629
- Likes
- 4,970
- Location
- Lakeland, Florida
- Website
- www.hockenberywoodturning.com
With the exception of round bottom bowls Inside shape doesn't often follow outside shape.
Many Successful bowl shapes have a rim detail that is thicker or a foot detail an then a slightly tapered wall thickness.
Even wall thickness is important when drying green wood. Once dry the wall thickness can vary.
I find that bowls with wall that taper thinner from rim to bottom have a nicer look and feel to them than bowls who's walls taper from thin rim to thick bottom.
When I do the bowls of goblets or end grain vases I turn the inside first then follow the inside shape with the outside shape.
Al
Last edited:
The only rule is that the inside should be smaller than the outside.
My favorite quote of the day!
I often make the inside much different than the outside. A good example is to add more weight to the bottom to make it feel better in the hand and more stable and less likely to tip. (I turn dry so the thickness isn't an issue.) Thicker walls on goblets and such don't impress turners but the rest of the world usually likes them, again, because of the feel in the hand.
With few exceptions I turn the outside first then the inside to compliment. On a bowl I turn the outside and rim before the inside. The outside is what you see first on a goblet, box, taller form (like a vase) and to some extent, a bowl. I want the outside to define the look and the inside to follow.
JKJ
- Joined
- Jan 27, 2005
- Messages
- 12,896
- Likes
- 5,181
- Location
- Dalworthington Gardens, TX
- Website
- pbase.com
If you make it past Joe's unbreakable rule and the inside and the outside both look good and go well together, then you are home free.
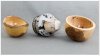
Al, here are a couple round-bottom bowls with outsides NOT following the inside shape, i.e. varying wall thickness. The inside was mounted on a core deliberately offset, so that they rock off-center. I think they were derived from a Journal article sometime in 2010.
Joe
Joe
Attachments
- Joined
- Apr 27, 2004
- Messages
- 8,629
- Likes
- 4,970
- Location
- Lakeland, Florida
- Website
- www.hockenberywoodturning.com
Al, here are a couple round-bottom bowls with outsides NOT following the inside shape, i.e. varying wall thickness. The inside was mounted on a core deliberately offset, so that they rock off-center. I think they were derived from a Journal article sometime in 2010. Joe
Cool! I missed that article.
john lucas
AAW Forum Expert
I turn the inside to whatever it needs to be. If it's a functional piece the inside is usually pretty regular shaped to aid in cleaning or getting candy out of it. The outside will then be designed to show off the wood and the foot will usually be larger to make it functionally stable. For some art bowls I have gone to extremes with the inner bowl being about 3" and the outer bowl about 9". Big lips to decorate or show off the wood on that style. When I do bowls with overhanging lips either inside or outside the tip will usually be thicker than the sides and on these I often leave the bottom thicker to stabilize the bowl. Just remember, they are your bowls. Have fun and do what ever you wish. Now if your selling them it's a different ball game. you often have to change things a little to get them out the door.
- Joined
- Apr 1, 2015
- Messages
- 603
- Likes
- 443
- Location
- Sitka, Alaska, United States
- Website
- www.zachlaperriere.com
Great advice and discussion so far, as always. I really benefited from Richard Raffan's discussion on wall thickness in his book Turning Bowls, which is what Al is talking about: slightly thicker rim, etc. Raffan goes to further lengths in Turned Bowl Design.
Raffan and some other ultra talented turners recommend cutting the occasional bowl in half on the bandsaw. The cross section really is educational on what works and what doesn't.
Raffan and some other ultra talented turners recommend cutting the occasional bowl in half on the bandsaw. The cross section really is educational on what works and what doesn't.
It seems I've been doing my inside-out turning all wrong...The only rule is that the inside should be smaller than the outside.
odie
TOTW Team
- Joined
- Dec 22, 2006
- Messages
- 7,113
- Likes
- 9,747
Great advice and discussion so far, as always. I really benefited from Richard Raffan's discussion on wall thickness in his book Turning Bowls, which is what Al is talking about: slightly thicker rim, etc. Raffan goes to further lengths in Turned Bowl Design.
Raffan and some other ultra talented turners recommend cutting the occasional bowl in half on the bandsaw. The cross section really is educational on what works and what doesn't.
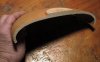
I've also read Raffan's book, and remember seeing his advice to cut a bowl half to see how well you've conformed the interior to the exterior shape......and as a matter of fact, I've done exactly this a number of times, and did so just recently. So, I went out to the shop just now to photograph a bowl I'd cut in half a few days ago. I was pleased in how well the interior matched the exterior profile in this one, because it was one where I had been attempting to specifically do that. Although having the interior shape conforming to the exterior is seen as an indication of excellence by some turners, I personally don't think it's necessary at all. There are plenty of my other bowls where the rim and general shape of the exterior make it impossible for the interior to conform. To my way of thinking, it's all about how pleasing the shape looks to the eye.....and, not what someone else thinks is a defining factor in craftsmanship.......
(In the photo, the rim was broken on this bowl when I let emotion get the best of me and threw it against the cement floor of my shop!
After that little episode, I decided to cut it in half. You can see that the waste block is still partially there after just having parted it away. The foot was still to be done.)ko
Attachments
I couldn't ever get myself to cut a perfectly good bowl in half to check for even thickness. Why throw away $20 or maybe $40 to $60 for Odie's bowl? They both have to 'feel' good. Most important. Having a perfectly even thickness works some times, and not others. Some prefer a small cove near the top inside rim for ease of picking the bowl up with one hand. Never noticed that it made any difference to me. The round bottom bowls, aka earthquake bowls generally are more symmetrical. A lot of bowls will taper some what, narrower at the rim, and slightly thicker at the base. The bowls turned from a square or rectangular board seem to look better this way, narrower at the outside and gradually getting thicker as you get near the bottom. Just a visual effect. I think they look nice if the thickness is uniform too.
robo hippy
robo hippy
odie
TOTW Team
- Joined
- Dec 22, 2006
- Messages
- 7,113
- Likes
- 9,747
Robo....
After throwing the bowl against the cement floor, like a big league fastball.......it was no longer a perfectly good bowl!
ko
After throwing the bowl against the cement floor, like a big league fastball.......it was no longer a perfectly good bowl!
ko
- Joined
- Apr 1, 2015
- Messages
- 603
- Likes
- 443
- Location
- Sitka, Alaska, United States
- Website
- www.zachlaperriere.com
This is getting humorous! I'm with you, Robo...I could never cut a perfectly good bowl in half. It's a bit like catch and release fishing: why catch a fish if you aren't planning to eat it? But I have cut a few bowls that I knew were much less than perfect, sometimes as an exercise to see how a new (to me) profile measures up.
And I also agree with you, Odie. Rules are meant to be broken. Putting a rim on a bowl changes the balance and profile, too. Some burls just lend themselves to wanting to be extra chunky bowls (not a recommended marketing term.) To reduce weight on heavier bowls with with rims I sometimes make a relatively thin bottom.
And yes, Robo, it's all about the feel—especially because no customer would ever be so impressed with a profile on two halves of a perfectly good bowl.
On an extreme side note, I posted a half-bowl to Facebook a while ago and wrote something like, "Today only!!!!!!!! This bowl half off!!!!!!" Facebook didn't like the post, and didn't show it to any of my Facebook friends.
- Joined
- Jan 27, 2005
- Messages
- 12,896
- Likes
- 5,181
- Location
- Dalworthington Gardens, TX
- Website
- pbase.com
Robo....
After throwing the bowl against the cement floor, like a big league fastball.......it was no longer a perfectly good bowl!
Were you going for "pique assiette" ... or something more mundane like flying off the lathe.
.... On an extreme side note, I posted a half-bowl to Facebook a while ago and wrote something like, "Today only!!!!!!!! This bowl half off!!!!!!" Facebook didn't like the post, and didn't show it to any of my Facebook friends.
It was probably an unfeeling cold-hearted emotionless software filter that has no sense of humor.
odie
TOTW Team
- Joined
- Dec 22, 2006
- Messages
- 7,113
- Likes
- 9,747
Were you going for "pique assiette" ... or something more mundane like flying off the lathe.
Pique Assiette is a form of art similar to mosaic but specifically uses broken plates and the like arranged in patterns or designs.
Heh,heh,heh......had to look it up!
Consider it as upholding my personal standards by not allowing it to exist.....even though I had spent quite a bit of effort trying to make it into something that it just wasn't destined to be. I should have tossed it out earlier.......
ko
cut in half
I also read where Raffan said that. I did cut one of my best little handbell ornaments in half, partly to show the shape and partly to show how it was put together. People often say, wow, that is thin! This shows it is only thin at the rim which makes it feel thinner than it is.


But I cannot deceive. I only cut it nicely in two AFTER I broke it carrying it around in my bag on a European trip a couple of years ago. It turned a depressing accident into a quite useful show_and_tell!
JKJ
I couldn't ever get myself to cut a perfectly good bowl in half to check for even thickness.
I also read where Raffan said that. I did cut one of my best little handbell ornaments in half, partly to show the shape and partly to show how it was put together. People often say, wow, that is thin! This shows it is only thin at the rim which makes it feel thinner than it is.
But I cannot deceive. I only cut it nicely in two AFTER I broke it carrying it around in my bag on a European trip a couple of years ago. It turned a depressing accident into a quite useful show_and_tell!
JKJ
Well, yes, if it hits the floor, then maybe... I keep a box of rejects that I take to the one show I still do. Max price is $5. They sell out in about an hour. I have seen a wall sconce made from half bowl sections, and a few other variations of cutting bowls in half by design...
Zach, well some times you have to catch and release. I go fishing once a year. Conservation lake. I would have to quit fishing after about 5 minutes or stay for about a year so I could eat every thing I caught in 5 days.... That would be fish 3 times a day too.... and I can eat a LOT of fish. Walleye, Northern, Lake Trout, and some Small Mouth Bass.....
robo hippy
- Joined
- May 16, 2005
- Messages
- 3,540
- Likes
- 15
With the exception of round bottom bowls Inside shape doesn't often follow outside shape.
Many Successful bowl shapes have a rim detail that is thicker or a foot detail an then a slightly tapered wall thickness.
Even wall thickness is important when drying green wood. Once dry the wall thickness can vary.
First sentence true. Often the choice for stability boils down to a broad clunky base or a low center of gravity from a thick section. Somewhere there's a compromise. I favor the thick bottom over broad.
Second sentence false, as anyone who knows about wood can tell you. Since wood loses moisture 10 times faster through end grain than face, and 12 or more times faster than through quarter, the argument that it "evens drying" is one of those turning myths so commonly asserted, but never challenged by reason, since they were uttered by an "expert." The reason you get splits in green roughs is mostly mechanical. The shape wants to shrink across the grain, but can't along it. If a check develops as the outer end grain dries and contracts, it can result in a full split as the squeeze across the grain progresses. The interior isn't a player, because the wood both wants to shrink, and is under compression as the circle forms an ellipse.
What happens when a cross-grain piece cures. http://i35.photobucket.com/albums/d160/GoodOnesGone/Picture-Package-14.jpg An extreme example of shoulder droop. http://i35.photobucket.com/albums/d160/GoodOnesGone/1-Oak-Distorted.jpg If your piece is rounded out, and not too broad at the base, there should be little problem with splitting. Can't remember last time it happened to me. Combination of squeeze and droop divides the mechanical stresses.
- Joined
- Apr 27, 2004
- Messages
- 8,629
- Likes
- 4,970
- Location
- Lakeland, Florida
- Website
- www.hockenberywoodturning.com
First sentence true. Often the choice for stability boils down to a broad clunky base or a low center of gravity from a thick section. Somewhere there's a compromise. I favor the thick bottom over broad. Second sentence false, as anyone who knows about wood can tell you. Since wood loses moisture 10 times faster through end grain than face, and 12 or more times faster than through quarter, the argument that it "evens drying" is one of those turning myths so commonly asserted, but never challenged by reason, since they were uttered by an "expert." The reason you get splits in green roughs is mostly mechanical. The shape wants to shrink across the grain, but can't along it. If a check develops as the outer end grain dries and contracts, it can result in a full split as the squeeze across the grain progresses. The interior isn't a player, because the wood both wants to shrink, and is under compression as the circle forms an ellipse. What happens when a cross-grain piece cures. http://i35.photobucket.com/albums/d160/GoodOnesGone/Picture-Package-14.jpg An extreme example of shoulder droop. http://i35.photobucket.com/albums/d160/GoodOnesGone/1-Oak-Distorted.jpg If your piece is rounded out, and not too broad at the base, there should be little problem with splitting. Can't remember last time it happened to me. Combination of squeeze and droop divides the mechanical stresses.
Even wall thickness is important in drying twice turned bowls or once turned hollow forms and bowls.
Even walls combined with curves allows the wood to move instead of cracking.
Your description of cracking is exactly why even wall thickness is important for drying success.
Although I did not mention even drying in my post, it too is important for the reasons you stated.
Even drying is achieved using a humidity chamber like a paper bag, a kiln, applying wood sealer on the end grain or several other ways.
For more information on successful greenwood turning I have a handout posted.
http://aaw.hockenbery.net/WORKING WITH green wood-HOcompressed.pdf
Last edited:
Like Al said, even wall thickness does contribute to reducing cracks in green wood. It isn't just about how the water leaves the wood, both free water and entrained water...
robo hippy
robo hippy
- Joined
- Apr 1, 2015
- Messages
- 603
- Likes
- 443
- Location
- Sitka, Alaska, United States
- Website
- www.zachlaperriere.com
Thanks, Al
Al, That was a great handout. I really like how you showed radial vs tangental shrinkage. I have two questions, if you don't mind.
1. I usually rough turn with wall thickness tapering slightly toward the base. I've had good luck with it, but for the most part I turn fairly stable woods. I figured there's less movement there and the base tends to dry out last, owing to the wider wood at the base that runs parallel to to the grain. Let's say I turned a 10" rough bowl, with 1" thick walls. I might end up at 3/4"+ at the base. Does that sound like a good idea in your opinion, or better to go 1" all the way?
2. I sometimes turn steeper walled bowls and dry them slower. Apart from some crazy ornamental maple that warped like a pretzel, I've had good luck just drying steeper bowls slowly. Can I ask what you think?
Thanks!
- Joined
- Apr 27, 2004
- Messages
- 8,629
- Likes
- 4,970
- Location
- Lakeland, Florida
- Website
- www.hockenberywoodturning.com
Al, That was a great handout. I really like how you showed radial vs tangental shrinkage. I have two questions, if you don't mind. 1. I usually rough turn with wall thickness tapering slightly toward the base. I've had good luck with it, but for the most part I turn fairly stable woods. I figured there's less movement there and the base tends to dry out last, owing to the wider wood at the base that runs parallel to to the grain. Let's say I turned a 10" rough bowl, with 1" thick walls. I might end up at 3/4"+ at the base. Does that sound like a good idea in your opinion, or better to go 1" all the way? 2. I sometimes turn steeper walled bowls and dry them slower. Apart from some crazy ornamental maple that warped like a pretzel, I've had good luck just drying steeper bowls slowly. Can I ask what you think? Thanks!
Zach
I rough mine somewhat the same way. I use a tenon about a 1/2" and I want to compensate for that somewhat so an inch at the rim 3/4 at the bottom plus the tenon works well
The bottom won't move much if it is straight grain. A crotch figure in the bottom will rise up in the middle of the inside bottom so I usually turn these natural edge and the ripple in the bottom becomes a feature.
Not sure wha thou mean by steeper bowls. Taller than wide? Or perpendicular walls?
- Joined
- May 16, 2005
- Messages
- 3,540
- Likes
- 15
Even wall thickness is important in drying twice turned bowls or once turned hollow forms and bowls.
Even walls combined with curves allows the wood to move instead of cracking.
Sorry, but making the wall uniform changes neither the rate of loss from various surfaces nor the differential R/T shrinkage. They are what stress the piece, as you almost acknowledge when you suggest "misting" to keep the end grain expanded. Even there your reasoning is based on incorrect interpretation of the nature of wood. Unbound water can fly all it wants without affecting checks. It's loss of BOUND water which causes shrinkage and stress, and you ain't going to break those hydrogen bonds even with excessive rpm, like some use. Really do recommend you check the difference and why/when wood checks in FPL Wood Handbook http://www.fpl.fs.fed.us/products/publications/several_pubs.php?grouping_id=100&header_id=p
Now control of the environment, in various forms which reduce RH slowly, or applying occlusive coverings to the outside may preserve the surface of the stressed end grain from drying too fast and checking as it drys below the FSP, but that's an entirely different matter, and is also basically unnecessary on normally curved surfaces.
- Joined
- Apr 1, 2015
- Messages
- 603
- Likes
- 443
- Location
- Sitka, Alaska, United States
- Website
- www.zachlaperriere.com
Zach
I rough mine somewhat the same way. I use a tenon about a 1/2" and I want to compensate for that somewhat so an inch at the rim 3/4 at the bottom plus the tenon works well
The bottom won't move much if it is straight grain. A crotch figure in the bottom will rise up in the middle of the inside bottom so I usually turn these natural edge and the ripple in the bottom becomes a feature.
Not sure wha thou mean by steeper bowls. Taller than wide? Or perpendicular walls?
Thanks for the response, Al. Great point on crotch grain. I've been lucky to turn a dozen or so of those, but not as many as I'd like. Straight trees in Alaska!
My apologies on the term steep bowls...I mean vertical walls, and those lend themselves to sharper curves at the base. I personally don't like the curve as much, but people ask for them since they hold more. I just try to dry those slower, bag and box them for slower drying.
- Joined
- Apr 27, 2004
- Messages
- 8,629
- Likes
- 4,970
- Location
- Lakeland, Florida
- Website
- www.hockenberywoodturning.com
Sorry, but making the wall uniform changes neither the rate of loss from various surfaces nor the differential R/T shrinkage. They are what stress the piece, as you almost acknowledge when you suggest "misting" to keep the end grain expanded. Even there your reasoning is based on incorrect interpretation of the nature of wood. Unbound water can fly all it wants without affecting checks. It's loss of BOUND water which causes shrinkage and stress, and you ain't going to break those hydrogen bonds even with excessive rpm, like some use. Really do recommend you check the difference and why/when wood checks in FPL Wood Handbook http://www.fpl.fs.fed.us/products/publications/several_pubs.php?grouping_id=100&header_id=p Now control of the environment, in various forms which reduce RH slowly, or applying occlusive coverings to the outside may preserve the surface of the stressed end grain from drying too fast and checking as it drys below the FSP, but that's an entirely different matter, and is also basically unnecessary on normally curved surfaces.
You seem to be missing the whole point of even wall thickness.
Even walls and curves allow the wood to move as it shrinks and not crack.
Wood shrinks in the tangential and radial directions as it dries and virtually not at all in the vertical direction.
When an object is shrinking at three different rates, it has to change shape.
Hollow forms go oval. Bowls go oval.
Even wall thickness allows turned objects to change shape without cracking.
Last edited:
- Joined
- Apr 27, 2004
- Messages
- 8,629
- Likes
- 4,970
- Location
- Lakeland, Florida
- Website
- www.hockenberywoodturning.com
Thanks for the response, Al. Great point on crotch grain. I've been lucky to turn a dozen or so of those, but not as many as I'd like. Straight trees in Alaska! My apologies on the term steep bowls...I mean vertical walls, and those lend themselves to sharper curves at the base. I personally don't like the curve as much, but people ask for them since they hold more. I just try to dry those slower, bag and box them for slower drying.
Steep walled bowls and vessels are more prone to cracking because the wood cannot move with the shrinkage. Slower drying can help a lot.
Al
- Joined
- May 16, 2005
- Messages
- 3,540
- Likes
- 15
You seem to be missing the whole point of even wall thickness.
Even walls and curves allow the wood to move as it shrinks and not crack.
Wood shrinks in the tangential and radial directions as it dries and virtually not at all in the vertical direction.
When an object is shrinking at three different rates, it has to change shape.
Hollow forms go oval. Bowls go oval.
Even wall thickness allows turned objects to change shape without cracking.
Nope, get your think going, and consider that what shrinks is primarily earlywood, where there's less density than late. So shrinkage is a percentage based on the percentage of the earlywood, while deformation deals primarily with the orientation of the latewood areas which are more dense, not the rate. Since wood can only shrink into itself, makes no difference how thin or thick it is. But broad bottoms which remain saturated and expanded while the exterior endgrain dries and tries to contract can split. Your little presentation mentions the cause or radial splits. Same thing. Outside dry, inside not, can't compress, so it splits. Same with end checks on logs, though they tend to self-limit as the opening extends into areas shielded from drying influences. Unless a check encounters a natural weakness, goes in maybe a couple inches, as you state. Why having every point on a roughed bowl within a couple inches of the air through endgrain is a worthwhile goal to prevent splits.
- Joined
- Apr 27, 2004
- Messages
- 8,629
- Likes
- 4,970
- Location
- Lakeland, Florida
- Website
- www.hockenberywoodturning.com
Logs split mostly because the tangential shrinkage is greater than the radial shrinkage.Nope, get your think going, and consider that what shrinks is primarily earlywood, where there's less density than late. So shrinkage is a percentage based on the percentage of the earlywood, while deformation deals primarily with the orientation of the latewood areas which are more dense, not the rate. Since wood can only shrink into itself, makes no difference how thin or thick it is. But broad bottoms which remain saturated and expanded while the exterior endgrain dries and tries to contract can split. Your little presentation mentions the cause or radial splits. Same thing. Outside dry, inside not, can't compress, so it splits. Same with end checks on logs, though they tend to self-limit as the opening extends into areas shielded from drying influences. Unless a check encounters a natural weakness, goes in maybe a couple inches, as you state. Why having every point on a roughed bowl within a couple inches of the air through endgrain is a worthwhile goal to prevent splits.
i assume you are not being a troll and just misunderstand how wood shrinks.
A simple way to think of it is the growth rings want to flatten out.
That is just the tangential shrinkage being more than the radial shrinkage
I occasionally leave the pith in a hollow form or natural edge bowl.
To have the green wood dry without cracking I turn the forms with even wall thickness and curves.
Thinner works better for pith in pieces because each growth ring shrinks more than the one inside it.
With thin walls each growth ring can dry and shrink without cracking by pushing its inside growth ring outward.
As the form dries it pushes each growth ring outside on the one it is in something like the collapsible camp cups or bandsaw baskets.
It can only do this with a thin uniform wall thickness.
Hoadley's book "understanding wood" explains how wood shrinks quite well.
Radial and tangential shrinkage are facts. Hoadley's has tables of the average shrinkage for many species.
I highly recommend it to you.
Last edited:
What a great visual, Al. I have so much trouble with envisioning the spatial nature of wood movement, I think this post will help. I have Hoadley's book, but he has an uphill battle 'splaining things to me.Logs split mostly because the tangential shrinkage is greater than the radial shrinkage.
i assume you are not being a troll and just misunderstand how wood shrinks.
A simple way to think of it is the growth rings want to flatten out.
That is just the tangential shrinkage being more than the radial shrinkage
I occasionally leave the pith in a hollow form or natural edge bowl.
To have the green wood dry without cracking I turn the forms with even wall thickness and curves.
Thinner works better for pith in pieces because each growth ring shrinks more than the one inside it.
With thin walls each growth ring can dry and shrink without cracking by pushing its inside growth ring outward.
As the form dries it pushes each growth ring outside on the one it is in something like the collapsible camp cups or bandsaw baskets.
It can only do this with a thin uniform wall thickness.
Hoadley's book "understanding wood" explains how wood shrinks quite well.
Radial and tangential shrinkage are facts. Hoadley's has tables of the average shrinkage for many species.
I highly recommend it to you.
Last edited:
john lucas
AAW Forum Expert
I'm having a senior moment and can't remember his name, maybe Dave (something) from Florida. Dave Barriger, it just hit me. Man this getting old sucks. He made hollow vessels with the stem being a spring, looked like a huge coil spring. Anyway, he explained that if you made a vessel thin with a cone shape it would not crack. this was because the wood could move. It would make the cone narrower and longer as it shrunk. He also stressed to make the walls an even thickness and his vessels demonstrated he knows what he's talking about. May be a turning myth, but it seems to work.
- Joined
- Apr 27, 2004
- Messages
- 8,629
- Likes
- 4,970
- Location
- Lakeland, Florida
- Website
- www.hockenberywoodturning.com
I'm having a senior moment and can't remember his name, maybe Dave (something) from Florida. Dave Barriger, it just hit me. Man this getting old sucks. He made hollow vessels with the stem being a spring, looked like a huge coil spring. Anyway, he explained that if you made a vessel thin with a cone shape it would not crack. this was because the wood could move. It would make the cone narrower and longer as it shrunk. He also stressed to make the walls an even thickness and his vessels demonstrated he knows what he's talking about. May be a turning myth, but it seems to work.
Dave is the guy who does the spiral bases on his forms. Dave is a foremost expert in tree identification. He also turns some 30-40" diameter platters.
In turning green wood, the wood will shrink and the forms will move in ways we can anticipate. As long as the shapes and walls of the form can move the forces that make cracks don't build to the cracking point.
Johannes Michelson uses the natural wood movement when he turns and shapes his cowboy hats. The rims roll with the wood shrinkage, the band area is dimensioned with shrinkage added and dries oval to fit the wearers head.