
I requested a few sentences from Johnny Tolly to supplement the recent vacuum tip I posted. He generously wrote this informative article in response, with several illustrative pictures.
Author: Johnny Tolly
Austin, TX.
(thanks Johnny)
Note: I call everything a project regardless if it is a bowl, plate, or a hollow form.
Making the chuck:
(see pictures at end of the tip)
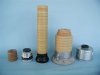
At Home Depot purchase a round nose MDF shelf board. This MDF comes in 6 and 8 foot lengths and is about 11&3/4†wide. You can make a lot of vacuum drum chucks from one MDF shelf board.
Decide the size disk you want for your MDF vacuum drum chuck. Using a compass, mark several circles on the MDF board. Using a band saw cut these out of the board. A scroll saw or saber saw may be used if you do not have a band saw.
If you have not tried friction drive here is how that works. Screw a faceplate or your chuck on the headstock. If using a chuck, close the jaws down below the size of MDF disk that you cut earlier. Place a MDF disk between the tailstock point and the faceplate or chuck. Use the compass center mark for the tailstock live center point. Tighten up the tailstock. Caution: use a shop vacuum to remove the MDF dust while turning; do NOT breathe the dust as it is harmful to your health.
Turn on the lathe and turn the MDF disk round. This does not have to be exact, just gets rid of the saw marks. Do this to several MDF disks at this time, saves taking the faceplate or chuck off and putting it back on to do the next one.
Next, screw the MDF adapter onto your lathe’s headstock. True up the face of the MDF where the next piece of MDF will go. This helps to ensure that the MDF is true to your headstock. You can check the face for being flat by laying the back of your tool across the MDF adapters face. Now, place the next MDF disk between the tailstock and the MDF adapter, mark the outer MDF disk with a pencil by rotating the lathe. This will be your outer glue line. Back away the tailstock and put glue on the MDF disk. Do not get excess glue on the inside where the headstock threads are. Now, place the disk back between the tailstock and MDF adapter, tighten the tailstock up, this will squeeze out some glue. If you have excessive glue squeeze out, wipe it away with a rag. Allow the glue to dry 15-20 minutes. You may then glue on your next MDF disk. When the glue has cured, drill a ½†hole through both MDF disks. Continue in this manner until you have the size of MDF vacuum drum you like. It is your call here, but, 3 to 6 inches across the outside works for 90% of projects. This uses from 6 to 8 MDF disk’s. Smaller MDF drum chucks may be used for eggs and small projects. NOTE: Leave the last MDF disk solid so the tailstock will provide support while turning the outside.
When the glue has cured 20-30 minutes, keep the tailstock up tight and shape the outside (ONLY) to your liking. At this point the glue has NOT cured completely between the MDF disks, so do not get rowdy when turning. Sand the MDF drum to 100 grit paper. Coat the entire outside with the same glue and allow it to cure over night. Next day, very lightly turn away the excess glue then sand with 100 grit and 220 grit sand paper.
Back away the tailstock, drill out the last MDF disk, and shape the inside of the MDF to form your vacuum drum chuck. Keep a 1/2â€Â- 5/8†wall thickness. Again, sand the inside to 100 grit paper, then apply glue and allow it to cure. Come back and lightly turn the inside to smooth the glue, sand to 200 grit. Remove the MDF vacuum drum chuck from the headstock.
Lay the MDF vacuum drum chuck on top of the close cell foam, mark and cut a ring about two inches larger than the MDF vacuum drum chuck. Remove the backing from the close cell foam and place the foam onto the MDF vacuum chuck. Form the outside down around the sides. You may want to make an X cut in the center of the foam then push the down into the vacuum drum chuck.
Place the vacuum drum chuck back on the headstock. Use something like black electrical tape and wrap the outside foam down, going in the opposite direction that the lathe will turn. This just helps keep the foam edges down when turning.
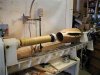
Large and long MDF vacuum drum chucks:
(see attached picture below, pic #2)
These vacuum drum chucks require some additional thought and safety concerns. After gluing two MDF disks on I drill and counter sink three holes evenly spaced around the MDF disk. I then screw in three (3â€Â) decking screws. Glue on two additional MDF disks and drill and place three more screws offset from the first three screws. It is wise to mark them MDF rings on the out side where the screws are located. The decking screws provide added strength to the large and long MDF vacuum drum chucks.
That is how I make the MDF vacuum drum chucks.
WARNING:
Remember the MDF is like paper glued together. NEVER stand in line of the turning and ALWAYS bring the tailstock up to provide additional support when turning the bottoms of projects down. With that said I highly recommend the Aluminum Drum Chucks from Oneway as these are truly outstanding for vacuum chucking. Start with the 3&1/2†and should you need a larger vacuum drum chuck purchase it later in your turning endeavors. Contact Oneway at 1-800-565-7288, ask for Kimberly as she really knows the business and is fun to talk with. Tell her I sent you her way. No, neither you nor I will get a cut; she just enjoys hearing whom sent you her way.
Footnote:
I do have the following items for sale along with Vacuum systems.
#1, Tolly designed tailstock adapters which enhance vacuum chucking.
#2, Center finders for centering faceplates and chucks to the wood.
#3, Tailstock extensions that enable one to get in closer to the project or extend inside a project for added safety while turning.
In closing, My hope is that I can help you make a step up in your turning and as always if you have any questions please Email or call me.
Johnny W. Tolly
16212 Crystal Hills Dr.
Austin TX 78737
Ph 512-858-4471 Home
512-922-1241 Cell
Email johntolly@austin.rr.com
Author: Johnny Tolly
Austin, TX.
(thanks Johnny)
Note: I call everything a project regardless if it is a bowl, plate, or a hollow form.
Making the chuck:
(see pictures at end of the tip)
At Home Depot purchase a round nose MDF shelf board. This MDF comes in 6 and 8 foot lengths and is about 11&3/4†wide. You can make a lot of vacuum drum chucks from one MDF shelf board.
Decide the size disk you want for your MDF vacuum drum chuck. Using a compass, mark several circles on the MDF board. Using a band saw cut these out of the board. A scroll saw or saber saw may be used if you do not have a band saw.
If you have not tried friction drive here is how that works. Screw a faceplate or your chuck on the headstock. If using a chuck, close the jaws down below the size of MDF disk that you cut earlier. Place a MDF disk between the tailstock point and the faceplate or chuck. Use the compass center mark for the tailstock live center point. Tighten up the tailstock. Caution: use a shop vacuum to remove the MDF dust while turning; do NOT breathe the dust as it is harmful to your health.
Turn on the lathe and turn the MDF disk round. This does not have to be exact, just gets rid of the saw marks. Do this to several MDF disks at this time, saves taking the faceplate or chuck off and putting it back on to do the next one.
Next, screw the MDF adapter onto your lathe’s headstock. True up the face of the MDF where the next piece of MDF will go. This helps to ensure that the MDF is true to your headstock. You can check the face for being flat by laying the back of your tool across the MDF adapters face. Now, place the next MDF disk between the tailstock and the MDF adapter, mark the outer MDF disk with a pencil by rotating the lathe. This will be your outer glue line. Back away the tailstock and put glue on the MDF disk. Do not get excess glue on the inside where the headstock threads are. Now, place the disk back between the tailstock and MDF adapter, tighten the tailstock up, this will squeeze out some glue. If you have excessive glue squeeze out, wipe it away with a rag. Allow the glue to dry 15-20 minutes. You may then glue on your next MDF disk. When the glue has cured, drill a ½†hole through both MDF disks. Continue in this manner until you have the size of MDF vacuum drum you like. It is your call here, but, 3 to 6 inches across the outside works for 90% of projects. This uses from 6 to 8 MDF disk’s. Smaller MDF drum chucks may be used for eggs and small projects. NOTE: Leave the last MDF disk solid so the tailstock will provide support while turning the outside.
When the glue has cured 20-30 minutes, keep the tailstock up tight and shape the outside (ONLY) to your liking. At this point the glue has NOT cured completely between the MDF disks, so do not get rowdy when turning. Sand the MDF drum to 100 grit paper. Coat the entire outside with the same glue and allow it to cure over night. Next day, very lightly turn away the excess glue then sand with 100 grit and 220 grit sand paper.
Back away the tailstock, drill out the last MDF disk, and shape the inside of the MDF to form your vacuum drum chuck. Keep a 1/2â€Â- 5/8†wall thickness. Again, sand the inside to 100 grit paper, then apply glue and allow it to cure. Come back and lightly turn the inside to smooth the glue, sand to 200 grit. Remove the MDF vacuum drum chuck from the headstock.
Lay the MDF vacuum drum chuck on top of the close cell foam, mark and cut a ring about two inches larger than the MDF vacuum drum chuck. Remove the backing from the close cell foam and place the foam onto the MDF vacuum chuck. Form the outside down around the sides. You may want to make an X cut in the center of the foam then push the down into the vacuum drum chuck.
Place the vacuum drum chuck back on the headstock. Use something like black electrical tape and wrap the outside foam down, going in the opposite direction that the lathe will turn. This just helps keep the foam edges down when turning.
Large and long MDF vacuum drum chucks:
(see attached picture below, pic #2)
These vacuum drum chucks require some additional thought and safety concerns. After gluing two MDF disks on I drill and counter sink three holes evenly spaced around the MDF disk. I then screw in three (3â€Â) decking screws. Glue on two additional MDF disks and drill and place three more screws offset from the first three screws. It is wise to mark them MDF rings on the out side where the screws are located. The decking screws provide added strength to the large and long MDF vacuum drum chucks.
That is how I make the MDF vacuum drum chucks.
WARNING:
Remember the MDF is like paper glued together. NEVER stand in line of the turning and ALWAYS bring the tailstock up to provide additional support when turning the bottoms of projects down. With that said I highly recommend the Aluminum Drum Chucks from Oneway as these are truly outstanding for vacuum chucking. Start with the 3&1/2†and should you need a larger vacuum drum chuck purchase it later in your turning endeavors. Contact Oneway at 1-800-565-7288, ask for Kimberly as she really knows the business and is fun to talk with. Tell her I sent you her way. No, neither you nor I will get a cut; she just enjoys hearing whom sent you her way.
Footnote:
I do have the following items for sale along with Vacuum systems.
#1, Tolly designed tailstock adapters which enhance vacuum chucking.
#2, Center finders for centering faceplates and chucks to the wood.
#3, Tailstock extensions that enable one to get in closer to the project or extend inside a project for added safety while turning.
In closing, My hope is that I can help you make a step up in your turning and as always if you have any questions please Email or call me.
Johnny W. Tolly
16212 Crystal Hills Dr.
Austin TX 78737
Ph 512-858-4471 Home
512-922-1241 Cell
Email johntolly@austin.rr.com
Attachments
Last edited: