• We just finished moving the forums to a new hosting server. It looks like everything is functioning correctly but if you find a problem please report it in the Forum Technical Support Forum (click here) or email us at forum_moderator AT aawforum.org. Thanks!
  • Beware of Counterfeit Woodturning Tools (click here for details)
  • Johnathan Silwones is starting a new AAW chapter, Southern Alleghenies Woodturners, in Johnstown, PA. (click here for details)
  • Congratulations to Dave Roberts for "2 Hats" being selected as Turning of the Week for April 22, 2024 (click here for details)
  • Welcome new registering member. Your username must be your real First and Last name (for example: John Doe). "Screen names" and "handles" are not allowed and your registration will be deleted if you don't use your real name. Also, do not use all caps nor all lower case.

Sap

Joined
Mar 17, 2013
Messages
485
Likes
3
Location
Roseland, LA
Not me, or at least not me that I am talking about. I am reading back through old threads and searching when I can but I can't search on just sap effectively.

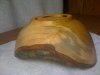
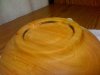
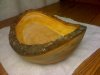
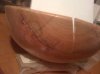
I have some green turned blanks drying and turning a few more but I occasionally try to finish turn one of the dripping wet cherry bowls. A couple of issues, one is that the sap comes out of the end grain and leaves big blackish blotches, especially when sanding although sometimes prior to sanding. Another issue is general blotchiness in the finish.

Just using boiled linseed oil for a finish right now, fixing to go to the BLO, shellac, and denatured alcohol or one of the other three part home brews but I welcome other suggestions. I am applying wax over the finish on some bowls but the blotchiness is there no matter if I wax or not. This isn't talking about the sap issue, just general color variation that shouldn't be there.

How do I deal with the current problem? Sanding sealer? Which one and when to apply? Something else?

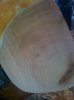
Sand paper is loading up badly but I do keep moving around on the piece of sand paper and clean it often. I am trying to sand very lightly and let the grit do the work, I had been sanding harder partially trying to build up heat which seems counterproductive with the sap. Moving through grits, 60, 100, 120(RO), 150, 200, 300 or 400 mostly on lathe. Cutting corners on some of these bowls that aren't keepers and not trying to get all the sanding marks out but either way I have the sap issue. I have tried washing it off with various things, tried bleach today. No real joy.

Please advise, I seem to be struggling in every area of green wood turning although the turning itself is going better all the time.

Hu
 

Bill Boehme

Administrator
Staff member
Beta Tester
TOTW Team
Joined
Jan 27, 2005
Messages
12,898
Likes
5,188
Location
Dalworthington Gardens, TX
Website
pbase.com
I have never turned green cherry so I am not familiar with its peculiar characteristics. I have turned other very wet wood and have not experienced any problems of that sort although I have received a good bath while turning freshly cut green pieces. I have worked with some kiln dried cherry lumber and it is a pain to cut without getting burns along the saw kerf.

You could try using mineral spirits to clean off any bad sap deposits.

It sounds like you might be applying the linseed oil too soon before the wood is dry. Also, I am not sure that linseed oil would ever be a good finish for cherry. Shellac is a good sealer for wood that likes to bleed, but wait several weeks (or months) for the wood to dry first.

As far as sanding is concerned, you should do that BEFORE applying an oil finish and not while it is drying or even after it has dried. My opinion is that is a good way to "ugly-fy" an otherwise nice piece of wood. And, yes, I realize that there are those who love that sort of finishing technique because the claim is that it "fill the pores". My opinion is that it makes the wood look drab.

Also, hand sand OFF the lathe for the best results. It is more work and takes longer, but the results are worth the extra effort.

I know some woodturners have their favorite "witches brew" finishes and some of those mixtures might be OK, but mixing two incompatible finishes such as linseed oil and shellac seems like a bad idea to me. When I was a newbie, I also tried some of that slop on some of my not-so-good creations. My suggestion is to stick with just one kind of finish for a project.
 
Last edited:
Joined
May 16, 2005
Messages
3,540
Likes
15
Do you have compressed air available? If I'm doing a warp and go type bowl rather than drying for re-turn, I like to shoot through the endgrain from the inside to kick out excess moisture. Makes sanding a bit easier without loading the paper so fast, and takes a couple-three days off of your time to dry for final sand.

I don't sand wet wood finer than 120/150 - waste of time, because variations in surface shrink are going to set up the fuzz you're pushing around anyway. As the wood dries, it'll show gray against a pink background. So, if I sand, I like my stearated paper, keep a file card close at hand to kick off any build-up, and do the minimum. Once it's fully cured - week or two at 1/4-3/8, I finish sand and apply my finish.

BLO and cherry are made for each other. The oil has color, develops more, just like the wood. I thin 50/50, soak to refusal, then wipe the surface after ten minutes. Don't wipe, you get into gooey situations. Let the oil cure and apply the finish of your choice. Shellac is good for "lookers" which won't be used, lacquer or oil finishes can be applied to whatever depth of glow you want, too. I don't use water-based.

You're not using SiC wet/dry are you? The black will work its way into open pores and stay there. Ugly.
 

hockenbery

Forum MVP
Beta Tester
TOTW Team
Joined
Apr 27, 2004
Messages
8,638
Likes
4,978
Location
Lakeland, Florida
Website
www.hockenberywoodturning.com
Like Bill said hand sand off the lathe. A 3/8 thick wall is ready to sand in 2 days.
In the long run this is faster than trying to sand wet wood on the lathe.
I use the 3" Velcro disc in an angle drill and try to keep the sanding marks going with the growth ring lines.

The blotchiness could be from torn grain.
If you are not getting a clean cut from the gouge the endgrain will have torn fibers which soak up finish differently and reflect light differently.
Pay special attention to the end grain while turning. Use a pair of magnifiers . If you have a torn surface you can't fix it by sanding as you will have to sand away too much wood. A sanding sealer can help if the tear out,is minimal. I use a 1 pound cut of shellac the blindest I can get. This can also be applied before the last finish cut on problem woods and it will stiffen the fibers and let them be cut more cleanly

Sanding wet wood clogs the sandpaper and the fibers don't cut from the paper the lay over.
Abranet does a reasonable job on wet wood.

The secret is getting a good tool finish. I shear scrape hollowforms and the outsides of bowls so that sanding off the lathe is usually 220 and 320
I rarely scrape the insides of bowls just go with the shear cut from the Ellsworth gouge. I usually need 180 in some spot then the 220 320.
I sharpen my gouge before taking the finish cut to get the best surface I can.

Have funal
 
Last edited:
Joined
Mar 17, 2013
Messages
485
Likes
3
Location
Roseland, LA
Cracks

I had tried wet or dry sandpaper very early, found out fast that was a bad idea! I am using "standard" sandpaper now but I really need to look at it. Some was from harbor fright when I was there and may not be stearated. Some from Lowe's, still need to double check.

Reading back on the forum I saw someone else comment on the black sap from wet cherry, may be just the nature of the beast. I do have compressed air, seventy miles away as usual. I'll need to bring my thirty gallon compressor over here, things are getting crowded!

I was getting forced into sealing or putting something around cracks that tend to run through this cherry so that I could glue the cracks with CA as I found them. Thoughts on preventing the CA stains without creating other issues?

I am generally sanding before applying any finish if I can. Applied BLO once and then tried to sand, what a mess! Now if I have to prevent CA stain I am just applying a little spot of linseed oil. Would just mineral oil work? Something else? I am using the BLO straight from the can then wiping off as much as I am able to. When talking about cutting it 50/50 is that with mineral oil?

Looks like my complaints about blotchiness are unjustified. It lasts for hours, maybe a day or more but the pieces I finished a week or so ago look fine, a little darker on the end grain. I do have a little issue with the muddiness from sanding in one place looking at an old piece. Tried to remove it without much luck before finishing and hoped the finish would soak in and match color. Looks like crap to me looking at it a week or so later. Once that happens is there a way to remove it before finishing or is the only cure prevention to begin with?

I may be suffering from information overload, reading and watching too much and getting confused. I thought protocol was to turn, sand, and finish the outside before starting the inside of a bowl to try to reduce movement, including on the green wood. I also like burnishing wood with another piece of wood but it seems that this is to be avoided when people talk negatively about the bevel burnishing the wood.

Seems like the goal is to cut fairly aggressively inside and out to prevent issues. Of course beginners don't cut nearly as fast as experienced turners so lack of speed might be part of my issue. If I didn't spin the bowl as long turning I would probably have less sap issues.

Thanks to all. Again you are all a tremendous help!

Hu
 
Joined
Aug 14, 2009
Messages
2,054
Likes
1,145
Location
Peoria, Illinois
I've never seen sap come from wet cherry. Black pitch pockets inside the wood, but nothing to do with it being wet or dry. Pictures would sure help. Maybe mold starting? I suggest that you not use Harbor Freight as an abrasive supplier. I haven't used it, but suspect it's about the cheapest and worst stuff out there. If you want to sand the wood while it is still pretty wet, look in Abranet. It's like sanding screen, and can be washed out in water if you clog it up. It may be slightly more expensive than Harbor Freight abrasives! LOL!
 
Last edited:

hockenbery

Forum MVP
Beta Tester
TOTW Team
Joined
Apr 27, 2004
Messages
8,638
Likes
4,978
Location
Lakeland, Florida
Website
www.hockenberywoodturning.com
Seems like the goal is to cut fairly aggressively inside and out to prevent issues. Of course beginners don't cut nearly as fast as experienced turners so lack of speed might be part of my issue. If I didn't spin the bowl as long turning I would probably have less sap issues.
Hu

The goal is to let the tools work efficiently at the task they are performing.

As you approach a finished surface fineness is much more the focus. Aggressive cut will tear the fibers.

Think in terms of making big shaving to shape the form. Gradually Smaller shaving for the last 1/4 inch of surface removal.
Last 1/4 inches should be 1/8", 1/16, 1/32, 1/64 shavings taken sequence.
Then shear scraping on the outside with even finer shavings.

With experience the tools will work faster. Concentrate on getting a good surface from the tools

Have fun,
Al
 
Last edited:
Joined
May 16, 2005
Messages
3,540
Likes
15
Nothing the matter with a preliminary sand prior to removing the center of a bowl you're not going to dry and re-turn, just don't go crazy. There may be places with torn grain or compressed areas where you dragged the bevel which will definitely not benefit by being damp when you sand. Compressed areas will rise a bit as they take moisture from interior and either side, torn areas will stiffen enough so you can cut them off with your abrasive rather than laying them over.

You can be as aggressive as you want when removing wood, as long as what you're leaving behind is the surface you want. Imagine as time goes by you'll find yourself leaving hog mode, which is great for shaping, and going into finish mode as you sneak up to final contour. More important than any numbers (thickness or width?) is to make those final passes with your best edge, presented correctly. If your $150 super alloy cryogenic famous-name-turner endorsed gouge doesn't have a fresh edge, it'll cut no better than the harbor Freight analog. I go to a broad sweep gouge because it leaves no ridging, and can produce an excellent surface. It's also impossible to catch when used horizontally. Lots of people complain about that final pass messing things up. I assume they are not using the same tools I do. I still have my old carbon steel originals if I don't want the sharpness angle on my M2 versions.

That business of "as it wishes to be cut" is absolutely true. If you can take a 1/2" wide 1/8" thick shaving with almost no tug, you'll find what's left behind will shine better than most people's shear scrape.
 

Bill Boehme

Administrator
Staff member
Beta Tester
TOTW Team
Joined
Jan 27, 2005
Messages
12,898
Likes
5,188
Location
Dalworthington Gardens, TX
Website
pbase.com
.... If your $150 super alloy cryogenic famous-name-turner endorsed gouge doesn't have a fresh edge ....

You forgot to include mention of any of the FNTWWAK¹ hollow elastomer embedded shot-filled boron fiber reinforced carbon composite handle with Silastic® polymer hand-grips and power-lock tool holders.


¹ FNTWWAK = famous name turners who we all know
 
Joined
Mar 17, 2013
Messages
485
Likes
3
Location
Roseland, LA
Pictures and aggressive cutting

I've never seen sap come from wet cherry. Black pitch pockets inside the wood, but nothing to do with it being wet or dry. Pictures would sure help. Maybe mold starting? I suggest that you not use Harbor Freight as an abrasive supplier. I haven't used it, but suspect it's about the cheapest and worst stuff out there. If you want to sand the wood while it is still pretty wet, look in Abranet. It's like sanding screen, and can be washed out in water if you clog it up. It may be slightly more expensive than Harbor Freight abrasives! LOL!


Richard,

Lost my DSLR with other stuff in Hurricane Isaac and am photographing with a cell phone with no flash and no settings so quality is suspect at best. No real photo editing software on this computer either, or none I know how to use. I think the dark gray shows adequately even after I tried bleaching on this work in progress. Note where the jaws on the chuck grabbed in the recess, dark black there.

I think this definitely is sap. No issues at first and then it seems to bloom and grow in the end wood area. An old post I saw yesterday had an image of a cherry log stored horizontal and the bottom area of the sap wood had similar markings on the end, blamed on sap and gravity.

A note to everyone: "Aggressively" probably wasn't the best way to describe what I was trying to say. I'm not trying to force the tool through the wood when cutting aggressively but I may be guilty of playing around too much practicing finish cuts and such while turning rather than trying to do the project in the most efficient manner possible. With metal cutting equipment, my main frame of reference, there is an optimum feed and bite. Take less and you are dulling a tool for no reason or even hardening some of the material you are trying to cut making things harder sometimes. Take too much and you are headed for a trainwreck or other issues. Cutting at the right feed and speed and everything feels and works great. When I said "aggressively" I actually meant at this optimum rate rather than the ones I am often using.

Habit from diesel engines and metalworking machines I tend to let my machine run if I am just stepping away for a couple minutes or less too, didn't consider I might be spinning the sap to the surface helping create the mess.

Harbor fright sandpaper was an impulse buy. I don't usually use junk abrasives, learned better in body shops. I will look into the open cut stuff mentioned, sounds sorta like the stuff I have used to sand drywall.

As always many thanks to everyone. Besides answering my main questions I learn a lot of little details from all these great posts.

Hu
 

Attachments

  • aawsap 001.jpg
    aawsap 001.jpg
    161 KB · Views: 48
  • aawsap 003.jpg
    aawsap 003.jpg
    160.2 KB · Views: 47
  • aawsap 004.jpg
    aawsap 004.jpg
    183.3 KB · Views: 47
  • aawsap 005.jpg
    aawsap 005.jpg
    166.9 KB · Views: 42

Bill Boehme

Administrator
Staff member
Beta Tester
TOTW Team
Joined
Jan 27, 2005
Messages
12,898
Likes
5,188
Location
Dalworthington Gardens, TX
Website
pbase.com
Tannins in the wood will react with steel to form blue-black precipitates which is probably what you see where the chuck jaws made contact with the wood.

The other gray stuff looks more like a mixture of sandpaper abrasive dust particles and wood dust. Was there any pitting or pecking of the end grain fibers? The iPhone image may be deceiving, but it appears that there are visible sanding scratches. Whether that is relevant to the problem, I can't say, but it could be an indicator of heavy sanding.
 
Joined
May 16, 2005
Messages
3,540
Likes
15
Few thousand words there. Your suspicions that the sapwood was spoiling on you producing the gray are correct. Confirmation here fresh from the woodpile four months old. http://i35.photobucket.com/albums/d160/GoodOnesGone/Gravity-2.jpg

Looks like your stuff is a bit dryer than the cherry that corroded the jaws here. http://i35.photobucket.com/albums/d160/GoodOnesGone/Chuck-marks.jpg The old standby of lemon juice will clear 'em.

Keep on working the gouge nose and you won't get those big digs around the inside rim. Once again, wide helps me with the problem of grabs and grooves. http://i35.photobucket.com/albums/d160/GoodOnesGone/Transition-Cut.jpg
 
Joined
Mar 17, 2013
Messages
485
Likes
3
Location
Roseland, LA
Good Points!

Tannins in the wood will react with steel to form blue-black precipitates which is probably what you see where the chuck jaws made contact with the wood.

The other gray stuff looks more like a mixture of sandpaper abrasive dust particles and wood dust. Was there any pitting or pecking of the end grain fibers? The iPhone image may be deceiving, but it appears that there are visible sanding scratches. Whether that is relevant to the problem, I can't say, but it could be an indicator of heavy sanding.


Bill,

Great point about the tannins, I only think about that issue with oak. That would indeed explain the heavy black marking. Should be some way to take advantage of that trait in the future, filing that info away.

I once knew what pecking was, drawing a blank at the moment at the end of a long day. Everything is a slick as the proverbial baby's bottom outside now, seems like there was about a silver dollar area of fuzzies in one spot. I stopped unexpectedly when roughing the inside so that is some heavy gouge marks below the wings, a little rough finish on the wings but no catches either place. What looks like might be catches is a ridge one place, discoloration another. There is a slight catch mark left near the middle bottom from an earlier pass, only place I can find anything other than rough turning. No sanding at all inside.

I was trying to rush things with it getting late, decided that was foolish and it was too dark to see to sharpen my gouge well so I shut down when I had planned to just resharpen and continue. The grain lines run roughly around in line with the edges of the bowl adding to the illusion of a rougher piece than it actually is. A big chunk of bark looks ready to fly off too. It is actually solid with a few flakes broken off of the edge. Low quality photo's and I did reduce them to 800x600 making these photo's of little value except to show the stain I am fighting.

While dust and debris might be a factor I don't think they are a major factor. I clean my sandpaper very often and too the gray often shows before sanding even starts. Also it is exclusive to end grain even when there are knots and other flaws that would be expected to catch dust and debris.

Thank you for your assistance. Your posts are always informative and bring out things I haven't considered. A huge help!


Few thousand words there. Your suspicions that the sapwood was spoiling on you producing the gray are correct. Confirmation here fresh from the woodpile four months old. http://i35.photobucket.com/albums/d160/GoodOnesGone/Gravity-2.jpg

Looks like your stuff is a bit dryer than the cherry that corroded the jaws here. http://i35.photobucket.com/albums/d160/GoodOnesGone/Chuck-marks.jpg The old standby of lemon juice will clear 'em.

Keep on working the gouge nose and you won't get those big digs around the inside rim. Once again, wide helps me with the problem of grabs and grooves. http://i35.photobucket.com/albums/d160/GoodOnesGone/Transition-Cut.jpg


Michael,

I do live in the very deep south, pretty hot and humid. I was turning another piece earlier and watching, seems some sap may be spoiled and some not. Large areas of the wood got wet but only smaller areas of that particular piece turned gray/black. The end of that log does look to have exactly the same issue as my wood. Always think of our buddies at Microsoft when I say things like this but maybe I can call it a feature! Gonna see what lemon juice does soon if not tomorrow.

The inside of the bowl is rough as a cob. My gouge was dull and dirty with sap and small flecks of wood. When I stopped to clean and sharpen I decided it was too dark to continue and shut down for the day. The part with an interrupted cut isn't that bad seeing the bowl itself and running a hand over it, the bottom and area below the lowest part of the rim are pretty rough with the bottom being very rough. Shouldn't ever be that rough, I can't remember why it is at the moment. Maybe just tired and getting sloppy. It was time to call it a day for a lot of reasons.

Putting together a half decent sharpening system is a plan for the next week or two. Then I will sweep back the wings on one gouge and rework the bevel. Probably an Ellsworth or maybe a three bevel grind. (Irish or Michelson?)Still working with very steep wings right now, A little convex but no real sweep back to them. A little improvement here and there but I still have a long ways to go. Actually I have came miles with the help of the posters here on AAW, just still have long miles to go too.

Thank you for your input and the images. You are always a big help with your posts and the time and effort you put into them is very much appreciated!

Hu
 
Joined
Aug 14, 2007
Messages
5,488
Likes
2,838
Location
Eugene, OR
Any wet wood and steel jaws will leave black 'oxidation' marks. With oak, which does have a lot of tanin, it will leave a lot more black, and the lemon juice will remove it in 60 seconds or so if the wood is still wet, and an hour or so if the wood has dried.

The grey coloration looks like the wood is deteriorating. Just starting to rot, so not spaulting yet, but starting to turn to compost.

For abrasives, I prefer Vince's WoodNWonders, his blue discs. Power sanding with an angle drill is most effective, and he will have a DVD out on sanding in a month or two, and I will be getting it for sure.

robo hippy
 
Joined
Mar 17, 2013
Messages
485
Likes
3
Location
Roseland, LA
I think I will be a buyer too

Any wet wood and steel jaws will leave black 'oxidation' marks. With oak, which does have a lot of tanin, it will leave a lot more black, and the lemon juice will remove it in 60 seconds or so if the wood is still wet, and an hour or so if the wood has dried.

The grey coloration looks like the wood is deteriorating. Just starting to rot, so not spaulting yet, but starting to turn to compost.

For abrasives, I prefer Vince's WoodNWonders, his blue discs. Power sanding with an angle drill is most effective, and he will have a DVD out on sanding in a month or two, and I will be getting it for sure.

robo hippy


Seems funny to say I'll be buying a DVD on sanding after putting in many hundreds of hours sanding auto bodies but wood is a different beast. I think I need the video too.

No rot to this wood itself. It was a healthy green tree less than a month ago. My nephew clears a little more woods to add area to his yard now and then only keeping the nice trees and some long forgotten storm or hurricane had this one laying over thirty degrees or more so it got whacked. Very obvious when I first cut up a log section with the chainsaw too, very nice fresh wood. Absolutely no sign of discoloration when I cut it with a chainsaw maybe a week or so ago at max.

Makes it tough to judge when all I can provide others to look at are low quality images but there is no sign of gray until I start turning. Spin the wood for awhile and the gray appears. When I think about it the gray appears or grows larger on the outside while I am hollowing the inside.

I'm going to try taking pictures as I whittle on a piece today if I can get enough light. Not sure I can even cut, rainy and nasty seems to be the norm around here lately and I am working under an open patio.

Thanks for the info on sandpaper and the DVD. I'll give the paper a try and almost certainly the DVD too. Got to get my ducks in a row with the entire process branch to bowl.

Your posts also are tremendously helpful. The information available on this forum is amazing.

Hu
 

Bill Boehme

Administrator
Staff member
Beta Tester
TOTW Team
Joined
Jan 27, 2005
Messages
12,898
Likes
5,188
Location
Dalworthington Gardens, TX
Website
pbase.com
... No rot to this wood itself. It was a healthy green tree less than a month ago. My nephew clears a little more woods to add area to his yard now and then only keeping the nice trees and some long forgotten storm or hurricane had this one laying over thirty degrees or more so it got whacked. Very obvious when I first cut up a log section with the chainsaw too, very nice fresh wood. Absolutely no sign of discoloration when I cut it with a chainsaw maybe a week or so ago at max.

So the tree was leaning you say ... for a very long time? Many years? Is this the same tree where you had some problems with cracking as the turnings dried? If yes to all of the above, then what you might have is some reaction wood -- wood that has built in stresses that are in equilibrium -- until you begin removing some of the wood. Then it is no longer in equilibrium until it moves a bit to get things back in equilibrium. If it needs to move a lot then it stands a good chance of cracking. It is not too different from a metal casting that has internal stresses from non-uniform cooling.

Despite the fact that the tree was alive and growing, it can still have the beginning of some decay going on. Wood changes color as it dries out and a bad area may not have been as obvious when it was sopping wet. Not saying that this was the situation here, but it is something that can happen.

... Makes it tough to judge when all I can provide others to look at are low quality images but there is no sign of gray until I start turning. Spin the wood for awhile and the gray appears. When I think about it the gray appears or grows larger on the outside while I am hollowing the inside.

OK, the wood is spinning and it changes color. Spinning the wood does speed up the drying process. Just something to think about. Wood that is in the process of starting to go south does not mean that it is bad -- just a bit different. I occasionally run across wood like that and it wasn't sap in the situations that I encountered. It was probably some fungus having lignin for lunch.

... I'm going to try taking pictures as I whittle on a piece today if I can get enough light. Not sure I can even cut, rainy and nasty seems to be the norm around here lately and I am working under an open patio.

Sounds like a good plan -- not the rain part -- the picture taking part.

... Thanks for the info on sandpaper and the DVD. I'll give the paper a try and almost certainly the DVD too. Got to get my ducks in a row with the entire process branch to bowl.

Nobody in woodturning ever stops learning -- if they're smart.
 

hockenbery

Forum MVP
Beta Tester
TOTW Team
Joined
Apr 27, 2004
Messages
8,638
Likes
4,978
Location
Lakeland, Florida
Website
www.hockenberywoodturning.com
No rot to this wood itself. It was a healthy green tree less than a month ago. My nephew clears a little more woods to add area to his yard now and then only keeping the nice trees and some long forgotten storm or hurricane had this one laying over thirty degrees or more so it got whacked. Very obvious when I first cut up a log section with the chainsaw too, very nice fresh wood. Absolutely no sign of discoloration when I cut it with a chainsaw maybe a week or so ago at max.

Makes it tough to judge when all I can provide others to look at are low quality images but there is no sign of gray until I start turning. Spin the wood for awhile and the gray appears. When I think about it the gray appears or grows larger on the outside while I am hollowing the inside.
Hu

Hu,
I misunderstood your post earlier.

Sap wood will begin to discolor within a few days sometimes and certainly within a few weeks.
I try to turn wood within a few days after it is cut. Not always possible.
Removing the bark will keep the sapwood a bit longer.
Freezing it keeps it for a long long time maybe years. Have to wrap it in thick plastic bags or the defrosting will freezdry the wood and make it crack

wood bleach
will usually take out these stains or at least make them less noticeable. I use the kleanstrip 2 part bleach. For some reason it is no longer available in pint bottles perfect for woodturners. It seems to be available in only gallons.
Good news is the recent AAW journal had a do it yourself bleach mix.
It is a trick to paint on the bleach only on the sapwood and keep gravity working for you

There is a fair amount of pigment carried in the wood water. So as you cut the inside you have opened the end of a straw so to speak and the water in that short straw can now flow to outside and carry some pigment with it. Hollow turners see this more than bowl turners.
I suspect your cherry wood has little fungi in the free water and they just concentrate when the bowl spins. So you can watch the stain grow as you turn.
Sometimes in walnut, the heartwood water will stain the sapwood, bleach takes this out nicely.

The fresh cut cherry will not usually stain like that.

Al
 
Last edited:
Joined
Mar 17, 2013
Messages
485
Likes
3
Location
Roseland, LA
So the tree was leaning you say ... for a very long time? Many years? Is this the same tree where you had some problems with cracking as the turnings dried? If yes to all of the above, then what you might have is some reaction wood -- wood that has built in stresses that are in equilibrium -- until you begin removing some of the wood. Then it is no longer in equilibrium until it moves a bit to get things back in equilibrium. If it needs to move a lot then it stands a good chance of cracking. It is not too different from a metal casting that has internal stresses from non-uniform cooling.

Despite the fact that the tree was alive and growing, it can still have the beginning of some decay going on. Wood changes color as it dries out and a bad area may not have been as obvious when it was sopping wet. Not saying that this was the situation here, but it is something that can happen.


OK, the wood is spinning and it changes color. Spinning the wood does speed up the drying process. Just something to think about. Wood that is in the process of starting to go south does not mean that it is bad -- just a bit different. I occasionally run across wood like that and it wasn't sap in the situations that I encountered. It was probably some fungus having lignin for lunch.


Sounds like a good plan -- not the rain part -- the picture taking part.


Nobody in woodturning ever stops learning -- if they're smart.


Bill,

First, about reaction wood, I feel like a dummy again! This tree has been lain over long enough to stabilize almost certainly so I am likely to be dealing with reaction wood despite working with a long straight trunk. Should have thought of that myself and glossed over the fact the tree has been leaning for some time.

Turning went pretty well today until the bowl was finished. Went to put a final polish on the rim and hung the gouge. Broke a big chunk out of a pretty nice looking bowl. The pith on both sides was very close to the top so I had little long term hope for the bowl but definitely annoying to think I had finished a nice one and then trash it in the last few seconds of turning.

Another bowl that just had a couple of catches in it now has a huge crack top to bottom of one side, more of the cherry. Seems like it is going to be nothing but practice wood. I think a few pieces have survived so far but I haven't been drying them properly after finishing.

The blackish areas are sometimes wet when I first notice them, almost always now that I am watching for them and catching them pretty early. I also get some medium orange colored wet areas on the same wood much of the time.

Tried to take the pictures outdoors in the rain and they are worse than usual, no value apparently. After hairlipping this bowl I was still in the mood to turn so looked in my bag of stuff I should be letting age for something to play with. Found some much larger black areas on some wood, doesn't really look like the original splotches but grew from them, I think no question that there is an organism at play. I suspect the usual smorgasbord of things down here in Louisiana. I still think sap spoiling is one issue. May be trying to ferment if there is enough sugar involved. Besides any possible sap issues I definitely have something black and growing that looks far blacker and fuzzier for lack of a better word than the black splotches did. Other wood in the same bag currently unaffected though.

I have cut down something in the low dozens of pretty large trees and cut them up with chainsaws, enough gum to last me a lifetime of turning had I not burned it among other things. Most of those big mature trees have some decay. no signs of that sawing or working this stuff. Definitely could be wrong but I believe if there is any decay of the wood itself it is just what has started in the last month. Pretty wood that comes off the saw in long wet shavings maybe three inches long. This doesn't really matter other than trying to chase the source of the black blotches. No old decay showing in the tree, no fungus, little moss.

I went on and attached pictures, unsized. The fourth one is the only one that shows a little of the blotchiness. Others show early in the rough shaping and then as the moisture starts to come out of the bowl. The last image is of a bowl that had big cracks in it that I repaired before I started hollowing. Too much stress sitting on the shelf, it split wide open.

There is a dark line between the heart wood and sap wood in this cherry, close to the same color as the blotches but I assume no connection, just thought I should mention it.

Thanks for the continued help. Hopefully better pictures to come when the sun shines.


Hu,
I misunderstood your post earlier.

Sap wood will begin to discolor within a few days sometimes and certainly within a few weeks.
I try to turn wood within a few days after it is cut. Not always possible.
Removing the bark will keep the sapwood a bit longer.
Freezing it keeps it for a long long time maybe years. Have to wrap it in thick plastic bags or the defrosting will freezdry the wood and make it crack

wood bleach
will usually take out these stains or at least make them less noticeable. I use the kleanstrip 2 part bleach. For some reason it is no longer available in pint bottles perfect for woodturners. It seems to be available in only gallons.
Good news is the recent AAW journal had a do it yourself bleach mix.
It is a trick to paint on the bleach only on the sapwood and keep gravity working for you

There is a fair amount of pigment carried in the wood water. So as you cut the inside you have opened the end of a straw so to speak and the water in that short straw can now flow to outside and carry some pigment with it. Hollow turners see this more than bowl turners.
I suspect your cherry wood has little fungi in the free water and they just concentrate when the bowl spins. So you can watch the stain grow as you turn.
Sometimes in walnut, the heartwood water will stain the sapwood, bleach takes this out nicely.

The fresh cut cherry will not usually stain like that.

Al


Al,

A lot of good information in your post but I highlighted the part in red because it would exactly match the physical evidence I am seeing. Black fungi could indeed become in suspension in the sap and "bloom" to the surface. Then when I leave the bowl in a bag full of very wet shavings in a warm dark place for most of a week, the fungi thinks it is time to have a field day growing on the surface and I get the black fuzzy stuff described above.

This cherry was growing in heavy enough woods that it was in much closer to a tropical environment than subtropical which the area is geographically. We aren't that far from the tropic line though and much of the weather seems very tropical and grows the same variety of plants large and small. A bit of trivia, the first Tarzan movie was shot in the south Louisiana "jungle".

Seems likely that the problem is defined. I can do a few things to minimize secondary growth but I don't see much I can do to prevent the original blotches. Maybe coat the outside of the wood with something that wouldn't allow the fungi to stick to the wood surface? I will do something to kill it before storing any more wood to hopefully prevent any secondary growth like I see on some wood. I can treat the outer surface before hollowing too. Progress being made, I think.

Thank you for your post! Very very helpful.

Hu
 

Attachments

  • reaction wood 003.jpg
    reaction wood 003.jpg
    219.4 KB · Views: 27
  • reaction wood 006.jpg
    reaction wood 006.jpg
    120.5 KB · Views: 25
  • reaction wood 008.jpg
    reaction wood 008.jpg
    138.7 KB · Views: 24
  • reaction wood 010.jpg
    reaction wood 010.jpg
    135.1 KB · Views: 26
  • reaction wood 013.jpg
    reaction wood 013.jpg
    145.9 KB · Views: 24

Bill Boehme

Administrator
Staff member
Beta Tester
TOTW Team
Joined
Jan 27, 2005
Messages
12,898
Likes
5,188
Location
Dalworthington Gardens, TX
Website
pbase.com
... Turning went pretty well today until the bowl was finished. Went to put a final polish on the rim and hung the gouge. Broke a big chunk out of a pretty nice looking bowl. The pith on both sides was very close to the top so I had little long term hope for the bowl but definitely annoying to think I had finished a nice one and then trash it in the last few seconds of turning.

Another bowl that just had a couple of catches in it now has a huge crack top to bottom of one side, more of the cherry...

Well known woodturning instructor Nick Cook from Atlanta has a tongue in cheek saying that you should never make that "one last cut" because it is always that last cut that causes problems. Always stop at the next-to-last cut.

That rim-to-bottom crack looks like a real show stopper. We've all had them and will have more of them.
 
Joined
Mar 17, 2013
Messages
485
Likes
3
Location
Roseland, LA
something is always in the last place you look too

Well known woodturning instructor Nick Cook from Atlanta has a tongue in cheek saying that you should never make that "one last cut" because it is always that last cut that causes problems. Always stop at the next-to-last cut.

That rim-to-bottom crack looks like a real show stopper. We've all had them and will have more of them.


Bill,

I hung at one of the piths wrecking the bowl today, I suspect a crack I didn't catch during one of my frequent stops for other things had the wood hanging out a little. As always, no excuse for operator error!

That last cut is indeed the one that always gets ya. You surely ain't making any more after one like I took today. Of course the saying is a lot like something is always in the last place you look. Sure it is, who goes on looking after they find something!

The rim to bottom crack happened on the shelf but that one and other bowls have warped mightily. Speaking of which, I have been thinking about reactive wood a good bit, I have a big oak limb I should be able to get when I want to. I know it isn't the best thing to turn but when I start running short of wood it all looks good! I assume that the limb wood, all things being equal not that they ever are, will tend for the ends to bow towards the top of the limb when stress relieved by turning? A year or three down the road I may play with drying and stress relieving wood in the drying process, far too much else going on trying to set up my shop and learn wood turning to worry about things I don't have to right now.

Making a list of toys "I need". Champagne tastes but I don't think this beer pocketbook is going too far.:rolleyes:

Hu
 
Joined
Apr 5, 2012
Messages
160
Likes
0
Location
Mosgiel New Zealand
I think the stain marks showing on the foot are from a reaction betwen the sap and the steel of the jaws cheery is bad for that when wet.You should allso wipe down your lathe bed i use wd40 to stop it from rusting as well.If you want a realy good looking finish wet rough turn wax seal and let it dry then finish it will look 10 times better and any one handling it will go wow that is nice and that is what sells it for you as well .dry cheery dosnt leave black stains. the marks on the side of i think it was the first photo looks like sap stain this happens somtimes when a log is left laying in the eliments and gets lots of rain wet it dosnt come out you didnt cause it. just my thoughts from the lots of cheery i have turned lately happy turning just be patient .

Cheers Ian
 
Joined
Mar 17, 2013
Messages
485
Likes
3
Location
Roseland, LA
Thank You and a Few More Details Please

I think the stain marks showing on the foot are from a reaction betwen the sap and the steel of the jaws cheery is bad for that when wet.You should allso wipe down your lathe bed i use wd40 to stop it from rusting as well.If you want a realy good looking finish wet rough turn wax seal and let it dry then finish it will look 10 times better and any one handling it will go wow that is nice and that is what sells it for you as well .dry cheery dosnt leave black stains. the marks on the side of i think it was the first photo looks like sap stain this happens somtimes when a log is left laying in the eliments and gets lots of rain wet it dosnt come out you didnt cause it. just my thoughts from the lots of cheery i have turned lately happy turning just be patient .

Cheers Ian


Ian,

Thanks for the information. I'm on shaky ground though, nobody mentioned patience when I started this deal! :)

These log sections are laying in the elements, no doubt part of the issue whatever it may be.

I thought most finishes wouldn't work over wax. Please tell me exactly what wax and finish you are using. Even if the brands aren't available here I can look at the product and match types and ingredients.

I live in a very wet and humid area and WD-40 is almost worthless as a rust preventive. OK if you use it everyday, seems to cause rust if anything if something is left unattended for a few weeks or longer. I have waxed all of the bare metal on my lathe and wipe it down daily but I need to get a product called Sheath I have found to be pretty good as fairly short term rust preventive. There are several longer term preventives I have used too but they require cleaning off before you can handle the metal, not much use! Another issue with WD-40 is that it gums up over time, bad for a lot of things including guns and locks. The only things I use WD-40 for is as a cutting fluid sometimes and it does a good job of "killing" some bore cleaners I use so they don't eat up my bore brushes I clean guns with as fast. Not meaning to bash WD-40 here, just trying to give back a little for all the help I receive. Forgot, one other thing WD-40 is great for, starting fluid for diesel engines. Much easier on cylinders than ether, seems just as effective. It is Water Displacement-40 so it does displace water, just doesn't last long here in the swamp.

Thank you very much for your post. The people on this forum are doing a tremendous job smoothing the hard knocks learning procedure I usually use to learn anything. I greatly appreciate each and every post.

Hu
 
Joined
May 16, 2005
Messages
3,540
Likes
15
The rim to base crack is from a heart check, almost certainly. Cherry is very prone to heart checks, which I suppose is why it has such a reputation among some turners. This one excepted. I LOOK for heart checks when I decide how to middle the log. The ones that are more than 15-20 degrees from what will be a horizontal rim become cut lines or cut outs. Used to think I could save 'em with epoxy or CA, but it's not worth it. See and avoid. Help seeing can be a quick dry of the newly exposed endgrain, then a wet rag wipe, looking to see where things wick in. You can be fooled by a wet end, because the water will swell the check closed, so look closely at the very center of the rings where the check will be widest.

I don't see any reaction wood. That's armpit stuff associated with spreading branches, or with sweepy trees, curly wood. Can't see any in your piece. http://www.fpl.fs.fed.us/documnts/pdf2005/fpl_2005_wiedenhoeft001.pdf is a good read on what's going on with cells and growth.

Mildew is one of the things turners hate, especially when turning white woods or trying to keep the sapwood clear. No way you can cover wet wood and escape. Might be the worst thing, if my experience with maple and anchorseal is valid. What prevents mildew digging in is dry wood, so let it dry. The business of curing wet turnings is a balance between surface checks which might expand, and mildew, which might ruin the aesthetics.

Some others, all in cherry:

Left a bit too long in the log here. Some of the sapwood has begun producing heartwood extracts. http://i35.photobucket.com/albums/d160/GoodOnesGone/Cherry-Top.jpg

Skid scar took the bark away, so a radial check got started. Close examination of the blank put it out where it will do the least damage. Note the sapwood's pretty light, having dried rapidly near the check, darker deeper. http://i35.photobucket.com/albums/d160/GoodOnesGone/Cherry-Sapwood-Radial.jpg

Bark sound, bit too long in the warmth, as you can see. Also an example of reaction to sweep, as you can see the heart is off center. http://i35.photobucket.com/albums/d160/GoodOnesGone/Upside-Cherry.jpg Turn your white-wanted stuff in cherry or walnut real soon to avoid the sapwood problems. With others, like beech, leave in the log long enough to spalt the sapwood - you a half season, if you get some from highlands - for us a mere half season will do this. http://i35.photobucket.com/albums/d160/GoodOnesGone/Beech.jpg

Most of the damage I see from your tooling is from edges grabbing. You need to be using the bottom of the flute at 90 degrees to the surface. Can't hook an edge or a high pitch nose that way. Anchor the tool to the rest and swing it into the work, don't stuff it in.

As long as we're talking cherry defects, there's always brown rot. While the wood's still sorta sound, you can even have fun with that. Couple of pieces which would have ruined the look of the drawerfront made from the rest of the board. Looking at the convex bottom of the one on the left, concave face of the one on the right. http://i35.photobucket.com/albums/d160/GoodOnesGone/Continuity.jpg
 
Last edited:
Joined
Mar 17, 2013
Messages
485
Likes
3
Location
Roseland, LA
a lot to think about

Michael,

As always you give me a lot to think about! I will read the entire PDF about wood but so far I have just read the part about juvenile and reaction wood. I may be using the term incorrectly. What I have been calling reaction wood is wood that was under a load in the tree, balanced out by the forces against it and the other wood around it.

A radical example was a one by twelve cypress board that had been in a house wall for over a hundred years dating back from when the inner walls were often made of diagonal planks then covered over. The board appeared flat and straight with straight grain. I was going to turn a piece as spindle wood just to play and started ripping from one end, about a one inch square strip. By the time I had cut about a foot the one inch wide piece had twisted like a shaving and the wide piece was visibly twisting in the other direction. Maybe forty-five degree twist in the one inch section. Enormous stress in that board even after all of that time. Balanced out so that it was invisible until I started cutting the board, effectively stress relieving both sections somewhat. I thought that any wood that had these stresses locked into it was reaction wood.

Most of my catches were indeed corner hangs, others caused by getting too wide of an area of the cutting edge against the wood. My tool, I am only using one gouge and a parting tool, isn't always shaped properly. I was getting a lot of catches and on closer examination found that my cutting edge was basically three equal length flat sections with almost sharp corners between the nose and wings. Too much time on the nose during a grind or two.

A few catches were caused by contacting the wood unexpectedly too. My wood turning using hand held tooling is very much in it's infancy and errors are common although far less than they were even a few weeks ago. I haven't done any spindle turning to speak of and looking at the shelf and considering what is bagged I have probably attempted about fifteen bowls or hollow forms now. I started out with zero knowledge so a lot of those attempts were wasted effort with no hope of success. The first half-dozen more or less I had no idea of the gouge angle horizontal or vertical to use, or the proper rotational angle of the gouge. Still far from perfect but I have improved considerably in all of these areas.

Right now I am guilty of selecting and cutting wood mostly by mass, is there enough meat to turn the size and shape I want to try? Having the pith or other features poorly positioned are sometimes known problems but I am using the wood I have on hand to get in lathe hours without worrying too much if the finished product is going to last any amount of time. The logs are fairly small to saw as I would like to, cutting away the pith. Also, I am not utilizing the wood well. I should be doing a better job both of selecting how to cut the blanks and how to position them for turning. Even the last bowl, I planned a nice open bowl then realized there was more curve to the bark than I had first thought when I decided to swap top and bottom of the bowl at the last minute. That funny looking little knob on the rough turning is because I had to cut a lot off of the log to get to enough solid wood for a recess or tenon. Solid being relative, it was still in sap wood.

Your images are a big help besides your finished work being very impressive as pieces of art! One thing never lacking on AAW are goals to aspire to. I'm just starting to crawl. Flying, turning out some beautiful pieces like you and other posters do, seems a very long ways off.

I think I am going to try a dry wood pretty much featureless blank soon just so I can take my time and turn it over as many sessions as needed. The green wood warping during and between sessions does rush me a little and beginners don't need to feel rushed.

Tremendous value in all of your posts and this one was no exception. Thank you for all the time and effort you put into these posts and providing links. Very much appreciated!

Hu


The rim to base crack is from a heart check, almost certainly. Cherry is very prone to heart checks, which I suppose is why it has such a reputation among some turners. This one excepted. I LOOK for heart checks when I decide how to middle the log. The ones that are more than 15-20 degrees from what will be a horizontal rim become cut lines or cut outs. Used to think I could save 'em with epoxy or CA, but it's not worth it. See and avoid. Help seeing can be a quick dry of the newly exposed endgrain, then a wet rag wipe, looking to see where things wick in. You can be fooled by a wet end, because the water will swell the check closed, so look closely at the very center of the rings where the check will be widest.

I don't see any reaction wood. That's armpit stuff associated with spreading branches, or with sweepy trees, curly wood. Can't see any in your piece. http://www.fpl.fs.fed.us/documnts/pdf2005/fpl_2005_wiedenhoeft001.pdf is a good read on what's going on with cells and growth.

Mildew is one of the things turners hate, especially when turning white woods or trying to keep the sapwood clear. No way you can cover wet wood and escape. Might be the worst thing, if my experience with maple and anchorseal is valid. What prevents mildew digging in is dry wood, so let it dry. The business of curing wet turnings is a balance between surface checks which might expand, and mildew, which might ruin the aesthetics.

Some others, all in cherry:

Left a bit too long in the log here. Some of the sapwood has begun producing heartwood extracts. http://i35.photobucket.com/albums/d160/GoodOnesGone/Cherry-Top.jpg

Skid scar took the bark away, so a radial check got started. Close examination of the blank put it out where it will do the least damage. Note the sapwood's pretty light, having dried rapidly near the check, darker deeper. http://i35.photobucket.com/albums/d160/GoodOnesGone/Cherry-Sapwood-Radial.jpg

Bark sound, bit too long in the warmth, as you can see. Also an example of reaction to sweep, as you can see the heart is off center. http://i35.photobucket.com/albums/d160/GoodOnesGone/Upside-Cherry.jpg Turn your white-wanted stuff in cherry or walnut real soon to avoid the sapwood problems. With others, like beech, leave in the log long enough to spalt the sapwood - you a half season, if you get some from highlands - for us a mere half season will do this. http://i35.photobucket.com/albums/d160/GoodOnesGone/Beech.jpg

Most of the damage I see from your tooling is from edges grabbing. You need to be using the bottom of the flute at 90 degrees to the surface. Can't hook an edge or a high pitch nose that way. Anchor the tool to the rest and swing it into the work, don't stuff it in.

As long as we're talking cherry defects, there's always brown rot. While the wood's still sorta sound, you can even have fun with that. Couple of pieces which would have ruined the look of the drawerfront made from the rest of the board. Looking at the convex bottom of the one on the left, concave face of the one on the right. http://i35.photobucket.com/albums/d160/GoodOnesGone/Continuity.jpg
 
Joined
Aug 14, 2009
Messages
2,054
Likes
1,145
Location
Peoria, Illinois
I can't remember seeing anyone telling you that sap wood shrinks more than heart wood. If you can turn the cherry so you get rid of all the sap wood, it will warp less. I'm trying to see how much wall thickness in the bowl that cracked. I turn my work in one session, and won't leave any cherry over 1/4" thick. Heavier than that, and anything closer than 2" from the pith, and you will increase the chance of cracks greatly. Don't aim for the biggest bowl you can turn while learning. Getting a bunch of 6" or 8" bowls that are cut perfectly, is a lot better than 10" bowls with pith cracks and other problems. You'll have plenty of time to get to the 16" bowls. Start smaller!
 
Joined
Mar 17, 2013
Messages
485
Likes
3
Location
Roseland, LA
mostly five to seven inches

I can't remember seeing anyone telling you that sap wood shrinks more than heart wood. If you can turn the cherry so you get rid of all the sap wood, it will warp less. I'm trying to see how much wall thickness in the bowl that cracked. I turn my work in one session, and won't leave any cherry over 1/4" thick. Heavier than that, and anything closer than 2" from the pith, and you will increase the chance of cracks greatly. Don't aim for the biggest bowl you can turn while learning. Getting a bunch of 6" or 8" bowls that are cut perfectly, is a lot better than 10" bowls with pith cracks and other problems. You'll have plenty of time to get to the 16" bowls. Start smaller!


Richard,

Almost all of my stuff is finishing at five to seven inches, one nine inch diameter piece but it is only a couple inches tall. The piece that cracked badly is seven inches across and has a roughly 3/16" wall, maybe a bit less. I have tried some smaller stuff and decided rightly or wrongly that I could see better and was better off cutting things a little larger so I had room to get a tool in and out.

I have very little tooling and while it wasn't planned that way all of it has 5/8" diameter shafts. The only tools I am using right now are a 1/2"(5/8" diameter) bowl gouge and a fairly junk little diamond shaped cutoff tool. I have a scraper made from 1/2" cold roll or drill rod I use to fix a mess now and then but mostly avoid. I am building on a homemade grinding jig and fixture and the half inch rod will be my test material until I feel competent to grind on my bowl gouge.

I know now that some of my issues were bowl geometry and bevel related but I still feel like I am better off giving myself a little bit of working room rounding the wall to bottom transition and such. Sounds like I am actually turning in the range you are recommending anyway, the photography might be a bit deceptive.

I appreciate the tips on finish thickness and sap wood, bowl size too. Haven't turned for a few days but I hope to in a little while after playing a little with my grinding toys. If they don't work I may get sidetracked there.

Thank you a lot for your post! Like all posts it adds more to my knowledge and helps me a bunch.

Hu
 
Joined
Jun 9, 2004
Messages
1,223
Likes
49
Location
Haslett, Michigan
cherry

Couple of thoughts. Even dry cherry tend to load up sandpaper more than alot of woods.
The black in the recess I get with many wet woods. I have a large "jug" of refrigerated lime juice from the grocery store, and apply using q tips. That usually takes care of the rings.
Recently as nat edge whitish maple was drying, there was some blackish areas developing. The lime juice made a more yellow area that didn't disappear with some sanding. Rats!!!!! Gretch
 
Joined
Mar 17, 2013
Messages
485
Likes
3
Location
Roseland, LA
Thanks!

Couple of thoughts. Even dry cherry tend to load up sandpaper more than alot of woods.
The black in the recess I get with many wet woods. I have a large "jug" of refrigerated lime juice from the grocery store, and apply using q tips. That usually takes care of the rings.
Recently as nat edge whitish maple was drying, there was some blackish areas developing. The lime juice made a more yellow area that didn't disappear with some sanding. Rats!!!!! Gretch

Sorry to hear about the yellow. I think next trip to the grocery I will buy a little lemon juice and lime juice. seems like we need a little bit of everything in our arsenal to try when issues appear.

I'm finding that my issues aren't single source problems, I have to figure out the likely source of my problem of the moment to try to figure out how to deal with it.

I'm working with very wet cherry and I too find that it loads paper in a hurry, definitely one of my issues. I notice the heat and loading of the paper using the RO sander on the outside causes issues even with other woods. I think I will have to find a sander I like better for when I do power sand and have to back off on power sanding too.

Thank you for your excellent post!

Hu
 
Joined
Aug 14, 2007
Messages
5,488
Likes
2,838
Location
Eugene, OR
I think I remember reading that Cherry tends to have a high level of creosote in it. Part of the reason for it wanting to load up the paper. One of the reasons why I prefer to do the LDD (liquid dishwashing detergent, cheap brown Costco, mixed 50/50 with water, soak for 24 or so hours, rinse off and let it dry a bit before sanding). Makes the sanding a lot easier, and your paper doesn't load up. Not sure if it would work if you just wiped or sprayed it on, let it sit till dry, then tried sanding, or maybe not. Ron Kent developed it to help deal with Norfolk Island Pine.

robo hippy
 
Joined
May 16, 2005
Messages
3,540
Likes
15
I'm beginning to wonder if all the wood that tastes, smells, and looks like cherry that I've turned over the years really is. Never been difficult to dry safely as many contend, never gummed up paper, either. At least not when it was dry. Even burned a few cords of it through the years without noticing any buildup in the pipe. Beech, yes, tamarack, sure, but not the two varieties of cherry we grow up here.

I use stearated paper on wet wood. slips the goo pretty well. The glycerine that kept Marge's cuticles soft would do the same, as the Hippy proclaims. It lubes the wood rather than the paper. Cherry behaves better than sweet birch, which is a bit oily, and several orders of magnitude better than resinous conifers wet OR dry.
 
Back
Top