• We just finished moving the forums to a new hosting server. It looks like everything is functioning correctly but if you find a problem please report it in the Forum Technical Support Forum (click here) or email us at forum_moderator AT aawforum.org. Thanks!
  • Beware of Counterfeit Woodturning Tools (click here for details)
  • Johnathan Silwones is starting a new AAW chapter, Southern Alleghenies Woodturners, in Johnstown, PA. (click here for details)
  • Congratulations to Dave Roberts for "2 Hats" being selected as Turning of the Week for April 22, 2024 (click here for details)
  • Welcome new registering member. Your username must be your real First and Last name (for example: John Doe). "Screen names" and "handles" are not allowed and your registration will be deleted if you don't use your real name. Also, do not use all caps nor all lower case.

Shop Made Wolverine Jig

Joined
Nov 25, 2006
Messages
215
Likes
0
I recently copied a photo of a wooden, shop-made, wolverine type grinding jig. I'm working on a workshop for our members and would like to offer this as one of the available resources for those who like to make everything.
Capt. Eddie Castelin
The Bayou Woodturners
www.bayouwoodturners.com
 
Joined
Dec 31, 2004
Messages
66
Likes
0
Location
columbus, oh
Captain Eddie said:
I recently copied a photo of a wooden, shop-made, wolverine type grinding jig. I'm working on a workshop for our members and would like to offer this as one of the available resources for those who like to make everything.

I for one would be extreamly interested in learning more about any and all shop-made grinding jigs :) Any chance at making this availiable to others who can't make this workshop?

--eric
 
Joined
Nov 25, 2006
Messages
215
Likes
0
Thanks for the help

Woodturners,
Thanks for the help. The woodturning online site was the one.
 
Joined
May 7, 2004
Messages
315
Likes
1
Location
Lincoln Hills, CA (At the foot of the Sierra Nevad
Website
jerryhallstudio.com
Look at Darrell Feltmate's Sharpening Guide

Great site: http://www.aroundthewoods.com/

I have used Darrell's system of sharpening jigs. Easy to make. Make a 45 deg and 60 deg cradle to drill press a hole for the leg. No adjustments is GOOD. I dedicate one to each bevel and tool diameter. Have about 6 or so. Just grab the right one and go. No setup time to lose and errors to make. Use a story pole to mark the location of the slideout arm pocket relative to the wheel for each jig. This all gives me near perfect repeatability with just a couple passes across the wheel. No overheating of the tool. Little loss of metal. I added an "L" bracket to swing down on the flute to insure consistent indexing of the flute to the jig.

I have attached a picture of my variation. Here is my web page describing how and why to build one, a story board, grinder comments, and some other sharpening links: http://docs.google.com/View?docID=admp7zph558w_bcj4t5jchs7kq&revision=_latest
 

Attachments

  • Fingernail Jig 2 small.jpg
    Fingernail Jig 2 small.jpg
    42.7 KB · Views: 2,197
Last edited:
Joined
Nov 11, 2005
Messages
5
Likes
0
Location
Plainfield, IL
Looks easy enough. But, what function does the angle bracket serve?

The other thing I"ve been curious about on these shop-made jigs is how you get the length of the rod/dowel right? Trial and error?

Thanks!

Danny
 
Joined
May 7, 2004
Messages
315
Likes
1
Location
Lincoln Hills, CA (At the foot of the Sierra Nevad
Website
jerryhallstudio.com
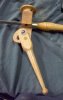
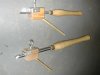
Angle Bracket on Feltmate Jig

Some of the manufactured jigs have a plate or disc that secures the gouge from the top and also orients the flute consistently with the jig (Kelton, Truegrind.) Other jigs fix the gouge from the bottom with the flute pushed up against a flat surface, also orienting the flute consistently (Ellsworth.)

The Feltmate jig uses a 1/4" or sometimes a 3/16" screw eye (ground to a rough hemisphere where it contacts the flute.) While simple and effective, this can result in the flute being tilted one way or the other in some cases, and can lead to a bias to grind one side or the other a little differently than the previous time. I press the "L" bracket down on the flute as I tighten the screw eye to insure that it is always oriented the same way, and get a very repeatable grind on the gouge wings, normally one or two passes.

The length of the leg is important, not only for the resultant grind, but also in my case to have a constant arm/pocket extension for a given bevel angle for different diameter tools (1/4, 3/8. 1/2, 5/8.) I have a jig for each, or maybe share adjacent diameters in some cases. Darrel provides a drawing for this on his web site: http://www.aroundthewoods.com/imgssharp/sharpsketch.jpg

I doubt that 1/2" one way or the other on the leg matters much. it is more important that the your jigs be consistent.

It is also important that the height of the arm pocket that receives the leg be located correctly with respect to the grinding wheel. This is also shown in the sketch. It is well worth reading Darrell's entire article and reviewing all the pictures. Again the site is:
http://www.aroundthewoods.com/sharp.shtml


Hope this helps.

Jerry
 
Last edited:
Joined
Nov 11, 2005
Messages
5
Likes
0
Location
Plainfield, IL
Thanks!

It does help a lot, Jerry. I see what you mean about the screw eye tipping the gouge slightly; hadn't thought of that.

I'll check out Darrell's webpage, it looks like good stuff to have bookmarked.

Thanks!
 
Joined
Oct 5, 2005
Messages
451
Likes
48
Location
North Georgia
If I understand this correctly, the L-bracket ensures that the gouge is held squarely in the jig.

The L-bracket contacts the gouge at the top of the flutes and ensures it doesn't tilt left or right.
 
Joined
May 7, 2004
Messages
315
Likes
1
Location
Lincoln Hills, CA (At the foot of the Sierra Nevad
Website
jerryhallstudio.com
"L" Bracket

Jim,

You described the purpose of the "L" bracket well.

I have created a page for our local woodturning club on this sharpening system with a drawing of the revised jig. It also includes a discussion of a "story board" to deal with the problem of the shrinkage of the grinding wheel as it wears and a grinder recommendation.
http://docs.google.com/View?docID=admp7zph558w_bcj4t5jchs7kq&revision=_latest

Jerry
 
Last edited:
Joined
Sep 11, 2006
Messages
3
Likes
0
Location
Tucson Arizona
Wolverine copy

I made a Wolverine 'copy' out of oak. It works fine in our dry climate here in Tucson AZ, untill the rainy season comes in July. The thing swells up and freezes in place as soon as the humidity rises. If I loosen the tolerances so it works in the rainy season it is sloppy when the humidity drops to 3% again. I just bought a real Wolverine and it's a pleasure to use after fighting the one I made.
 
Joined
May 7, 2004
Messages
315
Likes
1
Location
Lincoln Hills, CA (At the foot of the Sierra Nevad
Website
jerryhallstudio.com
"Freezing" of clamp screw

This doesn't need to be a problem.

Suggestions:
- Make sure your clearance hole is big enough and clear it of shavings with several swipes of the bit. Eg. 1/4" hole for 5/16 thread
- Wax or soap the threads
- Or use an epoxied nut or "T" nut. I have done this and the "looseness" of the screw eye in the nut works in my favor by providing flexibility for the tool to seat in the center of the flute and clamp down centered on the far side of the hole. This works so well I use only one jig sized for my largest tool.

If the threaded hole is prepared properly the shrinkage across just 1/4" is not going to be a problem. At my home in the gold country of California I vary from 6 feet of rain in the winter and very high humidity to very hot dry summers.
 
Back
Top