Follow along with the video below to see how to install our site as a web app on your home screen.
Note: This feature may not be available in some browsers.
We just finished moving the forums to a new hosting server. It looks like everything is functioning correctly but if you find a problem please report it in the Forum Technical Support Forum (click here) or email us at forum_moderator AT aawforum.org. Thanks!
Johnathan Silwones is starting a new AAW chapter, Southern Alleghenies Woodturners, in Johnstown, PA. (click here for details)
Congratulations to Dave Roberts for "2 Hats" being selected as Turning of the Week for April 22, 2024
(click here for details)
Welcome new registering member. Your username must be your real First and Last name (for example: John Doe). "Screen names" and "handles" are not allowed and your registration will be deleted if you don't use your real name. Also, do not use all caps nor all lower case.
I've turned lots. First tip.
They are often hollow. Be prepared to change your plans in the middle of the turning due to cracks and hollow spaces.
Look at the ends. One end has a sort of stem. Cut this off and you can often see the voids inside. Fill them through this hole using a thin epoxy such as West System 105 resin with 207 hardener or System 3 mirror coat. I mix a small amount of Black ink in with it to give it a smokey color.
They are odd shaped. Mount them very lightly between centers and turn a little to see how they center up. Move the centers if necessary. When you get it exactly where you want it turn a small tenon about 1/6" long on one end. Drill a hole to match this tenon in a waste block and then glue the nut to this block using the tenon and tailstock to align it. This gives you the best use of the shape.
Glue it sideways to a waste block. Saw off slices on the bandsaw. Now use a plug cutter to make little white plugs to use to decorate your work.
Take these same thin slices and cut them into a shape and then inlay them into your work similar to how pearl inlay is done on guitar backs.
Glue these thin slices to a scrap block, turn them round and then use a chatter tool to decorate them. Insert them into box lids or in my case the back of hand mirrors.
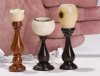
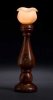
There's probably more if I think about it enough but one of the best used I've found was miniature doll house lamps. you can buy the lights at doll house supply's but it takes a little work to wire them up. They work on 12volts.
This site uses cookies to help personalise content, tailor your experience and to keep you logged in if you register.
By continuing to use this site, you are consenting to our use of cookies.