I would like to try my hand at some thin stuff like finials. I do not have a high quality chuck- HF three finger chuck. Can I use the headstock center and the live center to turn? What tool(s) do I need? Have a basic set of skews and roughing gouges. Thanks in advance.

-
Beware of Counterfeit Woodturning Tools (click here for details) -
Johnathan Silwones is starting a new AAW chapter, Southern Alleghenies Woodturners, in Johnstown, PA. (click here for details) -
Congratulations to Keven Jesequel for "Big Leaf Maple" being selected as Turning of the Week for April 15, 2024 (click here for details) -
Welcome new registering member. Your username must be your real First and Last name (for example: John Doe). "Screen names" and "handles" are not allowed and your registration will be deleted if you don't use your real name. Also, do not use all caps nor all lower case.
You are using an out of date browser. It may not display this or other websites correctly.
You should upgrade or use an alternative browser.
You should upgrade or use an alternative browser.
Turning finials
- Thread starter John Torchick
- Start date
john lucas
AAW Forum Expert
John Turning thin is difficult when you have it between centers, at least up to a point. the pressure applied by the centers causes problems. what I would do is mount it between centers. Then turn a tenon on one end that your chuck will accept. The 3 jaws aren't the best but they hold pretty good on a round tenon. Make it slightly shorter than the jaws are long.
then you can mount it between the chuck and your live center. The live center will only need enough pressure to hold it which reduces a lot of the compression that you get when you use a drive and tail center. Then it's just a matter of practice practice practice. try using as little pressure on bevel as possible. For thin finials it's all about cutting the wood the way it want's to be cut and using very sharp tools and light pressure.
these 2 videos may help you learn to use the tools better.
https://www.youtube.com/watch?v=lfZsH-Xprtg
https://www.youtube.com/watch?v=DSybPNw4F1o
- Joined
- May 16, 2005
- Messages
- 3,540
- Likes
- 15
This is a good place to use the old bodgers' trick of curling two fingers around underneath and putting your thumb on the chisel as you cut. Stabilizes well. I use it for the finials on ornaments and such. I have a good 4-jaw chuck, but I don't really find it necessary.
Before you start, like to put in a plug for riving your finial stock. Having the grain run full length will save a bunch of heartache, and you don't really need a froe for smaller diameters. Use a blunt chisel or a cheap dull hunting knife set into the end and tapped to split.
Before you start, like to put in a plug for riving your finial stock. Having the grain run full length will save a bunch of heartache, and you don't really need a froe for smaller diameters. Use a blunt chisel or a cheap dull hunting knife set into the end and tapped to split.
John,
Once you get your hardware set up, that Bradford Pear would make excellent finials. Except you've got to select pieces without the worm holes.
Once you get your hardware set up, that Bradford Pear would make excellent finials. Except you've got to select pieces without the worm holes.
john lucas
AAW Forum Expert
I find holding one end in the chuck greatly reduces the chatter at the loose end of a thin spindle. Mine are usually so thin that I have to have my fingers on the backside to keep the chatter down. I usually remove the tailstock after the roughing cuts.
I was turning Christmas ornaments all weekend as a demonstrator during a gallery open house one year. they had furnished the lathe and it had a Oneway Talon chuck with the 1" extended jaws. I was having lots of chatter at the small end of my spindles. When I went home for lunch I picked up my Vicmarc chuck with the 1" extended jaws. They are much beefier than the Oneway. I could not believe how much difference it made.
Beginners usually have trouble turning thin spindles so any help at all is a good thing.
If you Google Cindy Drozda utube you will see some very good videos on spindle and finial turning all so sharpening well worth a look she is exellent
Ian
Ian
Thanks to all. Have another reason to fire up the lathe.
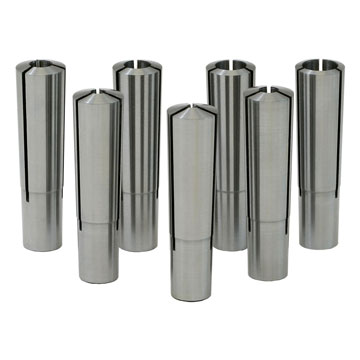
John - Here's an inexpensive way to turn a finial. Place your blank between centers and turn a tenon on one end. Place that tenon in a collet like one of these and you're off to the races.
$69 for a set of 7 (assorted sizes)
$11 for a single collet
http://littlemachineshop.com/products/product_view.php?ProductID=1752
$69 for a set of 7 (assorted sizes)
$11 for a single collet
http://littlemachineshop.com/products/product_view.php?ProductID=1752
If you are making long finials you may want to make of these .
Good luck John

You can buy waxed string, or make your own.
Col
Good luck John
You can buy waxed string, or make your own.
Col
Colonel, could you give some detail as to how it is used? Thanks. Got lots of scrap to make one.
- Joined
- May 16, 2005
- Messages
- 3,540
- Likes
- 15
This might help. http://www.hiltonhandcraft.com/Articles/String_Steady.asp
Many thanks. MM, I have plenty of scrap to make one of the string steady rests. Our local Ace Hardware has a large inventory of springs that would be useful. Another excuse to spend time in the shop and the hardware store (as if I need one).
Last edited:
That's a good tutorial. Thanks.
john lucas
AAW Forum Expert
A string steady only steadies the work already turned. It does not support the work you are turning. The better bet is to learn to steady with your fingers right behind the tool. Once you have this section turned and you move away from that area then you install the string steady to keep that end from wobbling so much. The problem is you need to be able to turn moderately long pieces without the string steady before it really does you any good on the longer pieces.
Thanks to all for your help. Things are slowing down a bit so I can spend some time on the lathe. Next thing is to learn to sharpen my tools.
You could make one of these like I did.
Wheels are from a shower rail & only 1' (25mm) diameter.


Didn't take long to make & fairly easy.
HTH
Col
Wheels are from a shower rail & only 1' (25mm) diameter.
Didn't take long to make & fairly easy.
HTH
Col
a couple of layout shortcuts
I know the locations of the anchors doesn't have to be precise but it takes seconds to lay out three, six, or four evenly spaced locations on a circle. You can then make divisions of those sections the same way four equal points are laid out if you have any need to.
First to lay out six evenly spaced points on a circle. Draw a circle with a compass or dividers. Pick any point on the circle. Without moving the setting on the dividers walk them around the circle placing alternating points on the circle. The sixth time will place the point exactly in the first hole you created. This gives six evenly spaced points on the circle, every other mark gives three evenly spaced locations.
To make four evenly spaced marks on a circle start by drawing a circle and a line passing through the center point of the circle extending past the circle dividing it in half. Open the compass or dividers to about three-quarters of the diameter of the circle or wider. This distance doesn't matter although the longer the distance the more accurate the layout is. After opening up the compass place the point on one intersection of the line and circle and strike an arc outside the circle on both sides of the circle. Do the same thing with the compass placed on the other intersection of the line and circle. A line through the intersections of the arcs will pass through the center point of the circle and divide the circle into equal quarters. drawing the line through one set of intersecting arcs and the center point will do the same thing if you are pressed for room on your layout material.
The same trick used to divide the circle into quarters can be used to redivide any angle and the method used to divide the circle into six parts is handy to divide a right angle or half circle into thirds.
Hu
You could make one of these like I did.
Wheels are from a shower rail & only 1' (25mm) diameter.
Col
Col,
That looks like a really good solution. Are those sections of T track holding the wheels? Any trouble with speed or do the wheels have little bearings in them? I'm embarrassed to be such a duffus but I need to ask--how do you get the locking part below the ways and how do you get it to lock? (I'm sure there's a more colorful Aussie equivalent for duffus
)Thanks.
Dean Center
Yes, I did use "T" track because that is what I had handy, & the rollers do have bearings, so no problems there.
The base section un-bolts & is passed up through the ways & then just bolted back together.
BTW..The Aussie equivalent is a "drongo"
HTH
Col
The base section un-bolts & is passed up through the ways & then just bolted back together.
BTW..The Aussie equivalent is a "drongo"
HTH
Col
You could make one of these like I did.
Wheels are from a shower rail & only 1' (25mm) diameter.
View attachment 6089
View attachment 6090
Didn't take long to make & fairly easy.
HTH
Col
Thanks for the pics. What is the smallest finial diameter you can turn with that setup?
- Joined
- Apr 27, 2004
- Messages
- 8,629
- Likes
- 4,970
- Location
- Lakeland, Florida
- Website
- www.hockenberywoodturning.com
John,
There are Two diameters you need to consider witH that steady.
1. spots where you position the wheels. That diameter minimum will be the closest the wheels can be without touching another wheel.
2. Every where else you can theoretically turn as thin as you and the wood are capable of.
Have fun,
Al
There are Two diameters you need to consider witH that steady.
1. spots where you position the wheels. That diameter minimum will be the closest the wheels can be without touching another wheel.
2. Every where else you can theoretically turn as thin as you and the wood are capable of.
Have fun,
Al
Right Al.
However, when turning finials it seems the steady would best serve its purpose when positioned close to the end, which tends to be the smallest diameter. Intermediate larger diameter sections often have very narrow edges, which would not give the wheels much bearing service.
I know the answer to my question can be mathematically calculated given the diameter of the wheels, but I certainly don't know the formula off the top of my head.
Thanks.
P.S.
I found some .765" ball-bearing shower rollers at lowes.com that would decrease the minimum diameter that the wheels could handle. Cheap too. $5.58 for 4.
Last edited:
- Joined
- Apr 27, 2004
- Messages
- 8,629
- Likes
- 4,970
- Location
- Lakeland, Florida
- Website
- www.hockenberywoodturning.com
John when using a steady you have to have working room to turn on one side of it.
I have turned a lot of Christmas ornament finials about 7" long.
These are held in a chuck at the headstock and turned thin to thicker with the thinnest at the in supported end.
Thickest part is about a 3/8 of an inch. I usually turn a cove right at the top down to an 1/8 inch so that the finial appears less connected tot he ornament ball.
There is just no room for a steady. So I support them with my fingers while turning.
I use two methods. Both have my thumb on the skew or gouge.
I reach around the tool rest thumb ver the top and forefinger underneath the final near where I'm cutting supporting the finial.
The other method is with my hand over the top with fore finger, middle finger, and ring finger supporting the finial.
For me it is only when turning that I have to support.
If I were turning a long finial with say a 1/2 diameter ball at the end I would need a steady because that mass would start to whip around.
I also would turn the spots way down when stopping and starting the lathe because a quick acceleration can snap the finial.
Don't know if this helps.
Al
I have tried & measure the steady & it turns ok with a 5mm (¼" ) spindle.
I originally made this steady because when finishing off a N/E 2 x ring goblet the cup section started whipping & snapped off before I could do anything about it. I was frustrated due to the amount of time I had spent on the goblet.
This steady really does work.
Col
I originally made this steady because when finishing off a N/E 2 x ring goblet the cup section started whipping & snapped off before I could do anything about it. I was frustrated due to the amount of time I had spent on the goblet.
This steady really does work.
Col