• We just finished moving the forums to a new hosting server. It looks like everything is functioning correctly but if you find a problem please report it in the Forum Technical Support Forum (click here) or email us at forum_moderator AT aawforum.org. Thanks!
  • Beware of Counterfeit Woodturning Tools (click here for details)
  • Johnathan Silwones is starting a new AAW chapter, Southern Alleghenies Woodturners, in Johnstown, PA. (click here for details)
  • Congratulations to Dave Roberts for "2 Hats" being selected as Turning of the Week for April 22, 2024 (click here for details)
  • Welcome new registering member. Your username must be your real First and Last name (for example: John Doe). "Screen names" and "handles" are not allowed and your registration will be deleted if you don't use your real name. Also, do not use all caps nor all lower case.

wet wood question

Joined
Jan 6, 2014
Messages
198
Likes
7
Location
Boulder City, NV
I have this really nice piece of crotch walnut, 3x3x7 that I want to make into a lidded box, (22% moisture content reading)
Do I still need to oversize the walls (1/4" instead of 1/8") and let dry for a while?
Or with it being such a small piece will I not have to worry about much movement when drying and can turn to finished thickness?

TIA for any help/answers
 

hockenbery

Forum MVP
Beta Tester
TOTW Team
Joined
Apr 27, 2004
Messages
8,637
Likes
4,976
Location
Lakeland, Florida
Website
www.hockenberywoodturning.com
I have this really nice piece of crotch walnut, 3x3x7 that I want to make into a lidded box, (22% moisture content reading) Do I still need to oversize the walls (1/4" instead of 1/8") and let dry for a while? Or with it being such a small piece will I not have to worry about much movement when drying and can turn to finished thickness? TIA for any help/answers

I would leave the wall 3/8" thick The warp of the crotch can be quite a bit.
It is also quite different for an end grain piece and a face grain piece.
The crotch flame figure or feather figure is often quite thin 1/2" to 1" thick in most woods.
I have seen older trees where it was over 4" thick in a piece slabbed on one side of the pith.
Pieces turned from crotches warp irregularly when compared to straight grained pieces

Typical boxes are turned endgrain. Difficult to show the flame grain of the crotch in an end grain turning well.

Al
 
Last edited:
Joined
Jan 6, 2014
Messages
198
Likes
7
Location
Boulder City, NV
Thanks for the reply Al :)
this is an end grain piece, but with your comments will over size it and let it dry, then re-turn it afterwards.
Was hoping this was small enough piece that it'd act like my Mesquite and "dry" as I turn it ;)

along the same lines .......
I just read somewhere yesterday, that if you soak a turned piece in Denatured Alcohol for 24 hours,
wipe it dry, then wrap in brown paper or newspaper, that it'd dry for final turning in a matter of a couple days.
Know anything, or have any thoughts on this process?
I keep my "shop" environmentally stable ........... constant 75-80 degrees and 12% maximum humidity ........

again, TIA for any help/answers
 

john lucas

AAW Forum Expert
Joined
Apr 26, 2004
Messages
8,336
Likes
3,592
Location
Cookeville, TN
I never make any boxes out of wood unless it's dry and stable enough to go in my house. Wood will move even a tiny bit and the lid won't fit correctly. You can somewhat predict the movement of side grain or end grain boxes but crotchwood is a different ball game. Rough it out and then put it in the microwave a bunch of time until it quits losing weight. I use the high setting with really short times like 15 seconds or so and let it cool between cycles. When it stops losing weight leave it in the house for a few days to pick up some moisture. Then turn your box the lid should fit most of the year anyway. Wood always moves seasonally.
 
Joined
Jan 6, 2014
Messages
198
Likes
7
Location
Boulder City, NV
thank you for the response John, leave it to me to try to work with the more difficult walnut .......... it is turning nicely though
funny thing, your process is another that I had read about last night, but wasn't sure enough to try (didn't want to ruin the crotch)
when interval drying, leave in microwave, or take out for the cooling process?
and at end, when losing no more weight and you remove, you don't put it in anything, just sit on a shelf?
(I had read same process where when done they put in plastic bag while cooling, so as to not regain too much moisture back)

so many have near the same process/procedure to do things, yet there is slight difference in end results, and that gets really confusing at times :rolleyes:

I appreciate the replies, gives me a direction to go, have the rough shape, will try the microwaving tomorrow .
 
Joined
Aug 14, 2007
Messages
5,488
Likes
2,836
Location
Eugene, OR
Even if the wood is 'dry', I rough out box forms first and let the wood 'adjust'. It moves every time, no matter how dry it is supposed to be.

robo hippy
 

Bill Boehme

Administrator
Staff member
Beta Tester
TOTW Team
Joined
Jan 27, 2005
Messages
12,897
Likes
5,187
Location
Dalworthington Gardens, TX
Website
pbase.com
+1 to what both John and Robo said especially what Reed said about even dry wood "relaxing" after it has been turned. This is because wood has internal stresses in various directions that all balance each other out until you remove some of that wood. Things are then out of whack until it re-balances the stresses in the remaining wood by moving.

Personally, I would not turn it until completely dry, but you could possibly speed things up by rough turning the box ... I wouldn't try roughing the lid except perhaps lengthwise ... you just need to be very cautious about having two pieces of roughed wood that must fit together in the final product -- because of their shapes they won't warp in a similar manner and you don't want any inside diameter to cross paths with an outside diameter -- not a good thing. :D

Regarding soaking in ethanol -- strictly my opinion: forget it. Mainly, I'm cheap and it's a lot of money for a debatable benefit. I doubt that the alcohol actually speeds up drying. I discussed the matter several years ago with Dave Smith at SWAT (he did a program there on alcohol drying). I told him that I had researched some old patents from back in the early 1900's where alcohol stabilization was tried, but possibly not meeting the intended goals and certainly not commercially viable. From what I gathered from the patent claims, the ethanol treatment wasn't meant to speed up drying, but was intended to help stabilize the wood. The theory was that the ethanol would soften the lignin in the wood sufficiently to relax internal stresses. If I recall correctly, I think that this might have been done under pressure and elevated temperature in the patent descriptions of the process. Dave was interested in what I had found, but based on his own experience, he wasn't sure that it had anything to do with the lignin and still felt that it sped up the drying process. BTW, the reason for the early twentieth century patents on wood stabilization wasn't primarily directed at construction lumber -- it was mainly for hardwood specialty products such as gun stocks and other stuff before the widespread use of plastics.

I would also avoid liquid dish detergent -- a fad that was going around about ten years ago when I started turning and comes up occasionally. There was somebody in Hawaii that used it successfully I believe, but everything has its drawbacks and I think that finishing was something that limited options of finishing the wood. Anothert thing that was tried back in the early twentieth century is polyethylene glycol 1000 (usually called PEG 1000 where the 1000 indicates the molecular weight). It was also intended for stabilizing things like wood for gun stocks. PEG is a very common product that comes in molecular weights from about 200 up to about 20,000. The higher the number, the harder the product. PEG 1000 is a solid at room temperature and looks almost identical to paraffin wax except that it is softer. The lowest molecular weigh PEG is thin as water. The very high molecular weight PEG is like solid plastic similar to UHMW plastic. Like I said, it is very common and used in all sorts of stuff like surfactants (wetting agents), supposedly in some drinks although I haven't found any that list PEG, cosmetics, ointments, and as as a well known "nuclear-option" laxative (PEG 3350). FDA approves certain PEG formulations for food and drug use since it is supposed to be inert and not absorbed into the body. When I first started turning, I bought two "wheels" of PEG 1000 (5 pounds each), but later decided that I didn't want to use it. I still haven't been able to give them away after ten years.
 
Joined
Jan 6, 2014
Messages
198
Likes
7
Location
Boulder City, NV
Too late Bill ;)
turned to an over sized piece and have it drying.
Too nervous to attempt the microwave process yet, have it in a bag 'o shavings, has been losing weight daily .......
did already make it into 2 pieces, but left more than enough to re-turn both pieces so they match in shape & grain pattern.

Thanks for the info re: the alcohol bath, have been so many places, can't remember where I read it, but will try to find it (is bookmarked somewhere)
don't think the process was for quicker drying, but more for stabilizing the wood so outer edges don't crack when drying.
Knew a little about the PEG , read up on it when I was researching stabilizing woods and that process.
Have been stabilizing a few pieces of soft spalted maple I have, tried the TMI products, didn't turn out as expected
went and tried the cactus juice product with a little dye, and pieces turned out excellent and workable ...........
makes them a little brittle IMHO so must use extreme care when turning finer details.....

Many thanks for the responses guys :)
 

Bill Boehme

Administrator
Staff member
Beta Tester
TOTW Team
Joined
Jan 27, 2005
Messages
12,897
Likes
5,187
Location
Dalworthington Gardens, TX
Website
pbase.com
I went to a Curtis Seebeck demo at SWAT last year where he went through putting pen blanks under high vacuum and then when the vacuum is released the resin gets forced into the wood. Some people call it stabilizing, but to me it seems a lot more like encapsulating wood in plastic resin. I would like to try it, but not for pen blanks. I am interested in seeing how it would work for weatherproofing wooden signs.
 
Joined
Jan 6, 2014
Messages
198
Likes
7
Location
Boulder City, NV
yessir, that's the process everyone is referring to as stabilizing
after the release of vacuum, it's essential to leave the pieces in the tank for at minimum the same amount of time as you vacuum'ed
preferably leave them in twice as long, you'll physically see the liquid being sucked back into your piece of wood.

As for that process alone working as weather proofing, not a chance, you'd still have to go through the sander sealer/lacquer/poly process
from my limited experience, all it does it make softer woods that are unable to turn without major tearout, stable enough to turn.
and if using the dyes, then the whole piece of wood gets saturated with color instead of just the outside as with stains/dyes.

my next experiment will be attempting double and triple dying, that is the effect I'm truly wanting to master
but when it comes to double/triple dying, no one wants to give out their secret recipe as to how they accomplish it :confused:
I'll figure it out thru trial and error tho :rolleyes:
 

Bill Boehme

Administrator
Staff member
Beta Tester
TOTW Team
Joined
Jan 27, 2005
Messages
12,897
Likes
5,187
Location
Dalworthington Gardens, TX
Website
pbase.com
Thanks for the answer, Jerry. The wood that I have is a tropical wood (canarywood) and it is already weather resistant, but I would like to do some sort of treatment that would keep it looking like it does now, but I suspect that is not a realistic goal. I am interested in making replacement address signs for some of our neighbors. Several months ago thieves stole the brass plaques from about half of the houses on our street. The police thought that it was done by kids, but when I contacted the company that originally provided the plates, they said it is the work of professionals. They said that stealing these things has become a big business. The reason: These 12 X 6 X 1/2 inch castings of house numbers now cost more than $400 apiece and at least a one year waiting list. Nowadays, almost nobody makes them from brass castings. Instead they use cast resin colored to simulate brass. A member of my woodturning club has a laser engraving business so I had him engrave the numbers in the wood. It turned out looking extremely good and I figured that there is no black market for stolen wooden house number signs. If the neighbors like this idea then my friend with the laser engraving business might have some new work coming up.
 
Joined
Jan 6, 2014
Messages
198
Likes
7
Location
Boulder City, NV
the current process of stabilizing is definitely not your answer then
the only thing I could think of would be to soak/saturate the wood in oil for several days
even then, with weather conditions where you are, it'd still dry out in time, needing some sort of re-coat
last resort to have a semi lasting process would be coat in a clear epoxy that completely seals the wood, weather wouldn't affect it.

But sounds like your buddy is going to get some good business soon, hopefully he's slow and needs it ;)
haven't seen brass plaques like that in a long time, am surprised they still make them for houses, was really big in the south (Florida) many years ago
and can definitely see why they've been stolen, especially at those prices.

good luck in your endeavors

and on topic, walnut steadily losing weight every day ........ waiting for the day it stops :D
 
Joined
Jan 6, 2014
Messages
198
Likes
7
Location
Boulder City, NV
ooops I did it again

OK, another question about drying, this time using Burl's ..........
and FYI, I used the search function, only relevant post/answer was long ago by Odie regarding Cherry Burl, and didn't answer my question ......

I just had a chance to gather quite a bit of burl blanks, Buckeye Burl's & Cottonwood Burl's, and Pollyanna Burls.
all pieces are 2 1/2" x 2 1/2" x 8" or larger, but some especially beautiful looking wood ....
Am thinking of using John Lucas's method of microwaving, since I want to be able to work with these within a week or so
am planning on resawing these and making into segments for the bottom and tops of a couple segmented vases/bowls
(and maybe usage in a feature ring if I figure out the proper design)

Am I to expect any kind of difference when dealing with the Burls when drying? any extra cracking possibilities?
would it be better for me to resaw in half to 1 1/4" thickness first, and then do the drying? would this reduce the chance of cracking/twisting/warping?
I'm aware Burls have a tendency to have voids in the woods, which is where my concern about extra cracking comes in ......

as always, TIA for any help / answers
 
Last edited:

Bill Boehme

Administrator
Staff member
Beta Tester
TOTW Team
Joined
Jan 27, 2005
Messages
12,897
Likes
5,187
Location
Dalworthington Gardens, TX
Website
pbase.com
I think that you should treat the wood essentially the same as any other wood when drying it. My limited experience with burls is that the cracks are smaller, run in random directions, and not as likely to cause a large piece to fly off when turning. However, don't count on the last one to be true or less of a hazard to turn than other wood that has cracks.
 
Joined
Jan 6, 2014
Messages
198
Likes
7
Location
Boulder City, NV
Thanks Bill
Burl is just about the only wood I have never had experience with (except a few pieces of veneer)
All the info I get on these species is that they are an extremely hard wood, great for turning
and I see a lot posted in the gallery that have the voids still intact in the finished pieces, so I presume using care that turning is not an issue with them.
I think I'll leave them the solid blanks when drying, common sense tells me they'll warp/twist less than if I resaw them 1st.
I've noticed Odie does a lot of burl work, might send him a message and see if he has any pointers. (haven't seen him post in a while)
Hope these don't blow up my microwave :eek:
 
Joined
Sep 28, 2008
Messages
41
Likes
9
Location
france
for green wood, the rule is to keep thick = 10% of the diameter of the room walls.
dry slowly (in a bag with chips) weigh regularly and when the weight is stabilized back on the lathe and finish

otherwise, turn the piece of green wood with thin walls, and discover the complete deformation.
especially keep tne background as thin as possible (dig the foot, if there is one) , because that's where the risk of cracking is the most important.

otherwise cooking the wood piece in the paraffin can stabilize the timber in addition to the system Curtis

the microwave oven also works for relatively small parts (or so a large oven)
 

hockenbery

Forum MVP
Beta Tester
TOTW Team
Joined
Apr 27, 2004
Messages
8,637
Likes
4,976
Location
Lakeland, Florida
Website
www.hockenberywoodturning.com
Thanks Bill Burl is just about the only wood I have never had experience with (except a few pieces of veneer) All the info I get on these species is that they are an extremely hard wood, great for turning and I see a lot posted in the gallery that have the voids still intact in the finished pieces, so I presume using care that turning is not an issue with them. I think I'll leave them the solid blanks when drying, common sense tells me they'll warp/twist less than if I resaw them 1st. I've noticed Odie does a lot of burl work, might send him a message and see if he has any pointers. (haven't seen him post in a while) Hope these don't blow up my microwave :eek:

I have turned a few burls. Mostly into hollow forms while the wood is wet. Burls do not have the grain structure id wood and is less predictable in shrinking.
When there are voids a great deal of care needs to be taken in the hollowing process. Can't be as aggressive . I also tape pieces that are likely to flap as the get thin.
If it flaps in when the cutter comes by it will break.
If the tape sometimes has to be supported with a wire ring to keep it from being cut by the hollowing.

The big thing with the hollow forms is the burls dry with a ripple surface. If I sand when wet the surface gets a wonderful feel to it.
Sanding when dry takes a bout twice as long as regular grain as one has to sand the ripples off.

Below are a couple of burl hollow forms
Left to right maple ( a poor burls my friend Clark gave me) about 14" diameter
A maple burls about 12" diameter
A cherry burl about 13" diameter

Have fun
Al
 

Attachments

  • image-2272531766.jpg
    image-2272531766.jpg
    368.1 KB · Views: 13
  • image-3801175744.jpg
    image-3801175744.jpg
    373 KB · Views: 10
  • image-98728067.jpg
    image-98728067.jpg
    361.9 KB · Views: 10
Joined
Jan 6, 2014
Messages
198
Likes
7
Location
Boulder City, NV
Thanks for the responses Kruger & Al

Kruger, that is the method I am using with my crotch walnut, and checking the weight every 3 days or so
am in no hurry with it, and it's a small enough piece I don't expect too much shrinkage/warping
The Burl is different, still smaller pieces, but want to work with them sooner, John Lucas gave me good tips on using the microwave
which looks like how I'll proceed

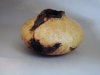
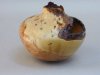
Al, those are some beautiful vessels, and definitely have the voids I'm talking about
Would really worry me when turning something like that :eek:
The Burls I have are basically in a spindle stock form, not big enough to do a vessel with
and seem to be fairly clean on the outside, just don't know what's under the surface
That's the reason I just plan on re-sawing them into lengths, then cutting into segments for a ring of vase I've drawn out
Maybe call it the feature ring, altho it won't be too special, just letting the contrasting color/grain speak for itself within the segmented vessel.
Burl woods are just so beautiful with their grains/patterns, those and spalted woods are my favorite
One day I'll have a chunk of Burl large enough to turn a vessel, but I'm happy with the pieces I have so far ;)
Curious, why do you use the tape to hold the "flaps" and not something like CA?
would the CA affect the look of the wood too much?

TIA for all help/answers
 

hockenbery

Forum MVP
Beta Tester
TOTW Team
Joined
Apr 27, 2004
Messages
8,637
Likes
4,976
Location
Lakeland, Florida
Website
www.hockenberywoodturning.com
Jerry,

You know for segments the wood has to be really dry.
One problem with burls is getting a clean clue line. Any tiny voids or bits of bark will compromise the glue line.

The reason for taping is to reduce the vibration of piece that sticks out like a peninsula. There is nothing to glue it to.
If these vibrate when hollowing the either get cut too thin or break off.
The tape and will hold it in place. If the tape is allowed to stretch flat across the opening it gets cut by the hollowing.
A wire ring will keep the tape out do the opening.
 

Bill Boehme

Administrator
Staff member
Beta Tester
TOTW Team
Joined
Jan 27, 2005
Messages
12,897
Likes
5,187
Location
Dalworthington Gardens, TX
Website
pbase.com
Jerry whenever you have the good fortune to find a burl large enough to make a hollow form, I would highly recommend using much greater awareness of interrupted cuts. Also, burls seem to sometimes have a random mixture of pith, heartwood, sapwood, and bark which can have an effect that is similar to interrupted cuts. Keep your tools extra sharp and never push a dull tool when working on a burl. Otherwise, it is possible to get some of the most spectacular catches that you will ever witness. DAMHIKT
 
Joined
Jan 6, 2014
Messages
198
Likes
7
Location
Boulder City, NV
Thanks for the replies guys
and yessir Al, am aware of the special need for the dry wood, hence me wanting to do with microwave/oven
Have a moisture gauge to triple check everything just to be sure it's really ready.
Also re: the glue line, these pieces seem to be extremely clean (for burl), plan on running all pieces thru drum sander, then also cleaning up mounted on lathe as each ring attached.
But sections have very little voids that I see and appear to be able to clean up, will know more once I can cut into them.
Your recommendation for Malcolm Tibbetts book was an excellent one, have read it twice so far, and have dozens of pages marked for future reference.

Bill, thanks for the heads up, will stay especially aware when working with Burl .....
as for the tools, just got a Raptor CBN, and resharpened every tool I have, what an immense difference that wheel made in the edge
I generally keep my tools sharpened while turning, makes it easier and no tear out, but again, will take special notice with the burls.

Looking forward to doing a complete vessel from Burl's, but damn those voids just bother me mentally
think I'll wait until I have plenty of other turning under my belt before I attempt a project like that ;)
 
Last edited:

hockenbery

Forum MVP
Beta Tester
TOTW Team
Joined
Apr 27, 2004
Messages
8,637
Likes
4,976
Location
Lakeland, Florida
Website
www.hockenberywoodturning.com
Looking forward to doing a complete vessel from Burl's, but damn those voids just bother me mentally think I'll wait until I have plenty of other turning under my belt before I attempt a project like that ;)

Once you master the hollowing the voids provide a back door for the chips to exit the vessel.

Often hollowing is a repeating pattern of 8 seconds of turning, 30 seconds of blowing out chips,

I like to turn hollow forms from a hollow log. Two windows for chips to exit. Breaking into the hollow part of the log is more of a problem than the opening void as it can cause the tool to grab a bit if you get too aggressive. Same for the other side of the hollow. Plus the wood around the hollow is a mix of densities.

Al
 

Steve Worcester

Admin Emeritus
Joined
Apr 9, 2004
Messages
2,693
Likes
96
Location
Plano, Texas
Website
www.turningwood.com
As far as stabilizing, I have done some work on hollow forms and bowls. It has to dry as the stabilizing resin won't impregnate unless it is. Additionally, it takes a lot of medium, because you have to completely cover the form and have some head room for saturation. Then you have to cook it at 200 degrees. Then re-turn it. It is about $100 a gallon without the vacuum chamber and pump.

It works great but there aren't any UV inhibitors and unless you want a satin to medium gloss, you need to find a compatible finish on top of that. Granted I didn't try a Beaal or like system, I was satisfied with the semi-gloss.
 
Joined
Jan 6, 2014
Messages
198
Likes
7
Location
Boulder City, NV
Al, never thought about the openings making cleaning out easier, still don't like the voids tho ......
and I definitely wouldn't be very aggressive when working around those ;)

Steve, I haven't tried to stabilize an already turned piece, I've been doing the blanks themselves (smaller) then turning
but then also, these haven't been bowls/vessels, they've been knick-knacks, candle holders, bottle stoppers, etc.
The cactus juice I'm using is $89/gallon , but that's still expensive, luckily you retain 75-80% when done to re-use on another project.
I got the complete kit @ Craft Supplies when it was on sale, vacuum pump included, here in my area maintains a pretty constant 25Hg @ 120psi.
And, have still went through complete finishing process after the turning, you can use your standard finishing compounds
and using the Beall system does give a high gloss sheen if that's what's desired, but I too prefer the look of a satin finish.
 
Back
Top