• July 2025 Turning Challenge: Turn a Multi-axis Weed Pot! (click here for details)
  • Congratulations to Bobby McCarly for "Hemostatmorphodon" being selected as Turning of the Week for July 7, 2025 (click here for details)
  • Welcome new registering member. Your username must be your real First and Last name (for example: John Doe). "Screen names" and "handles" are not allowed and your registration will be deleted if you don't use your real name. Also, do not use all caps nor all lower case.

Bark Inclusion in Walnut Bowl

Joined
Nov 22, 2023
Messages
598
Likes
4,421
Location
Morganton, NC
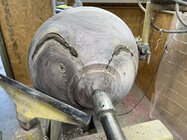
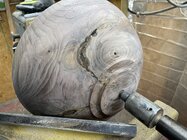
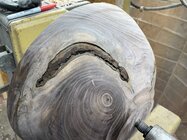
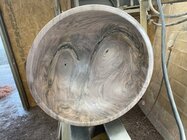
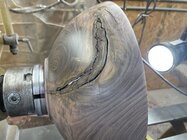
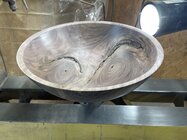
I have a 14” walnut bowl on the lathe and it has bark inclusion running from the outside to the inside. I thought about hitting it with thin CA and leaving it as is or filling the voids with coffee grounds or black CA.
Any suggestions?
Pay no attention to the tool marks as I will flip the bowl and make a final pass😂.
1715818488457.jpeg
1715818459445.jpeg

1715818389493.jpeg
 
If it were mine...and it was to be a functional bowl, I'd fill with black tinted epoxy to stabilize it, turn to final (or near final) thickness then add a few pewas / dutchmen in a contrasting color.
 
Not able to see the inside but assume it's similar to outside. My standard plan for traditional bowls that are likely to be used and not just for decoration is to fill the inside and just stabilize the outside if it needs it. It can vary depending on the size and openness of the inclusion on the outside. The rustic look on the outside can be a plus unless it makes it awkward or too rough to pick up or handle. Looks like you have enough of a rim to grasp that it wouldn't be a problem. Not sure. That's a lot of CA to use so if I decided to fill I would use two part epoxy and some black or turquoise mica powder. Same for the inside. I'll use CA fills mixed with sanding dust for very small fills but not big ones.
 
Not able to see the inside but assume it's similar to outside. My standard plan for traditional bowls that are likely to be used and not just for decoration is to fill the inside and just stabilize the outside if it needs it. It can vary depending on the size and openness of the inclusion on the outside. The rustic look on the outside can be a plus unless it makes it awkward or too rough to pick up or handle. Looks like you have enough of a rim to grasp that it wouldn't be a problem. Not sure. That's a lot of CA to use so if I decided to fill I would use two part epoxy and some black or turquoise mica powder. Same for the inside. I'll use CA fills mixed with sanding dust for very small fills but not big ones.
It looks about the same on the inside, just not as wide. However it is 1-1/2” thick and once I turn the inside to 1/4”-3/8” it will be about the same as the outside. At that point it may fall out so may add some thin CA until I get to that point and make a decision.
 
Not sure if you plan to turn to final thickness now or after drying. For inclusions that run through the piece or are deep I opt for long work time epoxy that flows well. Quick 5 minute stuff can fool you into thinking it penetrated when it can actually be very shallow and not hold onto the loose bits in the inclusion. When dry and ready to sand I tape the outside and add epoxy from the inside. I use GFlex. Easy to color and it will flow into every nook and crevice and has a long work time. I'm often very surprised at just how much will flow into even the smallest voids and cracks. It should create a nice staring point for sanding on the outside where it meets the tape covering.
 
Not sure if you plan to turn to final thickness now or after drying. For inclusions that run through the piece or are deep I opt for long work time epoxy that flows well. Quick 5 minute stuff can fool you into thinking it penetrated when it can actually be very shallow and not hold onto the loose bits in the inclusion. When dry and ready to sand I tape the outside and add epoxy from the inside. I use GFlex. Easy to color and it will flow into every nook and crevice and has a long work time. I'm often very surprised at just how much will flow into even the smallest voids and cracks. It should create a nice staring point for sanding on the outside where it meets the tape covering.
I may try that as the bowl is dry and this is the final turning, thanks!
 
What's hiding on the 'bottom side' of the view in photo #1? Are there more inclusions around the branch bases? How to manage the inclusion areas from an artistic standpoint is personal preference. My concern is whether this bowl is safe to turn, or what measures may be needed to make it safe.
 
If your interested in going outside the box, can always knock the inclusion all the way out and fill the gap with whatever epoxy you like….
 

Attachments

  • IMG_0612.jpeg
    IMG_0612.jpeg
    296.3 KB · Views: 8
  • IMG_0613.jpeg
    IMG_0613.jpeg
    148.5 KB · Views: 8
It looks like this was a crotch because of the double pith. Those will likely crack a little and require some filling. I'd put some PVA sealer on those for sure as it is drying. I wouldn't worry about the bark inclusions until you turn it a second time. this one does not look unsafe to turn. I wouldn't be concerned about it anyway. I'd wait on any glue or ca until you are turning it the second time. That way you will be applying it on dry wood not damp wood. It will be a very pretty bowl when it's done. Nice find.
 
What's hiding on the 'bottom side' of the view in photo #1? Are there more inclusions around the branch bases? How to manage the inclusion areas from an artistic standpoint is personal preference. My concern is whether this bowl is safe to turn, or what measures may be needed to make it safe.
The bottom is solid with just a small piece of bark. It is safe to turn as is. I’m going to flip it and take one cut on the inside to make sure nothing is hid.
 
It looks like this was a crotch because of the double pith. Those will likely crack a little and require some filling. I'd put some PVA sealer on those for sure as it is drying. I wouldn't worry about the bark inclusions until you turn it a second time. this one does not look unsafe to turn. I wouldn't be concerned about it anyway. I'd wait on any glue or ca until you are turning it the second time. That way you will be applying it on dry wood not damp wood. It will be a very pretty bowl when it's done. Nice find.
The bowl is dry and this is the second turning.
 
Only you can decide if the piece is structurally ok to turn safely. You've already made that decision for a 1.5" thick bowl, but final turning requires more attention to detail. Touch, bang, wiggle, and listen to the bowl to enhance your evaluation. And stop as you turn it down to re-evaluate. Sounds like you have all this covered, but it is worth saying anyway.
Adding epoxy and/or pewa won't always make an unsafe piece safe - especially if significant cracks go thru the tenon or all the way to the rim. And trying to adhere epoxy to flaky bark is structurally sketchy.
You can do things like wrapping strapping tape (that package tape with strings in it) to for a bit of extra insurance.

Assuming it's safe, all the other choices are artistic and utilitarian (are you trying to make a bowl for soup or fruit or display).

Based on the pics, here's what I'd probably do:
Finish turn the outside and take the inside down some more (at least find round).
Dig out the soft stuff in the center of the piths.
Add big pewa across the inclusions and small ones across some of small cracks around the piths, and/or across the pith itself.
Fill inclusions, piths, and cracks from the outside with epoxy (I add a drop or 2 of India ink for black). Painters tape and hot glue dams. Several applications till it's all filled to the outer surface, sand it down and probably one final squeegee to fill pin holes.
Finish turn inside, and re-fill epoxy from the inside.
Finish the foot and address any re-filling there.

It's a lot of work, and a lot of waiting for epoxy to cure.
 
I'm the odd man out. I just leave stuff like that as natural as I can. If it's prone to falling out, I'll reinforce it with CA. If it falls out, I'll just leave the hole. In this case I would use coffee grounds and CA on the gaps in the second photo. Each of us has their own view. For example, I don't like pewas. /shrug
 
It seems there is plenty of solid wood at the rim, the inclusions don’t go all the way through the foot. So, everything seems connected well enough that I would turn it as is. Your tool work seems good enough that knocking the bark out of the gaps is unlikely. Better stated is that I think you can pull it off. I’m confident I could, so in your shoes, with that piece, I wouldn’t use any fillers.

With plenty of walnut oil to gain maximum darkness and contrast, this could be stunning!
In my humble opinion
 
I left mine without any glue or epoxy. Turned it down to around 1/4 inch thick. Holes go right through. Use it to hold k-cups, soup wouldn't stay. . Hasn't fallen out even though the bowl warped like mad.
IMG_7742.jpg
 
Thank you everyone for your suggestions. I have used epoxy and coffee grounds to fill voids in the past but really like leaving natural if possible.
I thinking about it and checking how secure the bark was I made a pass on the inside before making the final turn on the outside.
The bark went all the way across the bottom but didn’t go all the way through so I was able to cut most of it out. I like the outcome but was seriously thinking about some colored epoxy for some contrast.
It was a tough cut on the inside as the bark is hard on ever a sharp Thompson bowl gouge.
Now trying to decide on walnut oil, Danish oil, or lacquer .
1715899306802.jpeg
1715899261835.jpeg
1715899222967.jpeg
 
I don't mind some bark inclusions as long as it doesn't make the piece unstable on the lathe.

I have found that there is shrinkage in and around the inclusion, which provides an opportunity to stabilise as well as highlight the inclusion.

I find such pieces sell as well at the gallery as any of my other work.

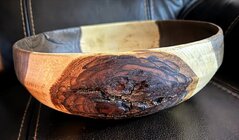
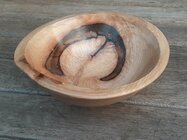
Here is an example of a branch inside a walnut bowl...

walnut branch inclusion.jpg
 
Back
Top