I've been asked by a friend to restore a 70 year old child's rocking chair. This involves turning replacement spindles for the back, arm, etc. with lots of beads. I do not do a lot of spindle turning, and could use a refresher course in how to turn a nice symmetrical bead (mine are more teardrop shaped). Any suggestions on where to go for some good instruction?
-
We just finished moving the forums to a new hosting server. It looks like everything is functioning correctly but if you find a problem please report it in the Forum Technical Support Forum (click here) or email us at forum_moderator AT aawforum.org. Thanks! -
Beware of Counterfeit Woodturning Tools (click here for details) -
Johnathan Silwones is starting a new AAW chapter, Southern Alleghenies Woodturners, in Johnstown, PA. (click here for details) -
Congratulations to Dave Roberts for "2 Hats" being selected as Turning of the Week for April 22, 2024 (click here for details) -
Welcome new registering member. Your username must be your real First and Last name (for example: John Doe). "Screen names" and "handles" are not allowed and your registration will be deleted if you don't use your real name. Also, do not use all caps nor all lower case.
You are using an out of date browser. It may not display this or other websites correctly.
You should upgrade or use an alternative browser.
You should upgrade or use an alternative browser.
Instruction on Turning a Bead
- Thread starter Doug Drury
- Start date
Hi Doug, There are many methods and tools to use. Here are a few ways to tackle them on YouTube.
View: https://youtu.be/q5MogcBXL8Q
- Joined
- Apr 27, 2004
- Messages
- 8,642
- Likes
- 4,983
- Location
- Lakeland, Florida
- Website
- www.hockenberywoodturning.com
Lyle’s video is a good tutorial. Always good to get tips from multiple sources
@john lucas has good one too
Review the A B Cs. Anchor Bevel cut
Choose the tool and sharpen it. Lyle’s grind is easier to control
I like a 35 degree convex bevel.
Practice practice practice. I suggest you put a foot long 3x3 or 2x2 on the lathe make s cylinder
Mark it off with pencile lines 1/2” apart. Lines will be the vee between the beads.
Turn 24 beads, admire them, return the cylinder, repeat marking an turning beads.
Repeat until you run out of stick. By then you will be good at beads.
I like the tool rest a bit above center and I tend to work on the top of the spindle
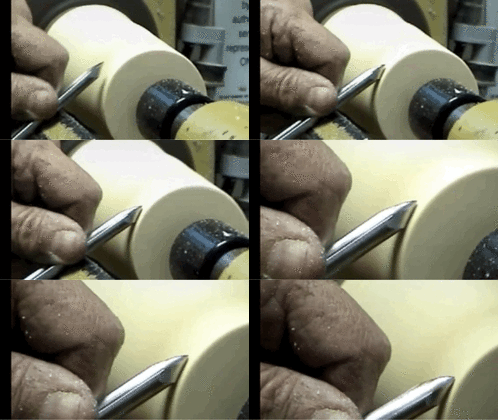
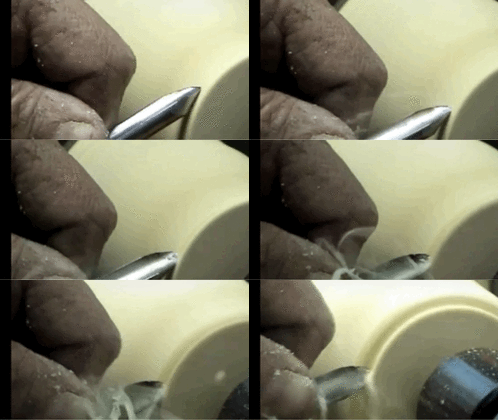
I have a couple gifs facing off a spindle - same as half a bead.
Anchor - tool on the tool rest. Bevel - bevel on the wood not cutting

Cut - raise the handle tool the tool to engage. The cutting edge

@john lucas has good one too
Review the A B Cs. Anchor Bevel cut
Choose the tool and sharpen it. Lyle’s grind is easier to control
I like a 35 degree convex bevel.
Practice practice practice. I suggest you put a foot long 3x3 or 2x2 on the lathe make s cylinder
Mark it off with pencile lines 1/2” apart. Lines will be the vee between the beads.
Turn 24 beads, admire them, return the cylinder, repeat marking an turning beads.
Repeat until you run out of stick. By then you will be good at beads.
I like the tool rest a bit above center and I tend to work on the top of the spindle
I have a couple gifs facing off a spindle - same as half a bead.
Anchor - tool on the tool rest. Bevel - bevel on the wood not cutting

Cut - raise the handle tool the tool to engage. The cutting edge

Thanks for pointing me in the right direction. I found a you-tube video by Jim Rodgers "5 cuts with a Skew" that I watched, and then put a stick of maple on the lathe and practiced. Quickly relearned that muscle memory and turned one of the required spindles for the chair. Looks just as good if not better than the one I was copying, so I'm good and "away to the races". Thanks again.
I second Al's comments, and agree you need to be fastidious about Anchor, Bevel, then Cut. As everybody knows, but you asked for a reminder: to make a bead, you start with the flute up (open), to one side of the center of your bead, resting on the wood without cutting. Then raise your right hand until the edge starts to cut, and roll the tool as you continue to raise, until the flute is fully horizontal (closed). If you need a bead that is wider than the natural size of your gouge, you will also need to slide sideways. The relative rate of raise-roll-slide determines the shape of the bead. (I never start making a bead with the gouge fully open--it's always rolled a little in the direction I'm going.)
Asymmetry is normal when turning beads and you have to work at it to get symmetrical ones. One 'trick' that helps me is this: when we grab the gouge in a handshake fashion, the gouge is comfortable to hold and apply to the wood. HOWEVER, our wrist naturally rolls easier and more fully counter-clockwise (anti-clockwise for Brits) than in the opposite direction, contributing to the asymmetry. Therefore, when we roll a bead, we should hold the gouge in the finished position, then grasp it. The starting position will be a little tight and uncomfortable, but it will get easier and more comfortable as we roll the bead and the bead will be more symmetrical.
Another tip is that you can always use very, very light cuts to refine the shape of your bead. If it's not perfect with one pass, make a few more careful, light passes. Be aware that doing so can affect the spacing to the adjacent feature.
Great insight from Alan and Doug, Ditto. Have a Happy and healthy, and safe New Year
john lucas
AAW Forum Expert
Here us my video showing how to turn a bead with different tools.
View: https://youtu.be/bjYehUsMdB4?si=WyrMQc1oC_RwgZNl
It just makes sense in bead cutting to start at the top and work to one side then to the other side.
