• We just finished moving the forums to a new hosting server. It looks like everything is functioning correctly but if you find a problem please report it in the Forum Technical Support Forum (click here) or email us at forum_moderator AT aawforum.org. Thanks!
  • Beware of Counterfeit Woodturning Tools (click here for details)
  • Johnathan Silwones is starting a new AAW chapter, Southern Alleghenies Woodturners, in Johnstown, PA. (click here for details)
  • Congratulations to Peter Jacobson for "Red Winged Burl Bowl" being selected as Turning of the Week for April 29, 2024 (click here for details)
  • Welcome new registering member. Your username must be your real First and Last name (for example: John Doe). "Screen names" and "handles" are not allowed and your registration will be deleted if you don't use your real name. Also, do not use all caps nor all lower case.

sharpening jig

Joined
Oct 1, 2008
Messages
706
Likes
1,128
Location
Sydney Australia
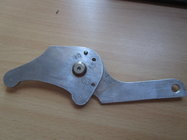
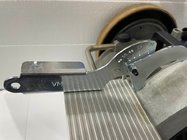
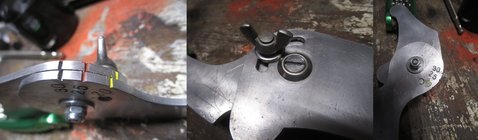
This one came about just recently, I didnt think having a bunch of set jigs lying was going to be a good. So this is what I came up with it does three angles at present for the 20mm dia grinder. The locking pin screws through form the back. It was cut out on the band saw out of 1/8th Aluminium, simple and very effective.
I believe Vicmarc has just brought out something similar, it must be very new as I couldnt find it on the web
 

Attachments

  • IMG_2978.JPG
    IMG_2978.JPG
    292.3 KB · Views: 70
Last edited:
Joined
Oct 1, 2008
Messages
706
Likes
1,128
Location
Sydney Australia
I found the Vicmarc jig I mentioned that has just come on the market. As its not on their website I asked a friend who is a supplier of Vicmarc Products if he could get an image of the new jig to see how mine stacks up against it.
 

Attachments

  • 297257717_5790063527693979_3179880860068859629_n.jpg
    297257717_5790063527693979_3179880860068859629_n.jpg
    65.1 KB · Views: 93
Joined
Oct 1, 2008
Messages
706
Likes
1,128
Location
Sydney Australia
Nice work. Curious how you determined the angles. Did you have a known reference?
I used existing sharpened gouges to set the grinder table up. Then set the jig up and tested the setting finally against the gouge. A little long winded perhaps but it seemed the easiest method at the time. I have since added another jig to the collection to cover scraper angles and flat work chisels. Colour coded and slotted to allow some fine tuning down the track
 

Attachments

  • IMG_3032-horz.jpg
    IMG_3032-horz.jpg
    115.5 KB · Views: 32
Last edited:
Joined
Sep 2, 2022
Messages
301
Likes
231
Location
Victoria, BC
As a new turner, I've looked at the Raptor gauges but I have a hard time justifying something that seems like it would get in frequent use. But I'm too new to really know what's what. :)
 
Joined
Oct 1, 2008
Messages
706
Likes
1,128
Location
Sydney Australia
As a new turner, I've looked at the Raptor gauges but I have a hard time justifying something that seems like it would get in frequent use. But I'm too new to really know what's what. :)
Well I didnt want a collection of them hanging off nail somewhere or getting in the way. My shop is very small 200sqft max and its very full. :oops: So I go for multi use tools wherever I can and this was simple to make. It doesnt have to be metal plywood would work just as fine. I havent drawn it up just winged as I went along, but I could if somebody was interested.
 
Joined
Jan 13, 2022
Messages
177
Likes
123
Location
Middletown, PA
Website
www.timsworkshop.com
I son't recall where I got it, I can see if it is marked. I use the Wolverine system and have the Varigrind 2 for gouges. There was a template you could download, print full size and glue to a piece of thin plywood. You have to cut out the template, drill some holes in a couple of places (well identified - including the sizes), and you have a setup jig for gouge sharpening. This jig sets how far the tool needs to extend from the varigrind, what angle to set the varigrind to, and how far out you need to pull the support to set the varigrind on. The proper swing of the tool to sharpen it is all on you - but with everything set where it needs to be that is not a big deal. Nice thing about it is that it works no matter how many times you have sharpened a gouge (and hence made it shorter), or how much wear there is on your grinding wheel (assuming you are not using a CBN wheel - which I love), you get good results every time. The instructions for using it are printed right on the page. I will see if I can find the source and share it here.
 
Joined
Feb 28, 2021
Messages
1,227
Likes
1,077
Location
Roulette, PA
Website
www.reallyruralwoodworks.com
One thing I like about the wolverine + Varigrind is that it is so flexible.. I came up with a way so that I never have to move the wolverine arm at all. For different gouges and grinds, all I need to do is change the projection of the tool from the varigrind, and the arm angle (and for one gouge, a spacer block) , and I can grind my spindle gouges, detail gouges, swept back bowl gouges, and "close but not quite" 40/40 grind, plus my 5/8 gouge grind (It comes closest to a 40/40 , but it isn't, it isn't exactly traditional grind, nor is it swept back) and I can get all the angles by just varying projection and jig arm angles (line up arm with a notch) for consistent repeatable grinds without ever moving the wolverine arm. (everything else I grind freehand on wolverine platform, waiting to see if RoboRest ever comes available again) Because of that I don't even need to bother with those angle setting gauges...
 
Joined
Aug 14, 2007
Messages
5,493
Likes
2,843
Location
Eugene, OR
My first prototype of my robo rest platform was a steel hinge. It was a 4 by 4 inch square. I gut out some of the middle for the grinding wheel, and peened over the ends of the bolt/hinge pin so it wouldn't fall out. The idea is to have the center of the hinge pin be even with the center height of the wheel, and also even with the edge of the wheel. That would give you consistent angles, and be easy to repeat.

robo hippy
 
Back
Top