I usually turn and let what happens happen. But wanted to ask how many twice turn? And knowing you need to turn thin and even to avoid cracking and excessive warping how does the tenon and other bulk affect drying? I hope I got that question makes sense. Thanks

-
Beware of Counterfeit Woodturning Tools (click here for details) -
Johnathan Silwones is starting a new AAW chapter, Southern Alleghenies Woodturners, in Johnstown, PA. (click here for details) -
Congratulations to Peter Jacobson for "Red Winged Burl Bowl" being selected as Turning of the Week for April 29, 2024 (click here for details) -
Welcome new registering member. Your username must be your real First and Last name (for example: John Doe). "Screen names" and "handles" are not allowed and your registration will be deleted if you don't use your real name. Also, do not use all caps nor all lower case.
You are using an out of date browser. It may not display this or other websites correctly.
You should upgrade or use an alternative browser.
You should upgrade or use an alternative browser.
Twice turned hollow forms
- Thread starter Ted Pelfrey
- Start date
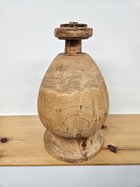
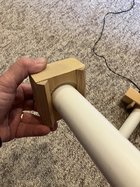
Practically all of my HFs are twice turned. For the first turning, I leave the wall and bottom thickness at 1/2" - 5/8". The outside of the vessel gets covered with anchorseal to slow the drying process. In my experience it usually takes about three months for it to be dry and ready for the second turning. It is after the second turning that I get to the final wall thickness of 3/16" - 1/4". If you turn the HF in the end grain orientation (grain running parallel to the lathe bed), there is very little warping. It doesn't take much wood removal to get it back to round during the second turning. The final wall thickness is achieved when I smooth the inside of the vessel. The photo shows that much of the wood is removed from the bottom so that the bottom thickness is the same as the wall thickness, except in the center area. This is a methodology that I learned from Steve Sinner.
Attachments
- Joined
- Apr 27, 2004
- Messages
- 8,650
- Likes
- 5,008
- Location
- Lakeland, Florida
- Website
- www.hockenberywoodturning.com
I single turn all my hollow forms. Most are hollowed through the face grain so the go oval.
I like letting them dry a few days then sand and finish them.
I have been turning some seed jars as split hollow forms from dry wood.
Still single turned but they keep the round shape.
If you want a nearly round form twice turning will get you there.
Many just turn the outside on the second turn. Gets round.
All my Hollow forms are single turned.
Depends on the finished product. I 1 turn most hf’s, but if I want it truly round, I 2-turn. If I want a thin wall < 1/8” inch, 1-turn.
With 2-turn on larger pieces there needs to be enough material lower in the piece to support cutting without resonance vibration. Also, rounding a portion of the OD will allow a steady rest to be used to damp those vibrations.
With 2-turn on larger pieces there needs to be enough material lower in the piece to support cutting without resonance vibration. Also, rounding a portion of the OD will allow a steady rest to be used to damp those vibrations.
So you finish turn your outside shape on first turning? What if the pith is present?Practically all of my HFs are twice turned. For the first turning, I leave the wall and bottom thickness at 1/2" - 5/8". The outside of the vessel gets covered with anchorseal to slow the drying process
Miss you and your knowledge at our monthly meetings, hope you can make them soon. Happy holidays!
Thanks Ed , exactly the info I was after.Practically all of my HFs are twice turned. For the first turning, I leave the wall and bottom thickness at 1/2" - 5/8". The outside of the vessel gets covered with anchorseal to slow the drying process. In my experience it usually takes about three months for it to be dry and ready for the second turning. It is after the second turning that I get to the final wall thickness of 3/16" - 1/4". If you turn the HF in the end grain orientation (grain running parallel to the lathe bed), there is very little warping. It doesn't take much wood removal to get it back to round during the second turning. The final wall thickness is achieved when I smooth the inside of the vessel. The photo shows that much of the wood is removed from the bottom so that the bottom thickness is the same as the wall thickness, except in the center area. This is a methodology that I learned from Steve Sinner.
Paul - nice to hear from you. Yes, the final shape is done during the first turning. The shape stays the same during the second turning, I just get it back to round. Most of my HFs are turned with the pith in the center of the bottom. I have had very few occurrences of cracking at the pith. However, it's not uncommon for the tenon or area between the tenon and bottom of the HF (see picture above) to develop a crack, without it extending into the bottom. If it's a sizeable crack, I fill it with epoxy when it's time for the second turning.So you finish turn your outside shape on first turning? What if the pith is present?
Miss you and your knowledge at our monthly meetings, hope you can make them soon. Happy holidays!
When I do choose to twice turn, I dry using paper bags without any anchor seal. I don't notice much cracking in the tenon area.
I usually twice turn my hollow forms because I usually leave an option whether it stays a hollow for or a lidded urn (which needs to be dry and true).
I single turn almost all of my smaller hollow forms and turn to about 1/4 to 3/8 thickness. When done turning I'll flip it and cut back the tenon to the smallest dia my check can hold to minimize the what has to dry and stay stable. Small pieces I put in paper bags to dry. Anything over about 10" I put in cardboard boxes with a fan pipe inserted to pull the moist air from inside the piece and circulate it with the rest of the air in the box.
Very large forms (over 22" or so) I twice turn since the finishing process is different and being round and smooth with a perfectly flat surface matters. The first turning is 3/8 to 1/2". I also boil them and then dry them in the large cardboard boxes with fan pipes.
Very large forms (over 22" or so) I twice turn since the finishing process is different and being round and smooth with a perfectly flat surface matters. The first turning is 3/8 to 1/2". I also boil them and then dry them in the large cardboard boxes with fan pipes.
@Randy Anderson could you post a pic of your “fan pipe”. Interested in what it looks like. Purchased or diy?
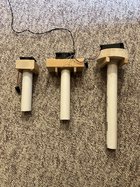
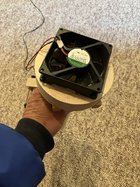
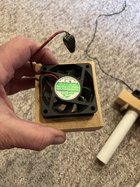
Doug, here are few pics. Simple DIY from scraps most have around. Some thin wall pvc pipe, scrap wood and a 12v computer fan. Idea is to draw the moist air out of the inside of the piece and circulate it around in the bag or box that you have the piece in. Without it the damp air will settle/stay inside the piece, especially on tall pieces, and the outside will dry much faster than the inside - not good. A tall vase will get very dry on the outside and be full of damp air on the inside if you don't get it out and mixing with the air in the box.
It should extend about 1/2 - 2/3 into the piece. The flanges on the wood the pipe fits into keep it off the rim so air gets pulled into the piece around the gaps at the top and then out the pipe at the top. 12V fans are cheap online but like most I have a number of them laying around from old computers. I got a bag of quick connect plugs (again, cheap online) and can plug and swap as needed. Some I've hot glued the pipe to the wood the fan sits on, some I just make it a tight fit so I can swap lengths as needed. I had some multi prong pigtails around so I can plug 4 fans in at once on a 12v adapter. Put the pipe in the piece, set it in the box and close the top. The air inside keeps moving around and the damp air gets pulled out of the inside.
When I have 4 going at once inside the big cardboard boxes it sounds like a large swarm of bees is in my office.
Note: This is NOT my invention. I got it from John Tisdale. It's how he dries his large pieces.
Attachments
Last edited:
@Randy Anderson - what are you using for a 12v power source? 110v ac to 12v dc adapter?
Ed, a 110V to 12V DC adapter is what I use. Like a lot of folks I have boxes of old AC adapters from different things purchased over the years. I usually don't throw them away and just pitch them in a box. If you have a 9V adapter that will work about as well and they're more common than 12V. The fans are DC and will just run a bit slower. You can check the current specs on the fans and the adapter and can keep it within range to run more than one fan if you want.
Here's a link to some fans. Lots of vendors selling same item for about $5-$6 apiece.
Here's a link to the plugs I use on the wires so I can swap out and change fans depending size and box they're in. These are handy little quick connects and a pack of 10 sets is about $8. I use them for other projects as well.
Last edited:
Randy - thanks for the info and links.
Ed, this is pretty much the same method I use. Two minor differences — I seal the green form with Johnson’s Paste Wax. It’s less expensive and I find it easier to apply than Anchorseal. Been doing this for over 20 years and almost never have a problem with cracking. Also, I tend to leave the bottom a bit thicker than the side walls. I am a big fan of Richard Raffan’s and I agree with him that a vessel ”feels” better in the hands if the bottom of the vessel has a bit more mass.Practically all of my HFs are twice turned. For the first turning, I leave the wall and bottom thickness at 1/2" - 5/8". The outside of the vessel gets covered with anchorseal to slow the drying process. In my experience it usually takes about three months for it to be dry and ready for the second turning. It is after the second turning that I get to the final wall thickness of 3/16" - 1/4". If you turn the HF in the end grain orientation (grain running parallel to the lathe bed), there is very little warping. It doesn't take much wood removal to get it back to round during the second turning. The final wall thickness is achieved when I smooth the inside of the vessel. The photo shows that much of the wood is removed from the bottom so that the bottom thickness is the same as the wall thickness, except in the center area. This is a methodology that I learned from Steve Sinner.
Last edited:
Just an aside: Johnson's Paste Wax is no longer inexpensive. An unopened can is going for $65 plus shipping on Ebay!! Even opened cans half empty are ~$30.Ed, this is pretty much the same method I use. Two minor differences — I seal the green form with Johnson’s Paste Wax. It’s less expensive and I find it easier to apply than Anchorseal. Been doing this for over 20 years and almost never have a problem with cracking. Also, I tend to leave the bottom a bit thicker than the side walls. I am a big fan of Richard Raffan’s and I agree with him that a vessel ”feels” better in the hands if the bottom of the vessel has a bit more mass.
@rkriet - during the second turning when working the inside to final wall thickness, I don't take anymore wood off the bottom, nor the bottom to side-wall transition area. Thus, I achieve the same "effect" as you; having more mass at the bottom for stability.Ed, this is pretty much the same method I use. Two minor differences — I seal the green form with Johnson’s Paste Wax. It’s less expensive and I find it easier to apply than Anchorseal. Been doing this for over 20 years and almost never have a problem with cracking. Also, I tend to leave the bottom a bit thicker than the side walls. I am a big fan of Richard Raffan’s and I agree with him that a vessel ”feels” better in the hands if the bottom of the vessel has a bit more mass.
With my bowls I turn them with the 10 percent rule. I wax inside and outside then set on a shelf to dry. With my hollow forms I turn them thick and just wax the outside and set on a shelf to dry.
Oops, I didn’t know that. I still have two full cans in my shop. I will have to treasure them as an investment that gains value every day!Just an aside: Johnson's Paste Wax is no longer inexpensive. An unopened can is going for $65 plus shipping on Ebay!! Even opened cans half empty are ~$30.