• We just finished moving the forums to a new hosting server. It looks like everything is functioning correctly but if you find a problem please report it in the Forum Technical Support Forum (click here) or email us at forum_moderator AT aawforum.org. Thanks!
  • Beware of Counterfeit Woodturning Tools (click here for details)
  • Johnathan Silwones is starting a new AAW chapter, Southern Alleghenies Woodturners, in Johnstown, PA. (click here for details)
  • Congratulations to Dave Roberts for "2 Hats" being selected as Turning of the Week for April 22, 2024 (click here for details)
  • Welcome new registering member. Your username must be your real First and Last name (for example: John Doe). "Screen names" and "handles" are not allowed and your registration will be deleted if you don't use your real name. Also, do not use all caps nor all lower case.

Secret to even-rim natural edge

Joined
May 28, 2015
Messages
1,554
Likes
178
Location
Bainbridge Island, WA
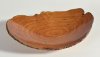
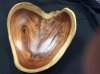
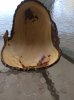
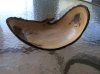
I have a couple bowl blanks I want to turn with natural edge. I've done a few small ones in the past, and one of the challenges is getting the rim the same thickness all the way around. The blank I'm about to work on will not be symmetrical -- the peaks will be pretty level, but the low spots will not be at the same level from the bottom. Anyways, it just seems that the rims often want to be thicker in some places than others. Can't seem to sort this out mentally. Bought Hohlfeld's natural edge book, but he doesn't really address this.

Edit: should have noted that these are being turned green.
 
Last edited:

hockenbery

Forum MVP
Beta Tester
TOTW Team
Joined
Apr 27, 2004
Messages
8,638
Likes
4,978
Location
Lakeland, Florida
Website
www.hockenberywoodturning.com
It isn' easy. More you do the better they come out.
I cut a stair step wall 1/2", 3/4" thick going down from the rim.

Then I Cut the final wall thickness 3/16 is a good one. 1/4" is usually fine.
And 1/8 or a 1/16 is good too.

I watch the outside and cut following the outside wall about an inch.
Stop an evaluate: Even, thicker at the bottom, ticker at the top.
Make the next cut accordingly.

With the right lathe speed and light angle I can see the outside wall and my gouge.
If I move the gouge along the inside of the wall the same distance away from the outside of the wall I cut and even wall.

Once the wall is set for the first inch cut the next stair step
And continue down the wall. Each cut into the next stair has to begin above the joint to avoid leaving a line.

It might be of value to take a look at the NE Bowl from a crotch demo I did a few years back.
The steps in turning the side wall are the same for crotch and symmetrical NE bowls.
View: http://www.youtube.com/watch?v=8jVoI12Kfug
 
Last edited:

hockenbery

Forum MVP
Beta Tester
TOTW Team
Joined
Apr 27, 2004
Messages
8,638
Likes
4,978
Location
Lakeland, Florida
Website
www.hockenberywoodturning.com
ps
if you get too thin you should correct leaving the transition line.
Sanding can blend it to look good. Correcting with the gouge just make it thinner.
I try to err on making the rim thicker as it goes- easier to cut of more wood on the next pass.
 
Last edited:
Joined
Nov 12, 2011
Messages
253
Likes
83
Location
Gassaway, WV
Website
www.steercreekwood.com
Jamie I like to pretty much finish the part that contains the bark down to where it becomes wood all the way around. The thickness depends on the size, about 1/4 to 3/8 inch thick. The bark becomes pretty fragile at less than 1/4". I use a bowl gouge to get pretty close then smooth to final thickness and smoothness with negative rake scraper. I twice turn mine because I think they look better. Not a fan off warped bowls. Good luck and it would be nice if you post a picture. BTW I stabilize the bark with thin CA, usually after I do the 150 grit sand.
 
Joined
May 28, 2015
Messages
1,554
Likes
178
Location
Bainbridge Island, WA
With the right lathe speed and light angle I can see the outside wall and my gouge.
If I move the gouge along the inside of the wall the same distance away from the outside of the wall I cut and even wall.
Ah, geez, I just realized what's happening when I turn these bowls, and feel kinda "doh!":p What I see is the low-point rim being thicker than the high-point rim. Obviously (obviously, Jamie!!) that's because the bowl is thicker at the lower part of the wall than at the upper. Probably should have put this in the Newbie sub-forum.:D:D:D
 
Joined
May 28, 2015
Messages
1,554
Likes
178
Location
Bainbridge Island, WA
Jamie I like to pretty much finish the part that contains the bark down to where it becomes wood all the way around. The thickness depends on the size, about 1/4 to 3/8 inch thick. The bark becomes pretty fragile at less than 1/4". I use a bowl gouge to get pretty close then smooth to final thickness and smoothness with negative rake scraper. I twice turn mine because I think they look better. Not a fan off warped bowls. Good luck and it would be nice if you post a picture. BTW I stabilize the bark with thin CA, usually after I do the 150 grit sand.
Fred, I forgot to mention in the original post that today I'm turning green bowls. But I will keep the "final thickness a or b or c" for 6 months from now. Do you do anything to the bark after the 1st turning?
 
Joined
Nov 12, 2011
Messages
253
Likes
83
Location
Gassaway, WV
Website
www.steercreekwood.com
Fred, I forgot to mention in the original post that today I'm turning green bowls. But I will keep the "final thickness a or b or c" for 6 months from now. Do you do anything to the bark after the 1st turning?
Jamie as the rough out dries the bark shrinks more than the wood especially on walnut, you might need to allow a little more thickness in your roughout. It shouldn't be a problem if you follow the 10% rule. Try not to get AnchorSeal on the bark, finish won't take on the wax.
 

hockenbery

Forum MVP
Beta Tester
TOTW Team
Joined
Apr 27, 2004
Messages
8,638
Likes
4,978
Location
Lakeland, Florida
Website
www.hockenberywoodturning.com
Using the bark or not, is a basic design choice. Each of which has pluses and minuses.

I remove the bark on most of the NE bowls I make these days.
It is usually more work to remove the bark but it allows the bowl to be functional.
Bark can be dramatic but it remains fragile and the bowl must be carefully handled and shipped with care too.
Woods with a contrasting sap ring like Walnut, cherry, camphor look terrific without bark,
Thin bowls look terrific without bark. Also crazy bark contours usual show better without the bark.
I do leave the bark on some bowls especially if I did not pull it off right after turning and it will be a pain to take it off when the bowl is dried.
 
Last edited:

john lucas

AAW Forum Expert
Joined
Apr 26, 2004
Messages
8,337
Likes
3,595
Location
Cookeville, TN
I've been adding my own bark. Well sort of. I first started burning the edge after removing the bark. The tried permanent markers. What I do now that i like a lot better is to color the edge using sponge painting techniques.
 

Attachments

  • painted-Natural-edge-bowl.jpg
    painted-Natural-edge-bowl.jpg
    89 KB · Views: 53

hockenbery

Forum MVP
Beta Tester
TOTW Team
Joined
Apr 27, 2004
Messages
8,638
Likes
4,978
Location
Lakeland, Florida
Website
www.hockenberywoodturning.com
I've been adding my own bark. Well sort of. I first started burning the edge after removing the bark. The tried permanent markers. What I do now that i like a lot better is to color the edge using sponge painting techniques.
John,
What a spectacular example of a crazy contour showing IMHO much better without the bark.

I often do something to rim. I like your sponge pattern.
Two bowls one unadulterated rim (14d) and one colored (13d) with a micro torch.
 

Attachments

  • image.jpeg
    image.jpeg
    700.8 KB · Views: 31
  • image.jpeg
    image.jpeg
    628.3 KB · Views: 33
Last edited:
Joined
May 16, 2005
Messages
3,540
Likes
15
Measure the thickness before you fiddle trying to get something optically equal. As I mentioned in the other thread, how steep the viewing angle counts. This looks thinner on the long grain where the angle is steep, but it's not.
Upside-Cherry.jpg


Swinging the tool into the shadow is the way to go, of course. I don't "step cut" anything, because I know it makes no difference in the end. Truth to tell, I don't use a "bowl" gouge, either. But I do sometimes put a dark card behind white wood or a light one behing dark wood when I have some problem seeing the shadow of the wood I want to remove. Procedure like this. http://i35.photobucket.com/albums/d160/GoodOnesGone/Bark-up.jpg A blast with pressurized air to surface dry, and a quick 120 sand takes it off the lathe. Time for finer paper once the fuzz of wet wood settles or stands.
 
Joined
Mar 28, 2016
Messages
95
Likes
6
Location
Upper Michigan
some nice bowls pictured here. jamie make sure you super glue the outside and the inside of the bark. some of the ones i've done I forgot to do both sides and right where the bark joins can tend to tear out for me. the super glue solidifies the fibers so I don't get pock marks from grain being torn. do this even when you're finishing the final cuts and you'lll get a much better result, like before your final finishing pass with the gouge, just run some thin ca around the edge, makes a big diff for me anyways.
 
Joined
Jun 1, 2006
Messages
326
Likes
154
Location
Freelton, ON
I discovered this after several years of turning NE Bowls. After you have started on the inside and can see that it is thinning out at the top edges and not needing more there, stop the lathe and rotate by hand taking notice of where the wall begins to thicken and needs additional work. Make a mark on the tool rest with a Sharpie or pencil opposite that place and position your gouge at that place and turn the lathe on and begin the cut. Was a Eureka moment for me.
 
Joined
May 28, 2015
Messages
1,554
Likes
178
Location
Bainbridge Island, WA
I discovered this after several years of turning NE Bowls. After you have started on the inside and can see that it is thinning out at the top edges and not needing more there, stop the lathe and rotate by hand taking notice of where the wall begins to thicken and needs additional work. Make a mark on the tool rest with a Sharpie or pencil opposite that place and position your gouge at that place and turn the lathe on and begin the cut. Was a Eureka moment for me.
I have so many scratches on my Jet tool rest, I just pick the right one.:D:D
 

hockenbery

Forum MVP
Beta Tester
TOTW Team
Joined
Apr 27, 2004
Messages
8,638
Likes
4,978
Location
Lakeland, Florida
Website
www.hockenberywoodturning.com
Here is an elm bowl I turned last week. It goes along with the idea that many bowls look better without the bark. I had planned to take the bark off but I had a brain cramp and did not rotate the bowl to get the wall centered on the branch. This left me with the dilema: I don't like the bark opposite the branch and I want to keep the branch which is all bark on one side.
Keeping the branch won so I left the bark.
Should have adjusted the bowl when it was between centers then I would have no bark and the branch and a better looking bowl. Oh darn!

It is 10" by 7", and has one coat of Waterlox. It is 5/32 thick. The wall is fairly even all the way through and the bowl has not foot just a rounded bottom. It needed to be thin to not crack at the pith. The pith is a nice feature in this bowl but is does mess up the curve.
The area around the pith pooches out in a bump as it dries.

These are fun little bowls to do and lots of people like them.
 

Attachments

  • image.jpeg
    image.jpeg
    534.3 KB · Views: 22
  • image.jpeg
    image.jpeg
    294 KB · Views: 23
  • image.jpeg
    image.jpeg
    795.5 KB · Views: 22
Back
Top