• We just finished moving the forums to a new hosting server. It looks like everything is functioning correctly but if you find a problem please report it in the Forum Technical Support Forum (click here) or email us at forum_moderator AT aawforum.org. Thanks!
  • Beware of Counterfeit Woodturning Tools (click here for details)
  • Johnathan Silwones is starting a new AAW chapter, Southern Alleghenies Woodturners, in Johnstown, PA. (click here for details)
  • Congratulations to Dave Roberts for "2 Hats" being selected as Turning of the Week for April 22, 2024 (click here for details)
  • Welcome new registering member. Your username must be your real First and Last name (for example: John Doe). "Screen names" and "handles" are not allowed and your registration will be deleted if you don't use your real name. Also, do not use all caps nor all lower case.

Using a blender for filler on epoxy repairs: report.....

odie

TOTW Team
Joined
Dec 22, 2006
Messages
7,116
Likes
9,818
Location
Panning for Montana gold, with Betsy, the mule!
It really chops it up with a mixture of sizes. That’s why I use the strainer to sift out the bigger particles. You can actually re-strain to yield and collect finer particles through a finer drywall sandpaper mesh. The blender’s glass container wall will be coated with the ultra fine dust which can be collected. The advantage of this process is you can make as much as you need at a consistent particle size. See the picture above.

I got the idea because I turned a burl and was wondering how to fill the voids. A friend said use coffee grinds. So I ground some coffee and tried it. It didn’t match. Then I got the idea to grind some of the burl’s bark in the coffee grinder. It worked but I quickly destroyed the grinder! I figured the blender would work because it does an excellent job on ice. A word of caution: ice is about 1.5 inch cubes. Use small pieces of bark/wood .5inch cubes. The Smaller the better and pulse rather than running the blender constant. Do not allow a heat build up inside the blender container. It’s possible that it could catch fire if you run the blender a long time. I empty the blender into the strainer often and reblended the bigger particles.
That's it! :D

This sounds like the perfect solution for me. Don't know why I've never heard of this before, but now I've got to try this out for myself. Matter of fact, I've got bowls in the shop right now that can use some help with small voids.

thanks

-----odie-----
IMG_4279.JPG

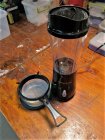
I have used this inexpensive (about $10) blender a few times now, with mixed results. At this point, my opinion is that using sanding dust, or bandsaw dust is a better solution, but the blender still has value for large voids, or when other sources of a filler for epoxy isn't available.

The blender doesn't produce as fine a dust as sanding dust is. The bandsaw dust is slightly coarser than sanding dust. The blender takes shavings, and produces the coarsest particles of the three sources. All of these sources are definitely useful, but all have uses that are useful for specific tasks.

In the blender, the chips tend rise up, and stay above the cutter blade, and are not cut small enough for my purposes. The solution, here, is to use the blender momentarily......start/stop/start/stop/start/stop, etc. This allows the chips to fall back down below the level of the cutter, so they can be processed again. This works up to a point when there seems to be a limit on how small the pieces can be.

The blender is cheap, and useful......but, not quite the "magic bullet" solution I had envisioned. It's worthwhile to have one of these blenders on hand for those times where it's capabilities are best utilized.

(As I sit here and think about this, the thought of sharpening the cutter blade, or a replacement blade might improve the blender's utility.......I'll check into that. :D)

-----odie-----
 

odie

TOTW Team
Joined
Dec 22, 2006
Messages
7,116
Likes
9,818
Location
Panning for Montana gold, with Betsy, the mule!
In recent times, it's becoming more common to use turquoise bits as a filler for large voids. To tell the truth, I've never been a fan of that. It's akin to putting lipstick on a pig.....or, so the saying goes. I have not used blender particles to fill a very large void yet.......but, I'm hoping the overall visual impact is somewhere in-between the stark contrast of the turquoise, and an attempt to hide a flaw. If it looks like it's hiding a flaw.....that, IMHO.....looks worse than the gaudy look of the turquoise. If it has the subliminal effect of utility without the attempt to neither showcase, or hide......that would be a perfect solution.

The jury is still out on that......but, when the right example presents itself, I'll do some further experimenting.......:D

-----odie-----
 
Joined
May 11, 2011
Messages
66
Likes
89
Location
Abbotsford B.C.
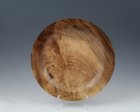
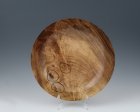
Odie, as I mentioned before I use artists earth pigments for colouring epoxy for filling voids.
With this platter I needed to fill three voids that went clear though the piece, if you look close you can see where these voids are but what is not evident is how small the fillings are. It appears as though the dark areas are the filled areas but the majority of the dark area is just the darker wood that surrounded the void, the patch itself is very small but blends in very nicely.
 

Attachments

  • F7C41AF0-3803-4A5B-B4E0-BCEF92A142A0.jpeg
    F7C41AF0-3803-4A5B-B4E0-BCEF92A142A0.jpeg
    261.1 KB · Views: 51
  • 390B6882-531B-49A7-A175-313C69932A36.jpeg
    390B6882-531B-49A7-A175-313C69932A36.jpeg
    264.8 KB · Views: 47
Last edited:

odie

TOTW Team
Joined
Dec 22, 2006
Messages
7,116
Likes
9,818
Location
Panning for Montana gold, with Betsy, the mule!
Odie, as I mentioned before I use artists earth pigments for colouring epoxy for filling voids.
With this platter I needed to fill three voids that went clear though the piece, if you look close you can see where these voids are but what is not evident is how small the fillings are. It appears as though the dark areas are the filled areas but the majority of the dark area is just the darker wood that surrounded the void, the patch itself is very small but blends in very nicely.

I remember that, John......and, you have my thanks for your suggestions. :D

At this moment in time, I'd rather explore my options using the actual sawdust from the bowl that needs repairs. To my thinking, it seems like the best way to handle the repairs. This doesn't mean I am dismissing your suggestions......I'm holding them in reserve for a possible solution when all else fails. I don't have cracks and voids that I can use for experimenting, at the moment, but you can bet I'm going to follow my instincts to come up with the best possible fix that I can muster.

I look forward to your input on any related subject in the future....you can count on it! ;)

-----odie-----
 
Joined
May 11, 2011
Messages
66
Likes
89
Location
Abbotsford B.C.
In the past I did try using the sanding dust from the actual project in hand to mix with epoxy but was never able to get a good match in colour, this is why I am now using the earth pigments.
 
Joined
Feb 12, 2018
Messages
411
Likes
249
Location
Millington, TN
John, I've seen many demonstrators (YouTube & professionals) use CA glue when filling cracks with wood dust & turquoise like material. Do you prefer using epoxy because you suspect (or know) something bad will happen to the CA patch (i.e. eventually pops loose)?
 

odie

TOTW Team
Joined
Dec 22, 2006
Messages
7,116
Likes
9,818
Location
Panning for Montana gold, with Betsy, the mule!
John, I've seen many demonstrators (YouTube & professionals) use CA glue when filling cracks with wood dust & turquoise like material. Do you prefer using epoxy because you suspect (or know) something bad will happen to the CA patch (i.e. eventually pops loose)?
Karl.......what I've found is CA tends to discolor the surrounding wood, and comes on like "see here" psychologically. That's why I no longer am a fan of CA. We all have our own priorities, and while the CA is a good result in the mechanical sense, it fails to give a quality that is more aesthetically appealing. This is the threshold that becomes an impasse for the casual observer, and that is what I wish to avoid.

-----odie-----
 
Last edited:
Joined
May 11, 2011
Messages
66
Likes
89
Location
Abbotsford B.C.
Like Odie I’ve tried C.A. For filling cracks and voids but didn’t like the outcome, especially how it will saturate into the surrounding wood and cause staining. And I also don’t like the look of turquoise.
 
Joined
Jun 13, 2017
Messages
49
Likes
37
Location
Hickory, NC
I use a cheap coffee grinder. It’s basically a mini blender so there isn’t as much space for larger chunks to rise up. I’ve not used it on much wood. I use an undrinkable coffee that makes a great black pigment.
If you want to avoid staining with ca glue, spray the area around the crack with shellac in a shaker can. That seals up the wood so the ca glue can’t soak into the area surrounding the crack or void. It also dries quickly and is easy to sand off. It doesn’t fix the structural problems of ca, but it works well for small voids or cracks.
 
Joined
Apr 25, 2006
Messages
115
Likes
51
Location
Coos Bay, OR
If you put a light coat of lacquer or shellac on your piece before you use CA it will eliminate most of the discoloration. Odie I have to disagree with you about turquoise. I find it to be a beautiful filler, especially with black walnut. We all have our own tastes.
 
Joined
Feb 12, 2018
Messages
411
Likes
249
Location
Millington, TN
The issues with CA bleeding can be controlled as some have suggested. What I'm wanting to understand is how CA glue holds up over time compared to epoxy (when used with fillers being discussed here). In other words, do CA filled cracks eventually open back up (as wood changes with seasons), and epoxy filled cracks don't because it remains flexible?

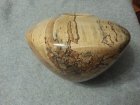
For example, here's a recently finished spalted maple form (9" x 6") that developed several cracks while drying. I used CA glue with wood dust to fill in the cracks, but was careful to limit bleeding. If I sold this piece then would CA glue & filler give my customer problems down the road?

Maple_Hollow_Form_201810.jpg
 
Joined
Jun 13, 2017
Messages
49
Likes
37
Location
Hickory, NC
For example, here's a recently finished spalted maple form (9" x 6") that developed several cracks while drying. I used CA glue with wood dust to fill in the cracks, but was careful to limit bleeding. If I sold this piece then would CA glue & filler give my customer problems down the road?

View attachment 27069

Maple doesn’t move a lot once it is dried and finished in my experience. I typically use ca for small cracks that won’t see much movement. Epoxy isn’t much more flexible, just less brittle. Unless you had a major crack to the rim I doubt you will have trouble with your form. I would suspect your crack was small and near or somehow related to the spalting.
 
Joined
Feb 8, 2014
Messages
1,178
Likes
613
Location
Evanston, IL USA
Odie, as I mentioned before I use artists earth pigments for colouring epoxy for filling voids.
With this platter I needed to fill three voids that went clear though the piece, if you look close you can see where these voids are but what is not evident is how small the fillings are. It appears as though the dark areas are the filled areas but the majority of the dark area is just the darker wood that surrounded the void, the patch itself is very small but blends in very nicely.

What are "earth pigments" and where does one get them?

I have used finely ground coffee, wood chips, and dust of the same species from the belt sander bag. In all cases, however, I have a problem with the epoxy soaking into the undamaged grain near the void, then when it's time for finishing the saturated areas stand out like a sore thumb.
 

odie

TOTW Team
Joined
Dec 22, 2006
Messages
7,116
Likes
9,818
Location
Panning for Montana gold, with Betsy, the mule!
In all cases, however, I have a problem with the epoxy soaking into the undamaged grain near the void, then when it's time for finishing the saturated areas stand out like a sore thumb.

I have never had this problem, Tom.
What kind of epoxy are you using?
-----odie-----
 
Joined
Feb 8, 2014
Messages
1,178
Likes
613
Location
Evanston, IL USA
I have never had this problem, Tom.
What kind of epoxy are you using?
-----odie-----

Just local Ace hardware store 5 minute epoxy, also sold as Devcon brand. I have some West System, but I save that for big projects.
Maybe it's just the job I did this weekend-- Acorn finials made of clear western cedar-- it's very soft and porous.
 

odie

TOTW Team
Joined
Dec 22, 2006
Messages
7,116
Likes
9,818
Location
Panning for Montana gold, with Betsy, the mule!
Just local Ace hardware store 5 minute epoxy, also sold as Devcon brand. I have some West System, but I save that for big projects.
Maybe it's just the job I did this weekend-- Acorn finials made of clear western cedar-- it's very soft and porous.

Hmmmm.....I'm currently using the Devcon 2-part epoxy, but the slow set version.....not the 5-minute epoxy. I buy it in the larger volumes......not the syringe type of application. One thing I've noticed, is pressure in applying this epoxy to a crack, or void, will tend to push it into the pores of the wood. This can be minimized by using hockey tape placed around the crack/void right up to the edge. The beauty in this, is the epoxy doesn't stick to the cloth hockey tape. I'm using finger cots (used for anal exams) for applying the epoxy with finger pressure. (Gives a great sense of feel for applying the epoxy.) Once the gap is filled, another piece of hockey tape can be applied over the entire repair. Then let it harden. When hardened, just pull the hockey tape off, and you have nothing left but a filled void or crack. This will leave a little epoxy above the surface of the wood, and it's easily sanded, or turned away.

-----odie-----
 
Back
Top