• Beware of Counterfeit Woodturning Tools (click here for details)
  • Johnathan Silwones is starting a new AAW chapter, Southern Alleghenies Woodturners, in Johnstown, PA. (click here for details)
  • Congratulations to Keven Jesequel for "Big Leaf Maple" being selected as Turning of the Week for April 15, 2024 (click here for details)
  • Welcome new registering member. Your username must be your real First and Last name (for example: John Doe). "Screen names" and "handles" are not allowed and your registration will be deleted if you don't use your real name. Also, do not use all caps nor all lower case.

Another Basket Weave Question

Joined
Mar 19, 2016
Messages
1,183
Likes
1,279
Location
Haubstadt, Indiana
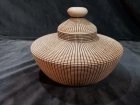
I am working on my second basket weave turning. Not yet complete. I showed the in process turning to my wife and daughter. and explained my plan to add color to imitate the Native American baskets. Both begged me not to do this, but leave it as is. What are your opinions? Has anyone done this or woul the piece look incomplete? If I do this, then I am unsure how th deal with the inside center. I had stopped burning lines as the are getting ridiculously close. I was initially going to color black. Now thinking may just burn random lines so it looks like one continuous curled piece.
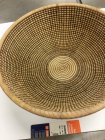
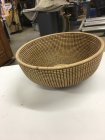
IMG_2191.JPG IMG_2192.JPG
 
Joined
May 25, 2010
Messages
121
Likes
68
Location
Prince Frederick, MD
Wow, that's a lot of work invested in there!

I've never done basket illusion work, but it's definitely on my "want to learn it one day" list.

On the one hand, my understanding is that the coloring will cover up any of the unevenness of the burn marks. But on the other hand, it's generally wise to keep your wife happy. :) Have they seen any examples of fully completed pieces? Maybe that will help them visualize what you were thinking of doing.

Dan
 
Joined
Jan 18, 2006
Messages
101
Likes
48
Location
Pueblo West, CO
If they want it left that way, then leave it. Start and finish another basket illusion and perhaps then they will want you to finish this one. It won't hurt for this one to set. It will probably war a little that will not affect the coloring. You have dome the easy part. The hard part in my opinion is the coloring. Allyn
 
Joined
Jan 22, 2018
Messages
264
Likes
313
Location
Cameron, Illinois
I can understand your indecisiveness with this piece. In your mind it is an incomplete basket weave illusion that you had planned. Your wife and daughter are viewing it as a piece of art and don't have the benefit of your vision for the piece.

My opinion is to look at it as a piece of art as it stands now. Tough to separate in your mind your plans for it, but I'd second what Arkriver said and leave it alone. You can always come back to it.

I love the look of it. For me, it works well as is. If it were mine, I'd leave the center un-burned and un-colored. The contrast of the light colored center provides a nice contrast.

It's easy for me to say that, I don't have anything invested in it, and I've never done any basket illusion pieces (although I want to when my skills increase).
 

Bill Boehme

Administrator
Staff member
Beta Tester
TOTW Team
Joined
Jan 27, 2005
Messages
12,897
Likes
5,181
Location
Dalworthington Gardens, TX
Website
pbase.com
It's always possible to come back later and color it, but not possible to go the other way. Personally, I don't care for the radial lines in an unfinished piece and think it would look better if embellished with a colored geometric design. I hope that you verified that your planned pattern matches the number of burned divisions in each row. Will your design work well with wide segments at the top and tiny segments near the bottom?
 

Emiliano Achaval

Administrator
Staff member
Beta Tester
TOTW Team
Joined
Dec 14, 2015
Messages
3,315
Likes
4,267
Location
Maui, Hawaii
Website
hawaiiankoaturner.com
It's always possible to come back later and color it, but not possible to go the other way. Personally, I don't care for the radial lines in an unfinished piece and think it would look better if embellished with a colored geometric design. I hope that you verified that your planned pattern matches the number of burned divisions in each row. Will your design work well with wide segments at the top and tiny segments near the bottom?
If that was my bowl, I'd probably lose some sleep with Bill's questions. I have never done a basket weave, but I can see his point. Might be a good idea to leave as it is! For what it's worth, if my wife tells me she wants it for the house, or don't color it, her wishes are my commands. I think you have done an excellent job. Aloha
 
Joined
Sep 4, 2013
Messages
71
Likes
18
Location
Kennedale, Texas
It is a basket illusion piece. Would bet that most woven baskets are left natural since they are functional pieces. I really like what you have done and agree with Amiliano, if my wife said leave like this I would. Have to disagree with Bill on the radial lines, since without them this would be a bee hive bowl rather than a basket illusion . I have been doing some small platters where I insert wood burning of flowers in center (Took a class from Charlie Phillips, who is well known wood carver and becoming a well known Woodturner). I like making things that are original and not wooden copies of woven art. So far my wife has encouraged me not to add design or color since she likes the natural color of the wood. Keep up the good work
 
Joined
Sep 3, 2012
Messages
84
Likes
59
Location
Edmonton,AB,Canada
Hi William,you are not alone I have sat with this piece for over a year trying to figure out what I should do with it. For me I think it wants a pattern but take your time to decide just maybe not as long as me.:D BTW great looking basket with well defined beads. hf.jpg
 
Joined
Mar 19, 2016
Messages
1,183
Likes
1,279
Location
Haubstadt, Indiana
Have they seen any examples of fully completed pieces?

The answer is yes, no change in their opinion


My opinion is to look at it as a piece of art as it stands now. Tough to separate in your mind your plans for it, but I'd second what Arkriver said and leave it alone. You can always come back to it.

I love the look of it. For me, it works well as is. If it were mine, I'd leave the center un-burned and un-colored. The contrast of the light colored center provides a nice contrast.

It's easy for me to say that, I don't have anything invested in it, and I've never done any basket illusion pieces (although I want to when my skills increase).


Appreciate your opinion

Personally, I don't care for the radial lines in an unfinished piece and think it would look better if embellished with a colored geometric design. I hope that you verified that your planned pattern matches the number of burned divisions in each row. Will your design work well with wide segments at the top and tiny segments near the bottom?

I guess the radial burns are something to consider. I started using the paper back sandpaper, but thought there was not enough definition. I then used formica that made a much darker
burn. However I think the sandpaper may actually give a better effect and will use that on the next piece. I can see I had the bead burner set high giving some over burn, but I like that effect.
Haven't even thought of a pattern and at this point it appears it will not happen.


Might be a good idea to leave as it is! For what it's worth, if my wife tells me she wants it for the house, or don't color it, her wishes are my commands. I think you have done an excellent job. Aloha

Yep, I'll leave it as is. Your opinion is worth a lot. Thanks Emiliano


Have to disagree with Bill on the radial lines, since without them this would be a bee hive bowl rather than a basket illusion . I have been doing some small platters where I insert wood burning of flowers in center (Took a class from Charlie Phillips, who is well known wood carver and becoming a well known Woodturner). I like making things that are original and not wooden copies of woven art. So far my wife has encouraged me not to add design or color since she likes the natural color of the wood. Keep up the good work

I agree on the radial lines. They just shouldn't be "too" burnt. My wife doesn't want me to color anything and i have all these transtint dyes.

Hi William,you are not alone I have sat with this piece for over a year trying to figure out what I should do with it. For me I think it wants a pattern but take your time to decide just maybe not as long as me.:D BTW great looking basket with well defined beads.

Stan that is a great looking piece. Really like the idea and shape.

Gary, The CFO has spoken and this piece will be left natural
 
Joined
Jul 26, 2016
Messages
2,326
Likes
1,105
Location
Nebraska
Take a photo of the finished basket and load it into a photo imaging program and do all of your experimenting with colors and patterns on the photo and save the different concepts until you are happy with a design. This exercise may give you some ideas on your next piece, no matter if you leave this one natural or decide to add color. Beautiful piece in its natural form!
 
Joined
Mar 19, 2016
Messages
1,183
Likes
1,279
Location
Haubstadt, Indiana
Take a photo of the finished basket and load it into a photo imaging program and do all of your experimenting with colors and patterns on the photo and save the different concepts until you are happy with a design. This exercise may give you some ideas on your next piece, no matter if you leave this one natural or decide to add color. Beautiful piece in its natural form!

good advice. hadn't thought to do it that way for the next one.
 
Joined
Jul 27, 2005
Messages
278
Likes
1,839
Location
North Ogden, Utah
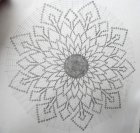
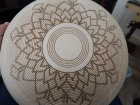
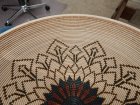
William, after doing a few of these basket illusions I've come to the conclusion that for them to work out best you should draw and even sometimes color the pattern on paper before you ever even turn the wood. I haven't read all the posts here but from what I've seen I have the feeling you've either had a class or watched the videos that Harvey Meyer has done. IMHO one of the best ways to learn the process. I recall having the same feelings as your "CFO" about how the pieces looked really cool after beading, then even cooler with the grid lines burned. With each step they seem to get more exciting. The smart decision is to let the boss have her way on this one. But get right into #2 and start it with a design drawn on paper. Then you can watch it all come to life with each step. I happen to be about midway into making one so I've taken a few photos to show my process. I hope I don't confuse you because I do it a bit differently. I only use the grid to draw the design on the basket. I draw it with pencil, shade in the spots that will be colored, then burn the pattern lines only. I then color it and fill in the rest of the unpatterned areas with random lines rather than following the grid. Last I burn the design on the rim. I get tired of the tedious amount of time each step takes so I have several steps going all the time to break it up. In these 3 photos you can see a little of each.WIP floral pattern.jpg WIP floral pattern 2.jpg WIP floral pattern 1.jpg
 

Bill Boehme

Administrator
Staff member
Beta Tester
TOTW Team
Joined
Jan 27, 2005
Messages
12,897
Likes
5,181
Location
Dalworthington Gardens, TX
Website
pbase.com
.... Have to disagree with Bill on the radial lines, since without them this would be a bee hive bowl rather than a basket illusion . ....

@Tom Beatty There are a number of different kinds of baskets. A "woven" basket design would typically have the radial lines while a "coiled" basket wouldn't. Both types are copying if you get down to brass tacks. Either type allows for creative expression to whatever degree the maker desires. Look at a real woven basket and you'll see that the radial lines don't truly represent the look.
 

Bill Boehme

Administrator
Staff member
Beta Tester
TOTW Team
Joined
Jan 27, 2005
Messages
12,897
Likes
5,181
Location
Dalworthington Gardens, TX
Website
pbase.com
start it with a design drawn on paper. Then you can watch it all come to life with each step. I happen to be about midway into making one so I've taken a few photos to show my process. I hope I don't confuse you because I do it a bit differently. I only use the grid to draw the design on the basket. I draw it with pencil, shade in the spots that will be colored, then burn the pattern lines only. I then color it and fill in the rest of the unpatterned areas with random lines rather than following the grid. Last I burn the design on the rim. I get tired of the tedious amount of time each step takes so I have several steps going all the time to break it up. In these 3 photos you can see a little of each.

Your description is very very close to my method.
 
Joined
Jul 27, 2005
Messages
278
Likes
1,839
Location
North Ogden, Utah
Curtis see something that looks like a very long crack that goes from rim to rim. Is it that or something else?
Long story Bill. I made two bowl blanks with a piece of 16/4 maple that was just under 10" wide and just under 4' long. I don't have a joiner so to get a nice surface to glue up I had to rip the wood down the middle so it would go through my planer on edge. After planing it I cut both pieces into thirds.Then I glued up 3 pieces each to end up with two blanks that were just over 14" wide. The wood had a dark streak down one side of it so when I glued them up it created a distinct glue line. That's what you're seeing. This basket will end up being entirely colored to hide the difference in the wood. The other blank is the Man in a Maze piece in the gallery. It's also entirely colored with black ink and a dilute wash of oil paint. You're probably scratching your head wondering why I would do it that way. But I had the board from a woodshop liquidation a few years back and that's the idea that came out of my warped way of doing things. ;-)
 
Joined
Mar 19, 2016
Messages
1,183
Likes
1,279
Location
Haubstadt, Indiana
William, after doing a few of these basket illusions I've come to the conclusion that for them to work out best you should draw and even sometimes color the pattern on paper before you ever even turn the wood. I haven't read all the posts here but from what I've seen I have the feeling you've either had a class or watched the videos that Harvey Meyer has done. IMHO one of the best ways to learn the process. I recall having the same feelings as your "CFO" about how the pieces looked really cool after beading, then even cooler with the grid lines burned. With each step they seem to get more exciting. The smart decision is to let the boss have her way on this one. But get right into #2 and start it with a design drawn on paper. Then you can watch it all come to life with each step. I happen to be about midway into making one so I've taken a few photos to show my process. I hope I don't confuse you because I do it a bit differently. I only use the grid to draw the design on the basket. I draw it with pencil, shade in the spots that will be colored, then burn the pattern lines only. I then color it and fill in the rest of the unpatterned areas with random lines rather than following the grid. Last I burn the design on the rim. I get tired of the tedious amount of time each step takes so I have several steps going all the time to break it up. In these 3 photos you can see a little of each.View attachment 28578 View attachment 28579 View attachment 28580

I haven't had any training, just watching videos and reading. I initially was going to lay out a pattern and do all the coloring after all the beading. I really like your idea of beading the pattern and coloring before beading the remainder. I hadn't thought to do it that way. That will be my approach on my next one, but will most likely follow the pencil lines instead of random beading until i get more experience. I admire your work and innovations and looks like you have another fantastic piece in process. Thank you for posting your process as it is something I plan on doing on my next one.
 
Back
Top