• We just finished moving the forums to a new hosting server. It looks like everything is functioning correctly but if you find a problem please report it in the Forum Technical Support Forum (click here) or email us at forum_moderator AT aawforum.org. Thanks!
  • Beware of Counterfeit Woodturning Tools (click here for details)
  • Johnathan Silwones is starting a new AAW chapter, Southern Alleghenies Woodturners, in Johnstown, PA. (click here for details)
  • Congratulations to Dave Roberts for "2 Hats" being selected as Turning of the Week for April 22, 2024 (click here for details)
  • Welcome new registering member. Your username must be your real First and Last name (for example: John Doe). "Screen names" and "handles" are not allowed and your registration will be deleted if you don't use your real name. Also, do not use all caps nor all lower case.

box turning woes

Joined
Mar 31, 2007
Messages
74
Likes
0
Location
Ames, Iowa
to this point, i've done mostly pens and bottle stoppers, shaving brushes and easier things. i successfully made a little box out of a 2x4, that was fun and the pine was easy to turn...

the only bowl i've tried to make, from juniper, was turning great until i snagged on a knot and the blank went flying across the room...

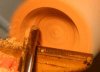
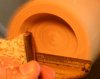
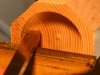
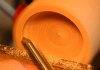
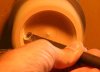
tonight i was trying to make a birthday present for my wife. a nice box from a MARA blank i found at rockler. it was the only one big enough for the size box i wanted to make. i've got a few questions...

i thought my bowl gouge technique was decent at least, but man was i proved wrong tonight. i tried slow, light cuts, slow lathe speed, everything and i just couldn't get more than a few cuts without a huge catch resulting. i runied most of a nice blank this evening. after the first blow out, i tried to make the box smaller, but that just resulted in a huge crack in the new lid... i even sharpened my tool right before starting and halfway through, didn't seem to eliminate the catches. so, this must be my technique or the MARA is extremely difficult to hollow endgrain with... does anyone have any exp. with MARA? or does anyone have any pointers about making boxes that might help me out? anything would be appreciated, i was on the verge of waking up neighbors with my profanity.... :rolleyes:

maybe i just needed to rant but if anyone has any tips or whatever, maybe i'll finish her present one of these days...

thanks.
 

Donna Banfield

TOTW Team
Joined
May 19, 2004
Messages
511
Likes
1,351
Location
Derry, NH
Hi Andrew

I've never turned the wood that you're attempting to make a box out of, so can't offer any help there, but, if there are any woodturning clubs near you, check them out.

Most of the clubs have plenty of skilled woodturners who are very generous with their knowledge and their time. I belong to a couple clubs, and one of them has a mentor program, created to help out any level turner who is having trouble with a particular cut, or just wants to learn how to turn -- see you don't even need to know how to turn to join a club!

If a club isn't an option, a very good alternative is to purchase or rent (check with your local library or video store) turning videos/DVD's. For boxes, Richard Raffan has one, that complements his book on the subject quite nicely. Sometimes, understanding why you're getting a catch can be a simple rotation of the tool that you aren't even aware you're doing. Watching it done right (with a video, several times) can show how to hold the tool, present it to the turning blank, and show you how the wood looks as it is being cut by the tool when all done properly. Then when you get into your shop, you can try out those techniques yourself. If possible, you may even be able to set up a small tv/DVD player in your shop so that you can watch/try the technique/watch/try the technique....you get the idea.

Now, onto specifics...if you were using your bowl gouge to hollow out the interior of the box, you're bound to have problems. The reason is because you're pushing the tool into end grain, and the orientation of the grains of wood are going to resist the cutting. The only time that I've used a bowl gouge to cut into end grain is when I back-hollow; Raffan demonstrates this technique in his video on box making. Tools like the termite, the hook tool, or even an end ball mill will work great on end grain. To use any of these tools, you start by drilling a depth hole into center of the blank, down to the bottom point of your box. Then you begin in the center of that hole, and drawn the tool out towards you - exactly the opposite of when you turn a bowl. If the descriptions that I've used are confusing, then do yourself the favor and get with a club, or a video. Considering how much money we spend in tools and wood (the blank at Rockler wasn't cheap, I'll bet) $30 on a video is worth a million bucks in lessons. :D
 

john lucas

AAW Forum Expert
Joined
Apr 26, 2004
Messages
8,337
Likes
3,595
Location
Cookeville, TN
I personally don't like the Raffen back cut. It's hard for beginners to learn, especially from a video. Up until recently I did all my endgrain hollowing with a bowl gouge. I turn the flute so it's pointed about 9 oclock and hollow from the center out to the edge. You should rotate the tool so the bottom flute is cutting at or slightly above the center line. The upper flute should be just a few millimeters away from touching the wood. This is a safe easily controllable method.
A good round nose scraper is also a good alternative for hollowing boxes. Keep the handle higher than the cutting edge and take light cuts until you get a feel for how it's cutting. Put a fresh burr on the edge before the last pass to keep the tearout to a minimum. Again cut from the center out on end grain hollowing.
Now I found a new tool. The Hunter tool. I use a #3 or #4 for boxes. It is a tool that "never" needs sharpening. The term never is a little misleading but he's quite serious. The tool is round and it does eventually get dull. You simply rotate it to a new area and use it some more. When it does eventually get completely dull you replace the cutter(that's where the never needs sharpening comes in). Seriously though this is one sweet tool. It cuts very similar to a ring tool or hook tool but doesn't dull anywhere near as fast. I've cut a whole bunch of ash boxes, hollowed most of 3 large box elder vessels, and holllowed a walnut vase and it isn't even remotely showing signs of dulling.
The Hunter tool cuts extremely clean. I holllow my boxes and start sanding with 220. The vase took a little more sanding because it was so thin it was starting to flex and get some tearout. I was able to hollow 6 1/2" deep with sides less than 1/8" and only had tearout near the lip where it was flexing to much.
It's almost catch free. Dont' try to use it flat like a scraper, then it can catch. Rotate it to about 45 degrees or slightly steeper to the left. You'll have to rotate it one way or the other to find the "sweet" spot but once you do it will pull big curls off.
 
Joined
Mar 31, 2007
Messages
74
Likes
0
Location
Ames, Iowa
thanks very much for the suggestions, i'll give the new bowl gouge method a try. i took one of my old HF cheapo round nosers and put a side of it to emulate a round nose scraper. i thought i was doing great with it until the worst catch of the evening ensued and the freakin' tool got bent! shows you the quality of HF tools... and my technique! :D

thanks again for your help.
 
Joined
May 16, 2005
Messages
3,540
Likes
15
I'll disagree with John. Don't go above centerline with any interior work, stay below so you don't jam the shaving/gouge edge into wood which gets closer as you go up. Instead, make your entry cut below centerline, with the exit at or slightly below to protect against a catch. Air doesn't, wood will catch.

Though you don't mention it, there are some people who grind the wing of their bowl gouge as a straight edge. I don't like this practice, because it doesn't allow me to employ the curve on the edge to take a thinner exit side on the shaving. Since a round nose has a tendency to skate a bit unless you prebore, I use a pointed gouge for hollowing http://www.photosite.com/mmouse8/Album2/ContactSheet_Hollow.html which allows me to tuck in and begin instantly to guide the opposite bevel as I continue the poke and begin the roll establish the proper side. Much less skate and grab potential.

Any fingernailed gouge, regardless the name, will work well for expanding a hollow. Longer the bevel, and therefore broader the shaving, the less problem with ridging.
 

john lucas

AAW Forum Expert
Joined
Apr 26, 2004
Messages
8,337
Likes
3,595
Location
Cookeville, TN
Micheal I'm sure it's just the terminology we are using. I'll try to explain my description. I have the cut at 9 oclock or above because if you get a catch it pulls it down into space. If you have the cut below 9 oclock when you get a catch it pulls the tool down into the wood. Is that more in line with what your saying.
 
Joined
May 16, 2005
Messages
3,540
Likes
15
john lucas said:
Micheal I'm sure it's just the terminology we are using. I'll try to explain my description. I have the cut at 9 oclock or above because if you get a catch it pulls it down into space. If you have the cut below 9 oclock when you get a catch it pulls the tool down into the wood. Is that more in line with what your saying.

Nope, I cut above center convex and below concave because a loose hand or arm drop on the leverage end doesn't put the gouge into wood, but air. I'm interested in preventing the catch, not worrying where the gouge would go after one. Means the bevel is pushed toward safety in both modes as well, and I'm close in with the rest at all time, so leverage is mine.

The actual cut progresses from somewhere around 8-8:30 as the gouge enters, skewed to near nine as it exits. Keeping the handle a touch low gives me gravity to help empty the hollow, rolling the curl down the flute.
 

john lucas

AAW Forum Expert
Joined
Apr 26, 2004
Messages
8,337
Likes
3,595
Location
Cookeville, TN
Micheal It sounds like your talking about cutting with the gouge and I'm talking about scraping such as in hollowing a vessel. I wish I could draw on the computer. It would be easier to show what I'm saying. I'm talking about hollowing a box on the inside or concave area. You are more likely to get a catch below the center line because the tool tries to self feed into the wood. When above center the wood pushes the tool out away from the tool. If you do get a catch the wood kicks the tool straight down into space. If your below center it digs in further and usually blows the piece up. Been there done that.
I may be wording this wrong but I learned this from guys like John Jordan and Clay Foster and I've turned an awful lot of boxes and small hollow vessels.
I'm going to be pretty busy for the next few days but I'll take some photos this weekend to show what I'm talking about.
 
Joined
Apr 20, 2006
Messages
1,273
Likes
1,004
Location
Erie, PA
If I were looking for advise in this thread I would without a doubt listen to John Lucas. Inside that box cut above the centerline, below centerline is an accident waiting to happen.
 
Joined
May 7, 2004
Messages
370
Likes
0
Location
Lynn Haven, FL
The more I read and reread this thread the more confused I get it seems, but I think I go more with what John says for a beginner. I also think all of us develop what works for us, and I have seem some turners definitely work slightly different from what I do and it all works.

Explaining how to use a bowl is just about impossible in words only, difficult with pictures, a little better in a video but still lacking, much better in a live demo, and only works really with a hands-on demo. Or at least that is the way it has been for me.
 

john lucas

AAW Forum Expert
Joined
Apr 26, 2004
Messages
8,337
Likes
3,595
Location
Cookeville, TN
Richard I just read an article about the Hunter tool in September Wood magazine. You can see them at www.hunterwoodturningtool.com They are carbide cutters but different than the others. These are made from what he calls nano carbide. The particles are smaller so they take a keener edge. He has also lowered the inside a little so that the cutting edge is not like a scraper. It has a sharp lip about 25 to 35 degrees. I haven't measured it but the cutting angle is fairly steep so it takes off a fine shaveing.
I was able to get super clean cuts on punky spalted maple by coating the wood with a layer of Johnson's past wax. I easily started sanding on that one about 150 I think. Would have easily been 220 if I it wasn't punky.
It's agressive enough to hog off wood, I hollowed most of 3 10" box elder vessels with it. Would have done them completely but the tool was a little too short. I have also done a walnut vase that's under 1/8" thick and 7" deep, so you can really take fine shavings with it.
 
Joined
May 29, 2004
Messages
995
Likes
2
Location
billerica, ma
From what I'm reading, I'd have to go with John's method using a scraper. I set the rest above centerline and lever the scraper up into the wood at a point where it contacts below the rest but a tiny bit above centerline. What this allows is for you to lever the cutting edge upwards into the wood in a very stable manner. Since scraping is done freehand (no bevel engaged), this gives you a much more stable and controlled cut, with any movement of the tool resulting in a change in cut depth or a small catch, which automatically disengages the scraper before it can dig in. Engaging the edge below centerline or from a rest below centerline is just asking for a major catch when the scraper encounters any variability in the wood, as it will bite and this will pull the tool deeper into the wood, increasing the bite, increasing the pull, .... "boom".

I'm much less worried about relaxing and dropping my arm, causing an unplanned cut. If this happens, it will damage the wood slightly but will push the scraper down and disengage it almost immediately, preventing a huge, box/bowl destroying catch.

Dietrich
 
Joined
May 16, 2005
Messages
3,540
Likes
15
No famous names to quote, but take a look. The gouge is swung in and pulled along the cut as in the right hand view. If you examine the cutting face nose on you can see that entering below center ensures that the work is curving away by it's own shape, minimizing possibility of a dig as the cut is established. Bringing it in above center makes it much more touchy, because the curve in the piece is closer to centerline as you begin to move away from center with the gouge. Lots easier to grab more wood quickly and inadvertently. Where the cut below is progressive both by natural curve of the wood and the gouge you get a more consistent shaving thickness, as the later portion, farther from center, is cutting over previously enlarged areas.

Having the flute up and the handle down a but carry the shavings down and out real well.
 

Attachments

  • Below-inside.jpg
    Below-inside.jpg
    14.6 KB · Views: 14

john lucas

AAW Forum Expert
Joined
Apr 26, 2004
Messages
8,337
Likes
3,595
Location
Cookeville, TN
Micheal I'm sorry I wasnt trying to name drop just trying to give credit to the guys who taught me this technique as well as Chris Stott. I'm sorry but i'm still confused by your drawings. I would agree with you if your turning from the rim to the middle but when hollowing and endgrain box I learned to hollow from the center out so that you are cutting downhill on the grain.
I start with the flute of the bowl gouge pointing about 45 degrees in the middle and then rotate it so the flute is pointing more to the 9 oclock position as I get to the side of the bowl. I cut at or slightly above center in this position. When cutting up the side of the box the cut is very controllable. You can actually pull the gouge out to the lip and then push it back in if necessary to help clean up the side.
 

Attachments

  • box-hollowing-BG.jpg
    box-hollowing-BG.jpg
    9 KB · Views: 14
  • box-hollowing-BG-side.jpg
    box-hollowing-BG-side.jpg
    8.3 KB · Views: 15

john lucas

AAW Forum Expert
Joined
Apr 26, 2004
Messages
8,337
Likes
3,595
Location
Cookeville, TN
Here is the roundnose scraper positioned as it comes out the wall of the box. I cut from the center out since this is an endgrain box. I turned the lathe off so you can see it better. I grind the left hand edge of my roundnose scraper to that it will cut the outside wall. Many scrapers come with a very short ground area and the left hand corner will catch on the wall.
You can't see it clearly here but the edge is cutting at the center and the handle is higher than the cutting tip. If you get a catch due to taking too big a cut or possibly hitting a really hard section like a knot. it pushes the scraper down into space and clears the wood. If I was cutting below center it would push the scraper deeper into the wood and probably blow the box up.
 

Attachments

  • box-hollowing-RN-scraper.jpg
    box-hollowing-RN-scraper.jpg
    12.1 KB · Views: 16

john lucas

AAW Forum Expert
Joined
Apr 26, 2004
Messages
8,337
Likes
3,595
Location
Cookeville, TN
Micheal. Again I apologize for not understanding what your saying but when I use a bowl gouge and go from the lip to the center such as on a side grain bowl I use the gouge with the flute in the position you show and usually start the cut at or below center. If you do this with an endgrain box it takes a lot more skill to be successful. I've had many beginners in my classes that try this and blow off the lip until I get over to show them a different technique.
 

Attachments

  • box-hollowing-rim-to-middle.jpg
    box-hollowing-rim-to-middle.jpg
    9.4 KB · Views: 11

john lucas

AAW Forum Expert
Joined
Apr 26, 2004
Messages
8,337
Likes
3,595
Location
Cookeville, TN
Here is the Hunter tool in use. Again it's hard to tell from the photo but the cutter is actually at about 45 degrees. It cuts extremely clean this way especially on end grain. It is a little harder to start the cut at the center nub with this tool but just takes a little practice. Beginners find this tool very easy to use. I had 18 people in my shop a few weeks ago and I let everyone who wanted to give it a try. I didn't give them any instructions, just let them "learn". They all found the sweet spot very quickly. With just a little help they were getting very clean cuts.
Again I would use this tool above center. If you get below center it will try to cut very agressively and if you don't fight it hard enough you'll get a catch.
 

Attachments

  • box-hollowing-hunter-tool.jpg
    box-hollowing-hunter-tool.jpg
    8 KB · Views: 14
Joined
Feb 15, 2007
Messages
148
Likes
1
Location
Woodland, CA
I noticed in the new CS USA, page A5, the Hunter bits are offered to adapt to other hollowing systems.


john lucas said:
Richard I just read an article about the Hunter tool in September Wood magazine. You can see them at www.hunterwoodturningtool.com They are carbide cutters but different than the others. These are made from what he calls nano carbide. The particles are smaller so they take a keener edge. He has also lowered the inside a little so that the cutting edge is not like a scraper. It has a sharp lip about 25 to 35 degrees. I haven't measured it but the cutting angle is fairly steep so it takes off a fine shaveing.
I was able to get super clean cuts on punky spalted maple by coating the wood with a layer of Johnson's past wax. I easily started sanding on that one about 150 I think. Would have easily been 220 if I it wasn't punky.
It's agressive enough to hog off wood, I hollowed most of 3 10" box elder vessels with it. Would have done them completely but the tool was a little too short. I have also done a walnut vase that's under 1/8" thick and 7" deep, so you can really take fine shavings with it.
 
Joined
Nov 7, 2005
Messages
882
Likes
2
Location
Wimberley, Texas
Hunter Carbide Insert

Thanks John,
If not too pricey, will buy one of their inserts to try in one of my home made tools. Sounds as though they have a way to make the carbide sharp enough for wood turning.
 
Joined
May 31, 2005
Messages
55
Likes
0
Texian said:
Thanks John,
If not too pricey, will buy one of their inserts to try in one of my home made tools. Sounds as though they have a way to make the carbide sharp enough for wood turning.


Another option would be the Oneway Termite. It is a carbide ring tool that is something of a cross between a gouge and scraper. It has the added advantage of coming with sharpening equipment and two cutting rings. I love mine...
 

john lucas

AAW Forum Expert
Joined
Apr 26, 2004
Messages
8,337
Likes
3,595
Location
Cookeville, TN
I thought the termite was HSS. I'll have to check. I have one and it doesn't even begin to hold an edge like the Hunter. It is easy to sharpen, I made my own jig. When I first go the hunter tool I did a test between it and my homemade hook tool and the Termite tool. They all cut about the same depending on the angle of the tool and the sharpening angle of the edge. My hook tool is high carbon steel and I have to hone the edge after one small ash box. I can get about 2 or 3 boxes out of the termite. I've turned 8 boxes with the Hunter tool plus lots of other things and it's still cutting well.
 
Joined
May 31, 2005
Messages
55
Likes
0
john lucas said:
I thought the termite was HSS. I'll have to check. I have one and it doesn't even begin to hold an edge like the Hunter. It is easy to sharpen, I made my own jig. When I first go the hunter tool I did a test between it and my homemade hook tool and the Termite tool. They all cut about the same depending on the angle of the tool and the sharpening angle of the edge. My hook tool is high carbon steel and I have to hone the edge after one small ash box. I can get about 2 or 3 boxes out of the termite. I've turned 8 boxes with the Hunter tool plus lots of other things and it's still cutting well.


Hi John,

I may be wrong about the Termite but, I thought it was carbide. Mine seems to hold an edge for a few boxes before I have to sharpen. I don't use a router to hold the sharpening stone, just a drill. It seems to work just fine. I also find that I can hog off a fair amount of material with the Termite if I need to and it can be very delicate as well.
 
Joined
Jul 9, 2007
Messages
44
Likes
1
Location
Texas
Termite

The Termite bit is a carbide material and brittle. I busted three of the cutter rings in the process of finding that out. Unfortunately for me, I bought one of these tools (without any instructions included) when I first started turning hollow forms several years ago. Since the tool was mentioned in this thread, I Googled and found a video on the proper method of use of the tool. So I intend to give it another try.
 
Joined
Feb 15, 2007
Messages
148
Likes
1
Location
Woodland, CA
This is the description from Oneway Web page.

The ring bits are supplied sharp so the tool can be used straight out of the box.
The Termite is made from high speed steel. It is held with a set screw in a 7½", high strength shank, with tensile strength of over 110 000 PSI. This assembly is mounted in a hardwood handle which measures 15½" long. The total length of this tool is 23" without the cutting tip inserted in the shank.

Because bits are made from high speed steel, and we supply an efficient and simple means of sharpening them, they have a very long life.

Keeping it Sharp

In keeping with ONEWAY policy, not only do we supply a superb tool, we also supply the means of maintaining the tool. We include a mounted point dressed to the proper angle and a fixture to hold the Termite for grinding.

Simply mount the point in your router. Mount the termite in the fixture and oscillate the inside of the termite around the mounted point thus precisely recreating the edge as originally supplied.
 
Joined
Jul 9, 2007
Messages
44
Likes
1
Location
Texas
Termite

Ahh! Missed the statement about HSS for the Termite bit on the site I was looking at. Assuming the HSS they are now using has some ductillity, that will be a big improvement over the ones I tried many years ago.
 
Joined
May 16, 2005
Messages
3,540
Likes
15
captjim said:
This is the description from Oneway Web page.
In keeping with ONEWAY policy, not only do we supply a superb tool, we also supply the means of maintaining the tool. We include a mounted point dressed to the proper angle and a fixture to hold the Termite for grinding.

Simply mount the point in your router. Mount the termite in the fixture and oscillate the inside of the termite around the mounted point thus precisely recreating the edge as originally supplied.

I use the drillpress myself. Works as well and the pucker factor is lower. I got mine before they began offering larger rings which clear better, so my instructions don't include moving the bit holder. Which you have to in order to use the larger ring with the original stone.

Angle isn't quite right for the diamond cones I use to sharpen my mortising machine chisels. Anyone said "who cares" and used them anyway? Little more of an included angle, though not sure how it would affect performance. Might make it a tougher start.
 
Joined
May 21, 2004
Messages
397
Likes
1
Location
South Lake Tahoe, CA
Website
www.tahoeturner.com
Very interesting thread. My suggested tool for hollow turning boxes and the like is a relatively new tool called an Eliminator. It's much like the Hunter tool, carbide tip, etc, except it also has two flat sides on its shaft. When the flat is on the tool rest, the cutting tip is properly positioned (a nice feature when you are turning blind). Using the other flat, it's easy to reverse lathe rotation and cut on the other side (in case you encounter some troublesome grain). Currently, it's only available through Packard. I recommend the 3/8" size. You can’t sharpen the carbide tip, but it is repositionable and relatively cheap to replace. I have no affiliation, but I do know the inventor. The tool is so easy to use, "a caveman could do it".
 
Joined
Nov 15, 2006
Messages
75
Likes
0
Location
Merced, California
I vote for a combination of scrapers. We all most likely have many. No need to buy a new tool. After all turners have been making boxes for a long time.

Make sure it is sharp. Sharpen one like the Lady (Bonnie Kline??) in the AAW sharpening video teaches. If the inside corners are rounded switch to round nosed scraper with the left side sharpened.
 
Back
Top