• Beware of Counterfeit Woodturning Tools (click here for details)
  • Johnathan Silwones is starting a new AAW chapter, Southern Alleghenies Woodturners, in Johnstown, PA. (click here for details)
  • Congratulations to Keven Jesequel for "Big Leaf Maple" being selected as Turning of the Week for April 15, 2024 (click here for details)
  • Welcome new registering member. Your username must be your real First and Last name (for example: John Doe). "Screen names" and "handles" are not allowed and your registration will be deleted if you don't use your real name. Also, do not use all caps nor all lower case.

Getting a jointed edge? Delta benchtop jointer?

Joined
Jun 20, 2006
Messages
116
Likes
1
Location
Cincinnati, OH
What do folks use to get a perfectly flat edge for gluing together pieces? In my furniture making days I'd use a jointer, but I don't have one in my shop.

Does anyone have experience using the Delta benchtop jointer? It's about the only jointer I'd be able to fit in my shop.

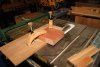
Has anyone used a fixed sander to get perfectly flat edges?

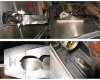
I'm experimenting with some cammed bowls and not having a lot of luck doing a perfectly straight cut through the middle of a round bowl. There's always a few flaws that severely impacts the ability to get a solid glue joint.

All help is much appreciated.
 
Joined
Dec 15, 2006
Messages
328
Likes
2
Location
Sierra Foothills
Ain't never done it, but I wonder if the few thousandths difference could be corrected using a flat abrasive surface mounted at the tail stock, squared with the lathe bed and applied to the uneven surfaces, one at a time, while each is turned while mounted in the chuck. Just an idea, Charlie. The bed on my jointer/planer isn't wide enough to accommodate any bowl diameter I might try to mate for caming purposes.
 

john lucas

AAW Forum Expert
Joined
Apr 26, 2004
Messages
8,333
Likes
3,585
Location
Cookeville, TN
I'm not sure what you mean by "cammed" bowls. I use a jig on my table saw to cut bowls that aren't very deep. I have planned to do the same sort of jig that runs in the miter slot for my bandsaw. I've cut a couple this way using hot glue to glue the bowl to the jig but I plan on building something that will clamp it. With a 1/4" blade and proper feed rate I get an edge that just barely needs to be cleaned up before glueing back together.

After I get them cut if they aren't perfect I touch them up on a 12" disc sander followed by sanding them face down on my workbench with a sheet of sandpaper I rescued from an industrial sander. It's 12" wide and 3 feet long.
My problem is getting all the glue out of the joint where the two halves of the bowl come together. I wipe it all out with a wet brush shortly after putting it together but it seems like I never get it all and it's really hard to get in there with a carving knife or chisel or sandpaper.
 
Joined
Jun 20, 2006
Messages
116
Likes
1
Location
Cincinnati, OH
A little explanation about a "cammed bowl" might help.

I start with a blank about 2" thick and 8" or so in diameter. Screw it to a faceplate and turn the outside profile, preferably a smooth radiused bottom that goes completely from edge to edge.

Then I take the semi-finished blank, remove it from the faceplate, set it top-down on a table saw, and make a pass over the blade that splits it lengthwise along the grain.

Because the bowl is round I can't use the rip fence or the miter gauge to stabilize the bowl. Consequently, the split gets a tiny bit wobbly. Unfortunately, it's just enough wobble to create a weak glue joint.

Anyway, the planned next step is to take the two bowl halves and offset them by 2" or so, then glue along the saw cut. The resulting piece looks like a cam.

I'm trying to find a way of making the saw cut perfectly flat to create a strong glue joint. I already had one come apart when turning the cam, and that's not a pleasant experience. And even the ones I've turned to completion still show flaws at the glue joint.

Maybe I just need to break down and buy a stand alone jointer.:eek:
 
Joined
May 16, 2005
Messages
3,540
Likes
15
I'd do this. Forty bucks at a flea market, and if you book the pieces as you join, you get a perfect match.
 

Attachments

  • Number-6.jpg
    Number-6.jpg
    78.6 KB · Views: 201
Joined
Apr 11, 2007
Messages
628
Likes
2
Location
Northwest Arkansas
Cammed Bowl

Charlie,
I sincerely hope you are not freehanding that bowl through the tablesaw! That sounds like a disaster waiting to happen. That said, I recommend that you cut the bowl in half on the bandsaw, preferably following a straight line drawn on the bowl. When finished with that, you should be able to dress both edges with the disc sander. This should give you an acceptable joint for gluing. (The jointer would be a little bit more of a sure thing, though.) Good Luck!:)
KurtB
 
Last edited:
Joined
Apr 30, 2006
Messages
31
Likes
0
Location
virginia
Charley, I have a thought, if you have a bandsaw, you could make a sled to cut your bowl with. It would need to have a VEE on top and bottom place your blank in between them and hold them in plade with wedges. Use a hard wood runner to guide it straight. Just a thought.
 
Joined
Apr 24, 2004
Messages
745
Likes
0
Location
Cowlesville,Western New York
Charlie,
A sled for the table saw, two toggle clamps, and a glue-line quality rip blade and you would be in business. Or go with MM's hand plane.
 
Joined
May 21, 2004
Messages
397
Likes
1
Location
South Lake Tahoe, CA
Website
www.tahoeturner.com
Charlie, the simplest method would be to just take a piece of MDF or plywood with a straight edge. Attached your bowl to the surface (clamps or a few beads of hotmelt glue is probably easier) - sort of a disposable sled. Then adjust your fence and cut with a good quality blade. The hotmelt can be removed with a chisel and/or utility knife. If you need to remove saw blade scoring marks, use a sheet of 80-grit paper attached with spray adhesive to a smooth (MDF) surface. Carefully stroke the glue lines back and forth.
 

john lucas

AAW Forum Expert
Joined
Apr 26, 2004
Messages
8,333
Likes
3,585
Location
Cookeville, TN
Here is what I do to cut almost anything accurately and safely on the table saw. I attached a piece of plywood to a piece of plastic that fits my miter saw slot. Then I run it through the saw so the edge exactly matches the cut line and is square to the blade.
Next I drill a series of random holes from the bottom side. I drill them first 1" in diameter just deep enough to counter sink the T nuts that I use. Then I drill them to fit the T nut threaded portion. I make my clamps by just cutting out a shape on the bandsaw and then I cut half circles out of them. I cut half cirlces to match the ones I just bandsawed and then drill and cut slots in these so they can rotate on the screw. The homemade long screws go through these clamps and into the board.
Anything I can clamp I can cut accurately as long as it's shallower than the 3 ". My blade goes only extends to 3 3/4. That's why I plan to make the same thing for my bandsaw. Most of the time when I cut things on the table saw I don't need to sand. The cut is perfectly straight and flat. This board can be rotated 180 degrees and has a 45 degree cut on the other side that exactly matches my 45 degree blade tilt so I can cut 45 degree cuts on anything I can clamp.
 

Attachments

  • Table-saw-cutting-jig.jpg
    Table-saw-cutting-jig.jpg
    30 KB · Views: 156
Joined
Nov 7, 2005
Messages
882
Likes
2
Location
Wimberley, Texas
Another vote for table saw sled + 80-tooth blade. John, very cool clamps with T-nuts on the bottom and wing nuts on top. No need to have different length hex cap screws (bolts) for each different clamping situation.
 

john lucas

AAW Forum Expert
Joined
Apr 26, 2004
Messages
8,333
Likes
3,585
Location
Cookeville, TN
I also take flat boards or even custom cut bandsaw boards that I can attach with the all thread and nuts to hold pieces. It is a really useful tool for your table saw. I made a series of odd shaped pieces for a client that would have been areal hassle to cut all those angles on the chop saw or table saw. I simply built some guides that I screwed to this table. Then all I had to do was drop the wood into each guide and make the cut. Then drop it in the next guide and make another. All 25 were exactly the same and took me about 2 yours to make. I had originally thought that I would have to build a vacuum jig for my router, rough cut the pieces and then route them using the jig. It would have worked but would have taken about twice as long.
 
Joined
May 15, 2004
Messages
118
Likes
10
I used to own the little Delta benchtop jointer.

I would recommend it: 1) ONLY if you don’t like hand planes; 2) only expect to face joint 6-inches wide or less; and 3) if you never expect to joint anything longer than 18 inches.

The bed is too short and too weak for long and heavy pieces.

The short and light-duty tables make it difficult to prevent long heavy boards from being cupped.

The fence is quite flexible... makes getting a perfectly true and square edge joint a dubious exercise.

On the plus side, when the knives are sharp, the finish is like glass: close to the best spiral-head cutters. This machine uses 2 knives (vs. 3 for a "normal" jointer) at high speed, so they tend to wear a bit faster than a 3 knife machine.

Wear double hearing protection: it is way LOUDER than a normal jointer.
 
Back
Top