-
July 2025 Turning Challenge: Turn a Multi-axis Weed Pot! (click here for details) -
Congratulations to Kent Reisdorph for "Sugarberry Bowl" being selected as Turning of the Week for July 14, 2025 (click here for details) -
Welcome new registering member. Your username must be your real First and Last name (for example: John Doe). "Screen names" and "handles" are not allowed and your registration will be deleted if you don't use your real name. Also, do not use all caps nor all lower case.
You are using an out of date browser. It may not display this or other websites correctly.
You should upgrade or use an alternative browser.
You should upgrade or use an alternative browser.
Design Advice
- Thread starter Brandon Sloan
- Start date
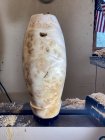
I’ll start, but others more knowledgeable will join in. If it were me, I think I’d take about half the base off to shorten it overall and narrow the base and feather into vase, including narrowing center of the vase a little, so that it was a smooth gentle continuous curve going up and gently rolling over to transition going in to the top. With the widest point of the vase being just under 2/3 of the way up.
Not sure if that makes sense, but my 2 cents...
Not sure if that makes sense, but my 2 cents...
Forgot to mention, very pretty piece of wood !!
I use a Fibonacci caliper to set the apex of the main curve. That would place the apex closer to the top. I also prefer the top to smaller than the base to give it visual weight. Many prefer not to follow design guides though.
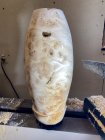
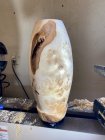
Maybe carve some feet.Something that has stuck with me is the comment “it looks like you ran out of wood” when referring to a vase I had made. I didn’t know the exact meaning, but I assumed it meant that the base was poorly done. Is there something I can do to make the base look like I didn’t just run out of wood? View attachment 34027View attachment 34028View attachment 34029
Attachments
john lucas
AAW Forum Expert
Not a bad vase. .most customers would.love it. If you want to get picky and take it to the next level there are several.things I would change. First is the bottom. It just stops the flow of your eyes. I would eliminate it and just carry the flow of the curve all the way to the bottom. There is a slight flat area around the bulge. I personally try to never have a flat on a curve. Then raise the widest area slightly so it might follow golden rectangle.principals.
Brandon I agree with the golden rule principles suggested. Work to make the surface facet free. Fantastic piece of wood. Bring the bottom diameter down and present the finish of the bottom as very light and up from the table. As suggested you could could go simply smaller or go with the carved feet idea but in the end it should look like is is light on the table.
Fibonacci caliper
Learn something new everyday, this is awesome - Thanks!
What John Lucas said
Beautiful piece of wood as others have mentioned. As John says
. I think this piece merits the "next level. How to get there is the question. What some might call a "simple form" leaves you nowhere to hide. Which means, more difficult to pull off. Walking away is always my first step. Coming back, sometimes the areas that need attention jump out. As you've done, setting it upright helps, but sometimes the grain pattern can trick your eye. LED's cast a great shadow (think shadow puppets) and can show areas that need to be resolved. I have tried a long glue stick or other flexible item bent along the length of the form to help visualize the high and low spots, but I have better results using a straight edge, rocking it up and down the form. At this point I would also define the base (length). Cut in with a parting tool, not too deep, so you know where the piece stops. If the base is inside the ring of screws only part in about an 8th or so, enough so you can visualize. Not knowing where the base stops can throw off the final proportions. If the piece is going to taper into a foot, I would cut a small chamfer or quirk for a shadow line to add lift. Sorry for the ramble, I am most envious of that piece of wood, is there a story behind it?If you want to get picky and take it to the next level
“it looks like you ran out of wood” Could easily mean you still had bark in a couple of spots on the vase. I'm also conflicted when I see that. When the rest of the form has a sophisticated, polished shape, the bark can look out of place. On a primitive bowl, with a natural edge rim, it's a natural.
I don't do many hollow forms... The shape is very symmetrical. So, pretty much the same curve line from top to bottom. If that is the finished shape, and it is already hollowed out, then there is nothing you can do about it. The base does not look 'right' to me. I am one who does things by eye, and never measure things out. I don't have a natural eye for hollow forms, mostly due to lack of practice. For forms like this, that Fibonacci rule can help with design before you turn.
robo hippy
robo hippy
I agree with the John Lucas comments - you have a good design evolving.
You are now ready for "final turning" - light cuts with super sharp tools
- how long and how big are the screws?
- What is the pattern of the screws?
- What is the MC of the wood?
- How thick is the thinnest point?
- Finished piece to be the full length
- Fair curved from top to bottom - no interruption, no bumps, no "non-fair" variations
- A high luster finish, both wood and bark, will pop this piece - the negative space in the bark inclusion should be open
You are now ready for "final turning" - light cuts with super sharp tools
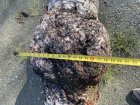
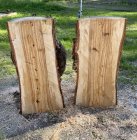
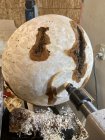
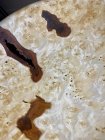
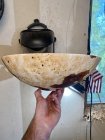
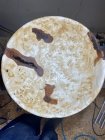 First off, thank you for all the reply’s! It really cleared some things up for me. I’ve been practicing a lot of forms but I think I need to study up on design theory. This piece is rough hollowed to a little over an inch, so I can fix a few things but am limited. Most importantly, I have an idea of how to finish the base and great advice on how to approach future projects.
 I am most envious of that piece of wood, is there a story behind it?
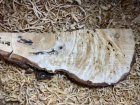
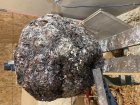
This was a cut off from a large burl that I bought from a local logger. I’m in Fairbanks, Alaska currently. The only local wood I turn is Alaskan Paper Birch. It doesn’t grow very fast due to our extreme winters. We have a tourist trap up here called The Great Alaskan Bowl Company. The logger said he dropped off a truck load of burls at this business for store credit. He had 3 giant burls that showed up when the snow melted and wanted $50 bucks a piece. I bought the biggest one and as we loaded it up he sold me on the other two for $25 a piece. This was the first burl I ever processed. I knew I wanted one big bowl because I have never done anything over 12”. After trimming, I ended up with 3 pieces that are roughly 5” x 5” and 16” long plus the bowl blank that ended up being 16” x 4”.
I’ve been practicing a lot of forms but I think I need to study up on design theory.
I am going to throw out this suggestion for your consideration. Sketch out your design ideas on graph paper.
I once joked to my club that I wouldn't turn a cylinder without a full size drawing. This isn't stretching the truth very much, I plan out most everything on paper first.
But I also do a lot of sketching just to look at different ideas and study form. This is a really cheap way to explore subtle variations of a curve. It's way easier to erase and redraw a pencil line than to alert the curvature of wood. And you can buy graph paper in very large sizes so you can draw full size. I have a pad that is 17" x 22".
- Joined
- Apr 27, 2004
- Messages
- 9,236
- Likes
- 5,896
- Location
- Lakeland, Florida
- Website
- www.hockenberywoodturning.com
That is a terrific pearl of wisdom I will steal to use in a demo some time.once joked to my club that I wouldn't turn a cylinder without a full size drawing. This isn't stretching the truth very much, I plan out most everything on paper first.
Spindles usually have a scale drawing and story board for duplicates to get the diameters and heights of elements.
hollow forms and bowls I have a vision of the shape, curves, heights of the rim, foot detail, curves, where the wide spot will be.
The vision either comes from a sketch of the shape or a previous form that I have done. I have some favorite shapes.
Spherical forms are fun because the Shape is given.
I use Fibonacci ratios a lot. 1,2,3
1,2 is the same as the rule of thirds,
2,3 close to the golden mean....
For hollow forms I like the wide part 1/3 up from the base, 2/3 up from the base, or 1/2 up from the base.
With a flared rim on the HF 1-rim, 2- top curve, 3 bottom curve
Boy how I wish I could sketch. Not only can I not sketch, I can't really see from a picture on paper what something is going to look like as a 3D object. So I've learned to make prototypes of important and/or one of a kind pieces. With some cheap poplar or alder held in my hand, I can assess it just fine. The piece in my avatar took 11 prototypes to figure out what I wanted and then learn the skills needed to make it. This was my last piece of pale enough wood. Not a very efficient process. How I wish I could sketch and see.

