• Beware of Counterfeit Woodturning Tools (click here for details)
  • Johnathan Silwones is starting a new AAW chapter, Southern Alleghenies Woodturners, in Johnstown, PA. (click here for details)
  • Congratulations to Dave Roberts for "2 Hats" being selected as Turning of the Week for April 22, 2024 (click here for details)
  • Welcome new registering member. Your username must be your real First and Last name (for example: John Doe). "Screen names" and "handles" are not allowed and your registration will be deleted if you don't use your real name. Also, do not use all caps nor all lower case.

Yet another sanding question...

Joined
May 31, 2019
Messages
292
Likes
364
Location
Highland, MI
First of all. I really did try searching for an answer here and on other sites, but since I don't know what it's called, that makes searching a little difficult.

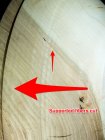
I don't know what the marks shown in the photo below are called, what I'm doing that's causing them, or the best way to get rid of them. When I start sanding, I don't see them, but they show up as I'm going through the grits. I'm hand sanding, using a light touch, keep the sand paper moving, and I blow off the wood and clean with DNA between grits. This is a piece of cherry, but I've seen it on maple, cypress too. It's always in the end grain where you'd expect to see tearout.

SandingScuffing.jpg

What causes it? I'm keeping my tools sharp, don't think I'm riding the bevel too hard (or am I ?).
How do I prevent it?
How do I get rid of the marks that are there?
What the heck is it called?
 
Last edited:

hockenbery

Forum MVP
Beta Tester
TOTW Team
Joined
Apr 27, 2004
Messages
8,636
Likes
4,976
Location
Lakeland, Florida
Website
www.hockenberywoodturning.com
What you are showing is the back side of the endgrain. You have some small tearout. Could be from rubbing the bevel too hard. Tool not as sharp as it could be.

Shear scraping will correct it. Better gouge cuts won’t cause as much.
Starting with higher grit paper on this section. You need to inspect the back side of the endgrain. If it looks good the r3t of the bowl will look good.

It is very difficult not to get some slight imperfections on the back side of the end grain.
When push cutting toward the rim most of the cut is toward the rim and cuts the fibers cleanly.
However a tiny bit of the cut goes around the bowl. On the backs side of the endgrain their are no supporting fibers so you get tearout. A pull cut will not have this issue.

AB9C8229-C04F-45C1-9863-2D2E0694B783.jpeg
 

Attachments

  • AB724719-2576-4A20-BA8C-58BE47175FD3.jpeg
    AB724719-2576-4A20-BA8C-58BE47175FD3.jpeg
    298.1 KB · Views: 1

hockenbery

Forum MVP
Beta Tester
TOTW Team
Joined
Apr 27, 2004
Messages
8,636
Likes
4,976
Location
Lakeland, Florida
Website
www.hockenberywoodturning.com
What you are showing is the back side of the endgrain. You have some small tearout. Could be from rubbing the bevel too hard which creates vibration, tearout, and bruised grain. Tool not as sharp as it could be. Too deep of a finish cut.

Shear scraping will correct it. Better gouge cuts won’t cause as much.
Very light shallow finish cut with a sharp tool will minimize the tear-out. Float the bevel. Hold the tool loosely.

Starting with higher grit paper on this section. You need to inspect the back side of the endgrain. If it looks good the r3t of the bowl will look good.

It is very difficult not to get some slight imperfections on the back side of the end grain.
When push cutting toward the rim most of the cut is toward the rim and cuts the fibers cleanly.
However a tiny bit of the cut goes around the bowl. On the backs side of the endgrain there are no supporting fibers so you get tearout. A pull cut will not have this issue.

When push cutting in the big arrow direction a little bit of the cut goes in the vertical direction.

View attachment 35612
 
Last edited:
Joined
Aug 14, 2007
Messages
5,485
Likes
2,836
Location
Eugene, OR
Yup, tear out.... They will also show on the opposite side of the bowl, and off at 90 degrees when comparing outside and inside of the bowls. Some times it is because your tools are dull. Some times you are cutting/pushing too fast/hard. Some times it is just because that particular wood likes to tear out more than others. Some times a negative rake scraper will cut most of it out, some times not. Some times a shear scrape will pull it out. Some times you have to resort to the 80 grit gouge (abrasives...). Oh, some times using a card scraper with the spindle lock engaged is a good way to get it out. Another trick for the insides of bowls is to make sure to grind off at least half of the heel of your gouge. A sharp bevel will leave bruises in the wood which don't come out, well seemingly they won't come out... That sharp bevel can also 'push' your gouge into the cut and you get ripples. The ground off heel is for any concave surface. Being able to see, and/or feel the tear out before you do details and sanding, is as essential as having good lighting...

robo hippy
 

john lucas

AAW Forum Expert
Joined
Apr 26, 2004
Messages
8,335
Likes
3,590
Location
Cookeville, TN
Excellent Reed. I find the short bevel just as handy on the outside. It helps you feell.the cut so it's easier to not force the cut. I did a.test.one day with 2 identical thompson V gouges. One had a full length bevel with just the very bottom.sharp corner ground ofcffff. The other had a main bevel of about 3 mm and the rest ground away. You can actually hear the difference in the cut. It was much harder to say if one cut cleaner but could have simply been that wood.
 
Joined
May 31, 2019
Messages
292
Likes
364
Location
Highland, MI
Hmm, maybe I'm catching onto some of this stuff. I was out my "shop" (the only part of the garage that doesn't have 30 years of clutter and debris), grinding the heel on my main bowl gouge back a little, about the same the time that Reed posted his answer. Obviously, I'm not too far up the woodturning learning curve, so all the replies were very helpful. I need to work on my gouge technique a lot more, so I'm not inadvertently working against myself as much. So much to learn, but that's what I like about this stuff. A lot to learn and good people to learn from. Thanks!
 
Joined
Aug 14, 2007
Messages
5,485
Likes
2,836
Location
Eugene, OR
Hmm John, now I may have to try your method. As near as I can tell, the closer the bevel rubbing point is to the cutting edge, the easier it is to control the cut. On a convex surface like the outside of a bowl, bevel length makes no difference due to the shape of the bowl. On the inside, it makes a huge difference. I am wondering about your gouge presentation John. For me, I hold my tools more level and flutes rolled over on the side. This means that most of the finish cut is done with the nose, and the wings, especially with a heavy cut, are doing more of a scraping cut. If I used the dropped handle and using the wings more for a high shear angle finish cut, that might make a difference.

robo hippy
 
Back
Top