• We just finished moving the forums to a new hosting server. It looks like everything is functioning correctly but if you find a problem please report it in the Forum Technical Support Forum (click here) or email us at forum_moderator AT aawforum.org. Thanks!
  • Beware of Counterfeit Woodturning Tools (click here for details)
  • Johnathan Silwones is starting a new AAW chapter, Southern Alleghenies Woodturners, in Johnstown, PA. (click here for details)
  • Congratulations to Dave Roberts for "2 Hats" being selected as Turning of the Week for April 22, 2024 (click here for details)
  • Welcome new registering member. Your username must be your real First and Last name (for example: John Doe). "Screen names" and "handles" are not allowed and your registration will be deleted if you don't use your real name. Also, do not use all caps nor all lower case.
Scarred Box; Hickory and (Pine) Fatwood
Michael Anderson

Scarred Box; Hickory and (Pine) Fatwood

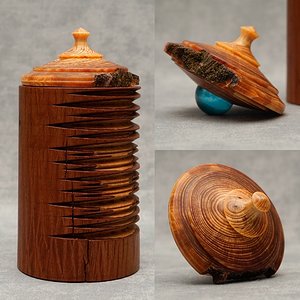
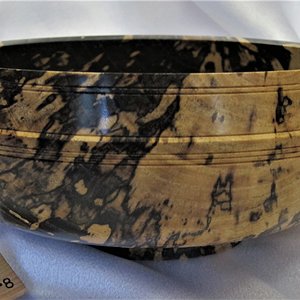
This box's exterior shows off the beautiful vein-like pattern of the cambium layer. I turned it on two axes so you get a glimpse of the wood beneath the cambium. The lid is made of pine fatwood. Fatwood isn't really conducive to sanding, so it's a tool finish. To add a bit of fun, I made the lid into a spin top, with the contact point being being an oversized glass marble. This decreases the friction and adds a bit of color. Of course, the top is very wobbly, give the partial natural edge I kept to match the box's form. Still, it's a satisfying spin!
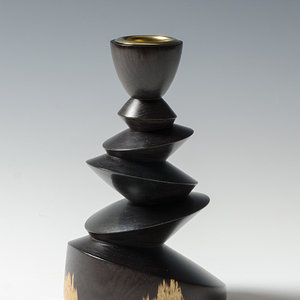
7"h x 3.5"d
Fun fact: if you’re ever in need of a natural fire starter, Fatwood is about as good is it gets. Look for the broken limbs of fallen and decayed pine trees. Voilà!
 
I like the effect of the multi-axis turning, the grain and the checks, Michael! It might be the fine points vs the rustic aspect…hard to look away from!
 
Thanks a lot Russ! I had this sitting around unfinished for a while. Finally got around to making a lid that matched the body. Fun stuff!
 
Thanks @Doug Agee!

@Will Armstrong Christian has some nice pieces on his site! For this box, I made the slits by turning on the wood between on a parallel axis to the original. Here's the basic process:
  1. Shape the outside of the log between centers. In this case I just trued it to round, but cut shallow enough to only remove the bark and leave the cambium intact. Sand as needed, and also cut a tenon for hollowing later
  2. Reset wood, but offset the centers a bit. I think for this I was 1/4" away from the original. It can be helpful to use a square to keep everything parallel.
  3. Cut slits using tool of choice. In this case I used a diamond shaped carbide cutter, but a spindle detail gouge or a skew would work. Because of the offset, your cuts will be deeper on one side of the wood than the other. Sand as needed.
  4. Put your wood between the original centers, OR in a chuck and hollow out the inside.
This is just one method, of course. You could also use an offset glue block, or an eccentric chuck. Always fun to experiment!
 

Media information

Category
Member Galleries
Added by
Michael Anderson
Date added
View count
1,004
Comment count
7
Rating
0.00 star(s) 0 ratings

Image metadata

Filename
9079E9CE-5C56-4520-A9D9-A5E0503E4CC9.JPG
File size
792 KB
Date taken
Mon, 16 January 2023 9:09 AM
Dimensions
2048px x 2048px

Share this media

Back
Top