• Beware of Counterfeit Woodturning Tools (click here for details)
  • Johnathan Silwones is starting a new AAW chapter, Southern Alleghenies Woodturners, in Johnstown, PA. (click here for details)
  • Congratulations to Paul May for "Checkerboard (ver 3.0)" being selected as Turning of the Week for March 25, 2024 (click here for details)
  • Welcome new registering member. Your username must be your real First and Last name (for example: John Doe). "Screen names" and "handles" are not allowed and your registration will be deleted if you don't use your real name. Also, do not use all caps nor all lower case.

8 Segmented Center piece with out a gap in the middle

Joined
Jul 19, 2018
Messages
1,686
Likes
2,077
Location
Ponsford, MN
8seg6.5-10.5.JPG

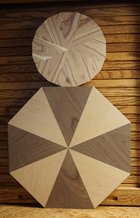
The photo above shows my first and third attempts at making a starting piece that does not require a center plug. The top one is 6.5" (165MM) diameter made up of 2 laminated layers of 8 segments each by about 7/16" (11MM) thick made of lilac wood. The lower one is 10.5" (267MM) diameter made up of 4 walnut and 4 birch segments by about 13/16" (20.5MM) thick in one layer.
  1. The process starts with boards long enough to get the 8 segments.
  2. The material for one unit should be processed together so that there are no variations in size between the pieces.
  3. The saws, planer, drum sander, and jointer used to cut the material should be tuned such that all cuts are square and parallel.
  4. The material is planed, edge jointed, ripped to width, and sanded in the drum sander.
  5. The segments are cut using a miter saw set as accurately as possible to 22.5 degrees which will be used for both cuts.
  6. The miter saw is equipped with an auxiliary wood table with its own fence and a toggle clamp.
  7. The first cut is on the end of the board with one edge against the fence to the right of the blade.
  8. The second cut is made with the first cut edge against the fence to the left of the blade so that the corner is lined up with the left side of the saw cut through the fence. The positive stop should be added to the outer edge (toward the operator) of the wood table at this time to improve accuracy for subsequent segments, then make the cut.
  9. The stop position to cut the next segment can be determined by placing the first segment long point left against the fence to the left of the blade, then line up the right corner with the left side of the saw cut through the fence, clamp it in place and add a stop to the left end at the fence.
  10. The remaining segments can be cut accurately just be sure there isn't any sawdust between the fence and the workpiece.
  11. The glue-up is one joint at a time using clamp blocks so the force is across the joint.
  12. The first step is to glue up 4 sets of 2 then check them for square.
  13. The next step is to glue up 2 halves then check for straight.
  14. The final step is to glue the 2 halves together.
  15. It is obvious that I left out many details but if there is enough interest I can post photos of the various steps that should clear up any questions that arise.
 
Joined
Nov 18, 2012
Messages
642
Likes
1,776
Location
Torrance, CA
Nice job getting those points aligned Don. You note that the first is laminated in two layers, the second is just straight glued segments? These types of glue ups tend to fail over time due to wood movement, sometimes not, most times it’s an issue. I do like the idea used in the first glue up of laminating layers allowing for a more brick lay lamination between the layers. This adds great strength to this type of glue up.

What you have done is not easy to do!
 
Joined
Jul 19, 2018
Messages
1,686
Likes
2,077
Location
Ponsford, MN
These types of glue ups tend to fail over time due to wood movement, sometimes not, most times it’s an issue. I do like the idea used in the first glue up of laminating layers allowing for a more brick lay lamination between the layers. This adds great strength to this type of glue up.

What you have done is not easy to do!
That is one of the details that I didn't go into and I am well aware that any construct of with mitered joints will probably fail if not laminated in a brick lay pattern. The second one that I did is lilac about 1/2" thick, is not laminated, is currently stored in a plastic bag and I am thinking of doing a bowl from a board with each layer shifted to get the brick lamination effect.
 
Joined
Mar 12, 2017
Messages
82
Likes
148
Location
Sweden
It takes real skill to succeed with that glue up. Smart gluing up sequence, but I think you left out the most important part, the disc sander to make minute corrections. Also to make the two piece segments ever so little more than 90 dgr, otherwise there is no possibility to make the final correction without cutting off the tips of the segments. What do you intend to use it for? As a flat platter it will probably crack by time due to wood movement and used for a bowl from a board, you will get all end grain, making it fragile. Thinking of the walnut birch piece.
 
Joined
Jul 19, 2018
Messages
1,686
Likes
2,077
Location
Ponsford, MN
It takes real skill to succeed with that glue up. Smart gluing up sequence, but I think you left out the most important part, the disc sander to make minute corrections. Also to make the two piece segments ever so little more than 90 dgr, otherwise there is no possibility to make the final correction without cutting off the tips of the segments. What do you intend to use it for? As a flat platter it will probably crack by time due to wood movement and used for a bowl from a board, you will get all end grain, making it fragile. Thinking of the walnut birch piece.
The Two piece segments did come out to less than 90 degrees so I corrected it by trimming at the points from both sides. I don't like disk sanders because minute corrections are just about impossible to achieve on a 90 degree or 180 degree glue up. I use a method taken from veneering where you clamp the piece between 2 boards with just the amount needing trimming exposed then hand sand it off or make a light pass through the jointer.
 
Back
Top