• It's time to cast your vote in the October 2025 Turning Challenge. (click here for details)
  • Congratulations to Curt Fuller for "Bell Ornaments" being selected as Turning of the Week for October 27, 2025 (click here for details)
  • Welcome new registering member. Your username must be your real First and Last name (for example: John Doe). "Screen names" and "handles" are not allowed and your registration will be deleted if you don't use your real name. Also, do not use all caps nor all lower case.

A way to turn accurate dowel / tendons

Joined
Oct 20, 2025
Messages
6
Likes
50
Location
Frankfort, KY
I like to make tools, I picked this up on the internet, and thought it might be worth sharing.

I bought a set of the cheapest combination wrenches that HF had to sell, 1/4" to 3/4", 9 pieces for less than $12.
You can use them as is as a fixed caliper for cutting a dowel or pin on the end of a spindle, which makes a very accurate, tight joint.

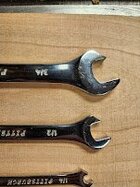
You can modify them into cutting tools by grinding of one side of the jaw of the open end wrench to around 38 degrees. (first picture).

The jaw sides are parallel, so if you have a square table on a disk or belt sander, just hold the wrench flat on the table and grind to the angle. I did not measure the angle, just tried to eyeball it to that of a skew. It is important to have the cutting edge at 90 degrees to the center of the wrench. I did not hone mine, they cut well with just the grind.

To use them, rough cut the space you want the to be the dowel, about 1/16" to 3/32" larger than finish, then set the tool rest with enough clearance for the open end of the wrench to clear the tool rest, with the height set so that the upper jaw, (cutting edge) is in line with the top of the cut. Apply slight downward pressure to the back of the wrench, so the longer jaw is rubbing the bottom of the dowel, (2nd picture) then feed the tool into the cut. If the pin is longer than the width of cut, reset and push in again. ( I have not had any luck moving the tool from side to side.)

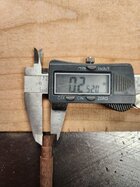
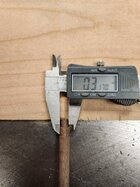
I took a 3/8" walnut dowel as a sample, used a parting tool to set the shoulder, then used the 5/16" wrench to size 5/8" of the end of the dowel , then parted a shoulder and used the 1/4" wrench to size the end. In picture 3, it shows the pin is 2 thousands of an inch larger than 1/4", and picture 4 shows the 5/16" pin is also .002 larger. both should fit nicely into its respective hole.

The cut is not glass smooth, so the glue will have small spaces to accumulate.

WH
 

Attachments

  • w1.jpg
    w1.jpg
    9.7 KB · Views: 22
  • w2.jpg
    w2.jpg
    46 KB · Views: 23
  • w3.jpg
    w3.jpg
    58 KB · Views: 20
  • w4.jpg
    w4.jpg
    54.6 KB · Views: 21
A good topic, one of my favorites. Turning a perfect cylinder of arbitrary diameter can be harder than it might seem. Turning a sloppy cylinder is easy.

People have their own methods for sizing. The method used may depend on how the cylinder will be used. Some use various versions of the wrench method.

I'm not knocking the wrench method - it's a old, well-proven method, However, I don't use it for several reasons. The diameters are limited to a set of discrete sizes. Modifying a set of good open-end wrenches can be expensive - not a problem if a supply of old wrenches is at hand. Also, the steel is typially not hardened HSS so it can't be sharpened into a long-lasting cutting edge. Some people don't modify the wrench but just use it with a wide parting tool for sizing.

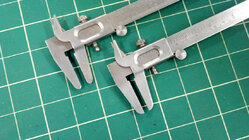
Here's my method. I round the "points" on some cheap vernier calipers, such as that at the top of this picture. (The one at the bottom is unmodified.) I bought a bunch of these when I found them for about $4 each on Amazon. I never measure with this type of caliper but set them to the desired size by another method.

When turning cylinders, I set one to the desired final diameter, plus a "smidgen".

1762023731802.jpeg

I use a very sharp diamond parting 1/8" tool to make a series of sizing cuts while holding the caliper in the groove. The thin steel of these cheap calipers easily slides into the 1/8" parting tool groove. The rounded tips let the calipers slip easily over the spinning wood without catching. After rough sizing, if appropriate, I use a skew ground flat across to make peeling cuts close to but a bit larger than the sized diameter, or if the spindle is thing, use planing cuts.
Finish up with planing cuts with a sharp skew.

To dress the cylinder to a perfect flat axial surface, if needed, sanding sticks made by gluing various grits of sandpaper on lengths of flat hardwood board are perfect.

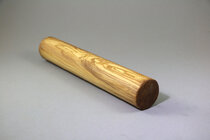
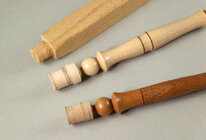
This method has worked for me for years and is not limited in size. For example, our resident chef prefers a rolling pin without handles - she said she can feel the dough better when rolling with her hands on the top of the rolling pin instead of with handles. I've also made "french" style rolling pins, but she didn't like those either. So about six years ago I made this "forever" rolling pin from dry Olivewood to her specifications. It's 2" in diameter, 12.5" long, end "corners" slightly rounded. The actual dimensions are not as important as the cylinder having a consistent diameter and made very straight down the length.

Rolling_pin_olive_IMG_8137.jpg

It get's used often. At this very moment, there is a fresh apple pie baking in the oven. Life is good.

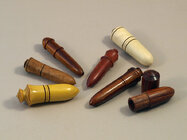
I use a similar method to cut precise tenons for small boxes, such as these needle/pill cases: I cut the lid mortise first, then size the tenon just like turning a larger lidded box. A little trickier since that tenon is relatively long.

1762025148111.jpeg

BTW, I keep one pair of calipers pre-set and locked to let me quickly turn short #2 morse tapers to hold thin spindles in the headstock. This method has several advantages over using centers, chuck, or collets. The two diameters that define the 2MT must be precise. (I've had a bit of practice while turning 100s of these.) I make two lines 1/2" apart, size at each line, then cut a taper between with a bit of clearance. One big advantage over a chuck is a partially finished piece can be removed from the lathe and remounted later with perfect registration. Detailed instructions are in my doc "Turning Thin Spindles".

1762024341588.jpeg

Sorry if this seems to have strayed off topic but I think it's related since the cheap calipers do provide a valid and flexible alternate sizing method.

Also, if the goal is is to simply make dowels and perhaps more than one or two are needed, there are other methods, including dowel/tenon cutters and dowel plates. These are fast and precise, aren't free, but for small diameter dowels may help with the issue of vibration while turning.

JKJ
 
If I need a gauge or jig I tend to make to suit my requirements. What you have described here looks like what the old chair bodgers you to make for green wood turning.
 
...What you have described here looks like what the old chair bodgers you to make for green wood turning.

Where would one find a copy of that book? I'd love to read it. I checked the stuartking web site but didn't see if it could be ordered.

JKJ
 
I like to make tools, I picked this up on the internet, and thought it might be worth sharing.

I bought a set of the cheapest combination wrenches that HF had to sell, 1/4" to 3/4", 9 pieces for less than $12.
You can use them as is as a fixed caliper for cutting a dowel or pin on the end of a spindle, which makes a very accurate, tight joint.

You can modify them into cutting tools by grinding of one side of the jaw of the open end wrench to around 38 degrees. (first picture).

The jaw sides are parallel, so if you have a square table on a disk or belt sander, just hold the wrench flat on the table and grind to the angle. I did not measure the angle, just tried to eyeball it to that of a skew. It is important to have the cutting edge at 90 degrees to the center of the wrench. I did not hone mine, they cut well with just the grind.

To use them, rough cut the space you want the to be the dowel, about 1/16" to 3/32" larger than finish, then set the tool rest with enough clearance for the open end of the wrench to clear the tool rest, with the height set so that the upper jaw, (cutting edge) is in line with the top of the cut. Apply slight downward pressure to the back of the wrench, so the longer jaw is rubbing the bottom of the dowel, (2nd picture) then feed the tool into the cut. If the pin is longer than the width of cut, reset and push in again. ( I have not had any luck moving the tool from side to side.)

I took a 3/8" walnut dowel as a sample, used a parting tool to set the shoulder, then used the 5/16" wrench to size 5/8" of the end of the dowel , then parted a shoulder and used the 1/4" wrench to size the end. In picture 3, it shows the pin is 2 thousands of an inch larger than 1/4", and picture 4 shows the 5/16" pin is also .002 larger. both should fit nicely into its respective hole.

The cut is not glass smooth, so the glue will have small spaces to accumulate.

WH
WH,

Thank you for posting this. I’ve seen this idea in the past but not tried it yet.

I often use a ¾” tenon for holding a piece in a collet chuck. So I want to try it.

Rich
 
Where would one find a copy of that book? I'd love to read it. I checked the stuartking web site but didn't see if it could be ordered.

JKJ
found this
The main publication about chair bodgers is "Going with the Grain: Making Chairs in the 21st Century" by Mike Abbott, which serves as a comprehensive guide to the traditional craft. Other relevant resources include historical accounts, such as the 1950s newsreel showing the last true bodgers, and general books on woodworking like Drew Langsner's work, which provides context and techniques for those interested in the craft.

Primary book
  • "Going with the Grain: Making Chairs in the 21st Century" by Mike Abbott: This is the most direct and comprehensive modern guide to chair bodging.
    • It is a step-by-step guide for making chairs using traditional tools and techniques.
    • Features over 600 color photographs.
    • Covers tools, techniques, and includes projects for making three stools and three chairs.
    • It is considered a sequel to Abbott's earlier books, "Green Woodwork" and "Living Wood".

Historical resources
    • 1950s Newsreel: A YouTube video documentary titled "The CHAIR BODGERS of the CHILTERNS" shows the last of the traditional itinerant bodgers practicing their craft in the Chiltern Hills.
    • Historical accounts: Wikipedia and other sources provide historical context on the trade, including production rates and the work of specific bodgers like Samuel Rockall.
    • Lithograph print: A specific 1937 lithograph print by Clare Leighton from the book 'Country Matters' is available through antique dealers like abebooks.com.


Related publications
  • Drew Langsner's work: Books like the one linked, which include content on Windsor and post-and-rung chairs, provide detailed instructions for novice chairmakers, covering many techniques used by bodgers.
  • Mike Abbott's website: Mike Abbott's own website also has information and resources related to his books and the craft.
see here

and here
 
Thanks, I'm interested in the historical aspects, tools, lifestyle. I've read a lot and have some old books but always looking for more.
 
Back
Top