• Beware of Counterfeit Woodturning Tools (click here for details)
  • Johnathan Silwones is starting a new AAW chapter, Southern Alleghenies Woodturners, in Johnstown, PA. (click here for details)
  • Congratulations to Jim Hills for "Journey II" being selected as Turning of the Week for May 6th, 2024 (click here for details)
  • Welcome new registering member. Your username must be your real First and Last name (for example: John Doe). "Screen names" and "handles" are not allowed and your registration will be deleted if you don't use your real name. Also, do not use all caps nor all lower case.

Advice Needed for Captured-Bar Hollowing System Secondary Rest

Joined
Jun 10, 2004
Messages
792
Likes
9
Location
Ames, Iowa (about 25 miles north of Des Moines)
Website
rwallace.public.iastate.edu
Hello everyone!

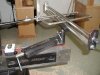
I am building a secondary tool rest to set-up a Lyle Jamieson type captured-bar hollowing system (I have a Jet 1642 2HP lathe with two banjoes), and will be making the secondary tool rest to fit a 1-inch diameter tool post for use in the second banjo.

For those that use this type of hollowing system, I'd appreciate learning from your experience about specific designs or improvements you would make to the "standard" secondary tool support supplied with the Jamieson system.

Some questions I have are:

1. What would you consider an optimal length for the secondary tool rest? (I'll be using the Jamieson D-handle with the "standard" boring bar, and perhaps components of the John Jordan hollowers and perhaps a few Sorby hollowing tools.) I have heard that dimensions from 24 inches to 38 inches have been used.....what is your opinion of 'best' length?

2. What offset attachment point (since the rest support is not centered on the secondary rest bars to accommodate angled entry into a vessel) do you think is most efficient? (i.e. Should the base attachment point be 1/3 the distance of the bar length in from the left end, or is there a better position? How much is too much offset?)

3. Does it matter if the support bars are round in section or square in section as long as the tool handle slides easily? (I am planning on using 1/2" diameter round section steel bars welded on the ends, and then to a 1" tool rest post.) I know out probably shouldn't, but perhaps someone would prefer one over the other....???

Any further suggestions would be helpful about set-up and use as I attempt to finish building the system. (I'm finally getting it set up after receiving the handle and boring bar as Christmas gifts.....I'd like to actually see it work on my lathe!)

Thanks!

Rob
 
Joined
Apr 25, 2004
Messages
2,560
Likes
34
Location
Annandale, New Jersey
Hi Rob,

I made my own and came up with what I deem improvements.

I made my 30" trap from 1-1/2" angle iron, some 1/4" plate and 3/4" cold rolled bar. The whole assembly slides through a "U" clamp fitting that uses 2 stud handles to lock it in place. The "U", cut from a piece of 1x2 bar stock, is welded to a 1" tool post. Not in the pics is a stop collar I added so that a particular set elevation is easy to repeat.

First pic shows the post and clamp. Note also that the angle iron is surfaced with nylon "slick strip" so there's no metal-to-metal contact and everything just glides. The trap bar is wrapped in a heavy nylon tape for the same reason.

Second pic shows the end. When the photo was taken I hadn't gotten the clamp handles. The bar was center-drilled and tapped for a 3/8 thread and the fender washer was notched into the vertical slot in the end plate to prevent the bar from rotating when the handle is tightened.

Hope this helps.
 

Attachments

  • Trap-2.jpg
    Trap-2.jpg
    51 KB · Views: 325
  • Trap-1.jpg
    Trap-1.jpg
    32.8 KB · Views: 324
Last edited:
Joined
May 26, 2006
Messages
120
Likes
0
Location
N.W. Alabama
Hello Rob,
Sorry for being tardy on my last PM. I want to chime in here. Mark's set up looks great and I'm sure it works just as well. Actually it's downright impressive. I purchased one of the complete Jamieson's several months ago from CSUSA and after somewhat limited use i can say I wish I had saved my money on the Munro, Sorby and maybe the Don Pencil (still fall back on the Pencil). The support that came with mine (I understand they differ by supplier) works well. The only thing I would change in regards to it is to extend by several inches the swing capabliliy on the fartherest portion of the rest and put a knurled knob on the bolt that attaches it to the ways. I haven't noticed much need for extending the capture portion nearest you. You could add an inch or two in my opinion and do just fine. Heck, Mark's looks better than the one I purchased. This isn't much but maybe it will help a little. I want to digrese a bit and say the Munro, although great at first, has been frustrating since trying to sharpen. Can't get a cut from it at all now. By the way, thought about you, had some micro Irish Lager that was great this past weekend.
Happy Turning.
 
Last edited:
Joined
Apr 29, 2004
Messages
576
Likes
2
Location
Hanover, VA
Website
www.abhats.com
I purchased a Jameson setup from CS several years ago, just before they started selling the manufactured secondary rests. I made mine out of plywood according to the plans that came with it, but made it another foot wider. It worked very well until I put riser blocks on my headstock (I've a Stubby and can do that easily) and couldn't make it 2" higher since I'd glued the vertical part. Rather than go through all the building again, I ordered one of CS's manufactured ones that would fit. It's the right dimensions, but I really don't like the little set screws that are supposed to hold things in place. That part is poorly designed for certain. I've a friend that is a machinist and I'm going to see if he can come up with a better fixing idea. If I had a fixed bed machine, I don't think I'd like the smaller size of their rest either. (The Stubby's bed is articulated, so I can swing it to the side and get further travel.) Don't know if you got the plywood plans - if you did, you might consider making your own.
 
Joined
May 30, 2004
Messages
236
Likes
1
Location
prairie village. kansas
i dstill use the original plywood rest,

I purchased a Jameson setup from CS several years ago, just before they started selling the manufactured secondary rests. I made mine out of plywood according to the plans that came with it, but made it another foot wider. It worked very well until I put riser blocks on my headstock (I've a Stubby and can do that easily) and couldn't make it 2" higher since I'd glued the vertical part. Rather than go through all the building again, I ordered one of CS's manufactured ones that would fit. It's the right dimensions, but I really don't like the little set screws that are supposed to hold things in place. That part is poorly designed for certain. I've a friend that is a machinist and I'm going to see if he can come up with a better fixing idea. If I had a fixed bed machine, I don't think I'd like the smaller size of their rest either. (The Stubby's bed is articulated, so I can swing it to the side and get further travel.) Don't know if you got the plywood plans - if you did, you might consider making your own.

a few years ago iadded a 2 in. block to go from 12in. to 16..still working with my conduit laser rig..mabye some day i will "modernize" frugal bob
 
Joined
Jun 10, 2004
Messages
792
Likes
9
Location
Ames, Iowa (about 25 miles north of Des Moines)
Website
rwallace.public.iastate.edu
THANKS for all of your comments!

Your suggestions and comments are VERY much appreciated! I'm sorry for the late reply, but it's just been one of those weeks at work.....finally getting on to more important matters (!) like turning!

Mark - I LOVE the design, and it looks very professional. I hadn't thought about adding friction-free strips (Jamieson's on-line instructions mention metal-to-metal contact using drill rod for low friction contact), and I like the idea of angle iron for the base/bearing surface of the of the rest. In actual practice, do you find yourself adjusting the side-to-side position of the tool rest (relative to the tool post)? Is that painted surface Hammerite or some other paint?? It looks REALLY good, and I'm quite sure it works well too!

Mike - Good to hear form you! - I'll reply to the PM (I just saw it - sorry that it'll not be likely to tip a few with you in Richmond this year... :( )

I'm looking forward to building the Jamieson system (Spring Break begins March 17th at Iowa State, and I can tell you there'll be some wood spinning and chips flyin' around here that week!). Thanks also for your comments about the Munro hollower - I 've used mine fairly regularly and still have not had occasion to sharpen the HSS cutter yet (....I'm about 3/4 of the way around the first cutter, and it's still performing well), but will keep your comments in mind when I do try to sharpen it.... could this possibly be an ineffective holding/grinding angle due to the smallness of the cutter holding jig? (Not having ever sharpened one, I am only speculating.) BTW - I'm doing my homework on local brews made in and around Richmond, and hope to be able to submit Pre-AAW Symposium Beer Update for attendees so they can be forewarned about what local beers to try while attending the symposium - I'll post it here when it's done, and probably a bit closer to the middle or end of May.

Walt - Do I understand correctly that your rest is 42" wide? I was going to go with the 30" recommended (by Jamieson) format, but given Mark's idea of an adjustable anchoring point, I may try this in lieu of going wider. Would your wider rest be unnecessary if you could adjust the position of the anchor point along the bottom bar?

Bob - I was going to prototype a wooden version of the secondary rest before committing to certain dimensions and fomats - I already have a piece of 3/4" baltic brich ply ready for the prototype, but will await the delivery of the few remaining parts of the Jamieson system before I start on the project.

Thanks again to everyone who provided feedback - it stopped me from going ahead with a 'compromise' design in preference to a bit better thought-out design for the tool rest.

Cheers!

Rob Wallace
 
Joined
Apr 25, 2004
Messages
2,560
Likes
34
Location
Annandale, New Jersey
Mark - I LOVE the design, and it looks very professional. I hadn't thought about adding friction-free strips (Jamieson's on-line instructions mention metal-to-metal contact using drill rod for low friction contact), and I like the idea of angle iron for the base/bearing surface of the of the rest. In actual practice, do you find yourself adjusting the side-to-side position of the tool rest (relative to the tool post)? Is that painted surface Hammerite or some other paint?? It looks REALLY good, and I'm quite sure it works well too!Rob Wallace

Hi Rob,

Hammerite it is. It's actually the same stuff that Stubby uses on their lathes.

Even though the Stubby has a rotating bed I do use the slide depending on what I'm doing. The 30" bar coupled with the slide and the 18" banjo gives me great flexibility to work the angles and amounts to about 60" of useable arc even with the bed in fixed position. Hollowing the ball you see in my other threads was done with the trap set way to the rear such that when I brought the holder in to cut from center, the D handle just touched the front end yet I could access the inside of the lip at a very acute tangent.

Remember though that you need 2 clamps for the slide of the bar which will tend to dip towards the long side otherwise. NOT a good thing [DAMHIKT]. Two clamps keeps it dead level.

You can spend the bucks for drill rod [it does have a nice finish] but cold rolled is far cheaper including the UHMW stip for the riding surface. I do use drill rod for my boring bars though.

mm

ps: I'm attaching a photo of John Jordan's trap as he uses drill rod. Note that his rest bar runs through a clamp fitting so that he can slide the rig either way. His clamp is nicer than mine, and using two bars reduces the contact point to a line rather than a surface. Note too that he uses a hex head bolt to fix the boring bar in the stabilizer. I do the same thing. I tried a set screw and a stud handle, but neither would tighten well enough. Since I went to a grade 8 bolt, the boring bars don't get loose. This is a GOOD THING. :D
 

Attachments

  • John+Jordan+Boring+Bar.jpg
    John+Jordan+Boring+Bar.jpg
    20.4 KB · Views: 108
Last edited:
Back
Top