• We just finished moving the forums to a new hosting server. It looks like everything is functioning correctly but if you find a problem please report it in the Forum Technical Support Forum (click here) or email us at forum_moderator AT aawforum.org. Thanks!
  • Beware of Counterfeit Woodturning Tools (click here for details)
  • Johnathan Silwones is starting a new AAW chapter, Southern Alleghenies Woodturners, in Johnstown, PA. (click here for details)
  • Congratulations to Dave Roberts for "2 Hats" being selected as Turning of the Week for April 22, 2024 (click here for details)
  • Welcome new registering member. Your username must be your real First and Last name (for example: John Doe). "Screen names" and "handles" are not allowed and your registration will be deleted if you don't use your real name. Also, do not use all caps nor all lower case.

All cracked up

Joined
Jan 23, 2020
Messages
689
Likes
956
Location
Shingletown CA
Who has spent countless hours trying to find a way to fill a crack or void in a nice chunk of wood? What is the secret that keeps the media used in the cracks or voids from chipping out in tiny pieces? A crack going across the grain seems to look crummy no matter what I try and fill it with. I've tried coffee grounds, sawdust, resin, colored ca glue. It all chips out, or sands at a different rate than the surrounding wood, causing dips and high spots. Since many of us cannot afford to buy wood because we spent everything we have on tools; it seems we are destined to take whatever we find.....and that always seems to be cracked, full of voids, or dried out incorrectly. Any tips that you have learned with fixing cracks and voids will benefit many turners on this forum! Here's a couple of example of cracks I filled.
Most are ones that I wouldn't even give away.
 

Attachments

  • IMG_3283.JPG
    IMG_3283.JPG
    616.2 KB · Views: 97
  • IMG_5812.JPG
    IMG_5812.JPG
    667.1 KB · Views: 96
Joined
Feb 28, 2021
Messages
1,225
Likes
1,075
Location
Roulette, PA
Website
www.reallyruralwoodworks.com
A few, I have just re-purposed , such as turning them much smaller, and they become box lids, I've done bronze powder & Ca glue which sort of turned a black-ish crack into a feature, one I turned into a small-ish yarn / knitting bowl, but yeah there are others I simply didn't figure out a good solution for - they still sit in my scraps bin , since they have tenons yet, so I can either use them as a jam chuck for something, perhaps a box lid , and one idea I had (but too late to put it to use) was to use a "bottom" half to fix an upper section by cutting the 2 pieces to a flat surface and glue in a board in between , turn away the board and true things up...
 
Joined
Nov 19, 2007
Messages
39
Likes
33
Location
Meridian Idaho
John, if these examples are typical of what you are running into, they are fairly wide. Because of that, the cracks need to be opened up and cleaned out, so the fill is uniform and complete. filling can be completed with many items; ex. brass key shavings, turquoise, epoxy with mica fillers. Try to stay away from shavings and CA glue, just looks bad. especially on soft woods.
 
Joined
Dec 15, 2021
Messages
300
Likes
158
Location
West Memphis, AR
Here is one of mine, John. The bowl has five coats of wipe on poly and I pushed dark wood glue into the crack and sanded prior the finish. The crack is tiny but blow the picture up and you can see the crack in the top corner, disappears about 1/2 way to the rim and an inch into the bottom. The specks you see are trash settling in the bowl that I put to the side until I figure out what to do to it, hate to burn it......
 

Attachments

  • 66415882970__85A9B4F1-45C3-4325-8F5F-DFB78118D66E.jpg
    66415882970__85A9B4F1-45C3-4325-8F5F-DFB78118D66E.jpg
    103.2 KB · Views: 73

Dave Landers

Beta Tester
Joined
Dec 1, 2014
Messages
811
Likes
2,487
Location
Estes Park, CO
Website
dlwoodturning.com
If there's a crack (or more often for me, a void or bark inclusion) that I want to keep and fill, I will start with the bowl or hollow form turned to final form and sanded to final grit (probably 400). If the crack is too bad to turn the piece, it's probably firewood (or a smaller piece). It had better be a very special chunk of wood to justify the effort to keep it from flying apart - that's a totally different set of problems. Also, it has to end up looking like a "feature",. or "nothing" (disappear into the grain, etc). If it's just going to look like a filled/repaired crack, I am likely to skip it.

Before filling or patching, clean out whatever is in there (loose bits of wood, bark, worm poop, shavings, etc). I go with dental picks (the thing the dentist scrapes your teeth with), and a set of needle files, and compressed air.

I do different things depending on the piece and what effect I'm after.

I hardly ever try to fill with CA - never satisfactory result for me. Gets all over the wood. And it's hard to drink that post-shop beer with a bowl stuck to your fingers.

I sometimes use epoxy (I use West Systems G5 - long work time, so you can fuss with it, but have to watch it that it doesn't run out of the crack before it cures - some might prefer a 30 min or 5 min epoxy so it'll stay put sooner). Mask with tape to keep the epoxy from going where you don't want it (you'll just have to sand it off - easier to remove it with the tape). Make a dam out of something (blue tape, hot glue, etc) to keep it where you want it. Work it down into the crack (I cut a point on a coffee stir stick, and/or use the edge of credit card, etc). Get the bubbles out and force the goo into the crack. Carefully "hit" the surface with a little heat (a brûlée torch from like 8-10" away) - this pops bubbles and seems to help the epoxy flow. But don't overheat or the epoxy doesn't cure right.

I usually will color my epoxy with India ink - just a drop or half-drop is enough for most fills. I've also used other colors (watercolor paint, powder dyes, etc) if I want a "color". And it usually takes a few fills to get it right (mainly because bowls are not flat, so it's difficult to get a single application to flow everywhere you want it).

Epoxy does not sand the same as wood, so careful and specific sanding is needed. I go with the finest grit that will take the epoxy off - I'd like to use 180, but it's usually 120 or 80. Stop when the sandpaper starts to touch the wood, but make sure you get the fill flat (avoid a hump or dip) sand up to the same final grit as the rest of the bowl. This does take some practice.

I have also used turquoise - the rocks, not the fake stuff - crushed and separated into various sizes from tiny pebbles to dust. Start filling with the bigger rocks and fill in with finer stuff. Thin CA glue on each "layer" of fill - carefully on the rocks (not all over the wood). Keep layering till you get the fill proud of the wood surface.

Rocks are tougher than epoxy to sand (grind), so get ready for a chore.

When the piece will allow it, I skip most of that and use pewas (butterfly patches).
 
Joined
Feb 6, 2010
Messages
2,977
Likes
1,954
Location
Brandon, MS
When filling a crack also try to seal the area first, shellac is good or lacquer. This will eliminate staining caused by the glue and be easy to sand off the excess glue.

another option is if you cannot fix it highlight it. Had a bowl with a long crack so I burned the crack and made it look like a vine with leaves .
 

Attachments

  • IMG_2550.JPG
    IMG_2550.JPG
    231.9 KB · Views: 37
Joined
Feb 26, 2019
Messages
1,825
Likes
1,421
Location
Lebanon, Missouri
I’ve used CA and 5 min epoxy for smaller voids and most cracks. Bigger areas are better done with other slower cure resins using tape, dams etc.

Is your fill actually chipping out or are the little defects actually bubbles? I havent had chipping issues but have had bubbles that can appear to be chipping. Coffer grounds always caused bubbles. Mica powder for coloring seems to have solved most of my bubbles, and I need to try the small torch to help it more.

I prefer to get the item finish turned, do the fill, then use an nrs to level, then sand. I can usually start sanding with 180 or 220 after the nrs, and dont have issues with the repair being soft.
 
Joined
Aug 14, 2007
Messages
5,486
Likes
2,836
Location
Eugene, OR
Well, If I can't turn the crack out, I burn the piece. This stuff does grow on trees...... Just not worth the extra time, and if you sell, and two similar bowls are next to each other, and one has a repaired crack and the other doesn't, that is the one that sells. Every time. If it is an 'art' piece, then I chase with the thin CA glue first, then the medium, then some dust on top.

robo hippy
 
Joined
Jan 7, 2012
Messages
271
Likes
2,538
Location
Davison, Michigan
Website
jpseyfried.com
When I saw the title of this post I did a bit of a double take, as I have recently posted (elsewhere) this little box with the same title.

pausanto858.jpgpausanto861.jpgIMG_1256.jpeg

I bought a peppermill blank of Pau Santo wood online. When it arrived it showed some cracks on the outside that I thought might easily turn away. I was very disappointed when I roughed out the box and almost threw it away. I decided to finish the box as I paid quite a bit for it even on sale. I used CA glue and sanded it to fill the cracks. I think it cleaned up pretty well.

Edit: The supplier gave me a store credit for what I paid for the blank.
 
Last edited:
Joined
Aug 14, 2009
Messages
2,054
Likes
1,145
Location
Peoria, Illinois
I have thousands of blanks of wood around here. If I find one with a crack, it gets repurposed into smoke for pork loin, or heat for our son with a wood stove. I'm not taking a chance with brain injury while turning.
 

Donna Banfield

TOTW Team
Joined
May 19, 2004
Messages
511
Likes
1,351
Location
Derry, NH
I have done exactly what you (and others on this thread) have tried to do. I now apply John Jordan's philosophy: Life's too short to turn crappy wood. Like Reed Gray (Robo Hippy) has said, if you try to repair, it will always look like a bowl that has cracked. And wood moves, throughout the changes in season. It will eventually open up and the filling will fall out. And my experience in selling bowls that have been repaired like that - they never sell.
 
Joined
Jan 23, 2020
Messages
689
Likes
956
Location
Shingletown CA
I found that even if you give one to someone; they expect perfection. Unfortunately some of us cannot just pay for logs or wood; so we are kind of stuck getting what someone will give us. Although I'll have to say, that some of my favorite pieces I kept are cracked in one spot or another. Although I do have a possible live oak that someone just asked me if I wanted!
 
Joined
May 4, 2010
Messages
2,449
Likes
1,875
Location
Bozeman, MT
I find it ironic that cracks are detrimental, but "voids" and bark inclusions are "features". Some of you braver people turn objects that are more air than wood, and it's great art. That being said, it is what it is, and I have mostly managed to turn off the cheapskate inside and throw out wood with cracks. Now what to do with nice pieces made from ash that crack after they're finished....
 

hockenbery

Forum MVP
Beta Tester
TOTW Team
Joined
Apr 27, 2004
Messages
8,637
Likes
4,976
Location
Lakeland, Florida
Website
www.hockenberywoodturning.com
I find it ironic that cracks are detrimental, but "voids" and bark inclusions are "features". Some of you braver people turn objects that are more air than wood, and it's great art.

It’s all in the eye of the maker… what the maker likes/ dislikes. Often the makers are influenced by feedback and experience into an evolving appreciation of features.

I like organic elements. I often use natural cracks and voids and seek blanks that will yield them.
A drying crack rarely looks natural to me. the more experience we get the less we get them.

I appreciate pieces made by others that use pewas or stitching( Jerry Kermode) to feature and stabilize cracks.

As to turning pieces with voids. Nothing about being brave. It’s about learning technique. Using stabilizing wire and tape to hold the forms together. Also it’s about building confidence by working up from easy to moderate to harder

EasyB97BC6CE-4AA3-4E82-90BC-801CFD804433.jpeg. F2893515-3DEC-4805-B133-1BCFB32F74F8.jpeg
Moderate 8E10D1D8-EB31-4E04-8363-F2A73772A27F.png
Harder0626DD67-8571-4EB9-B256-041AE3916727.jpeg
 
Last edited:

John Jordan

In Memorium
Joined
Jun 24, 2008
Messages
506
Likes
965
Location
Cane Ridge (Nashville), TN
Website
www.johnjordanwoodturning.com
Who has spent countless hours trying to find a way to fill a crack or void in a nice chunk of wood? What is the secret that keeps the media used in the cracks or voids from chipping out in tiny pieces? A crack going across the grain seems to look crummy no matter what I try and fill it with. I've tried coffee grounds, sawdust, resin, colored ca glue. It all chips out, or sands at a different rate than the surrounding wood, causing dips and high spots. Since many of us cannot afford to buy wood because we spent everything we have on tools; it seems we are destined to take whatever we find.....and that always seems to be cracked, full of voids, or dried out incorrectly. Any tips that you have learned with fixing cracks and voids will benefit many turners on this forum! Here's a couple of example of cracks I filled.
Most are ones that I wouldn't even give away.
There's free or cheap green wood everywhere, you don't have to buy wood or use cracked wood. Might need to pay firewood price from some people, but look around.

I can't help with filling the cracks. LOL

John
 
Joined
Oct 13, 2016
Messages
1,066
Likes
1,523
Location
Rainy River District Ontario Canada
Who has spent countless hours trying to find a way to fill a crack or void in a nice chunk of wood? What is the secret that keeps the media used in the cracks or voids from chipping out in tiny pieces? A crack going across the grain seems to look crummy no matter what I try and fill it with. I've tried coffee grounds, sawdust, resin, colored ca glue. It all chips out, or sands at a different rate than the surrounding wood, causing dips and high spots. Since many of us cannot afford to buy wood because we spent everything we have on tools; it seems we are destined to take whatever we find.....and that always seems to be cracked, full of voids, or dried out incorrectly. Any tips that you have learned with fixing cracks and voids will benefit many turners on this forum! Here's a couple of example of cracks I filled.
Most are ones that I wouldn't even give away.

John you have to befriend some people that remove trees, I have never bought my turning wood, safe a few small pieces of Padouk, Ebony and Purpleheart .

For me it was the. city's wood dump mostly and then hydro crews and road maintenance crews, a couple of times got wood from the tree people that look after peoples property.

I also went and looked where the developers were worked and doing all the roughing in work of trees and sewers etc., they had trees removed and were glad for me to take some of the wood off there hands, anyway you have to keep you're eyes and ears open, that way you will get fresh green wood you can turn, pre-turn or turn to finish, than dry the pieces.

Slow drying is the only way to get wood turnings without splits in hem.

I use the brown paper bag with nothing else in it folded close and set away in a cool place, as I have been preaching this for years and years, it works.

Canada plum burl.jpg Canada plm burl warped.jpg
Like the above Canada plum bowl, yes it warped severely, but it did not split.

And yes it takes time for these turned pieces to dry, but the end results are worth it.

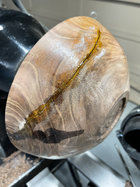
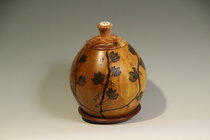
Now that does not mean that we don't have to fill the wood sometimes, like these 4 bowls that I did add filler into, the first one is larger Black Willow burl (24") I let it sit in our house for 2 years I believe, because of all the burl eyes that dry inward like a Knott, I did then fill all those splits with fine coffee ground that was slightly damp so that the CA woold sink in and harden, as dry coffee ground does not like to absorb the CA.

The Elm platter with the tile in it has a small bark inclusion, and I just needed some CA to keep it solid in there, stil fine after 5 years as I just saw it this past weekend.

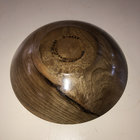
The next one was a lot more work, as it had the Apple tree's grafting seam in there that had not grown totally grown together, I did fill that with coffee ground, I like that stuff as it is and looks like dark wood, and we have lots of it :)

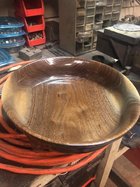
Next is a Siberian Elm bowl that had an opening from a branch and the edge was also missing a small bit of wood for the same reason, some painters tape and again some coffee ground filled with CA, I often use thin CA first and the thick CA after to get it filled good, this last two where filled before final turning and finishing, rather than trying to fill a finished piece that then has to be. again sanded.

Large Black Willow burl floor bowl.jpg Siberian Elm platter.jpg Apple tree graft.jpg Elm bowl.jpg

Of course I don't always fill splits and voids, as the piece will look good to me with these things in it.

Also a split like in the Black Walnut piece, I knew it had a split, but could also see that it had nice ripply grain in the wood, so I turned it anyway, I'm not a fan for trying to glue splits like that, they look bad and will never hold in the long time, so I decided to use some brass wire to sow it together, and I was pleased with that result, also a piece we still have.

Oak burl bowl.jpg Black Malnut ripple wood wired.jpg
 
Last edited:
Joined
Dec 15, 2021
Messages
300
Likes
158
Location
West Memphis, AR
I've never bought wood. Craigslist, Marketplace and word of mouth. Nice chunk of cherry. Straight line wind took out the oak in the next picture yielding an unusual mark of a parasite or something growing in the wood. I need to dig that blank out and turn it...... I have an MS660 magnum Stihl with 32 and 36 inch bars, my trailer with a drop tailgate and a super duty dolly. Even at 70 I manage to harvest wood for burning and turning.....cut pieces bowl length plus a couple inches then split those with the big saw, easy to dolly onto trailer. Trailer load of wood is hickory, got lots of bowls and burned hickory all winter three winters ago.
The black walnut I've been having trouble with was harvested summer before last from midtown. We burnt walnut all last winter, glad I only roughed in about a dozen bowls from that tree.....
100_2925.jpg100_2915.jpg100_2961.jpgAAFC2614.JPG
 
Last edited:
Joined
May 4, 2010
Messages
2,449
Likes
1,875
Location
Bozeman, MT
John, I feel your pain. Our native trees generally produce poor turning wood, too. That means you have to find trees planted in orchards or as landscaping.

If Shingletown doesn't have such stuff, then you can find it in Redding. Tree services and the city remove trees planted 80-100 years ago around somebody's home where shopping center is getting built or a bigger home is going in. You have to make contact with them, then keep badgering them with your interest, as many of the bosses see us as a potential hazard. The crews are generally good folks and very accommodating. Give people bowls and they'll remember you better. Point out how safety conscious you are, how you'll stay out of the way and only go after stuff when they say it's OK, and will decrease they load for the dump or the chipper. Our city crews can't give away the wood, but they often let it lie on the ground while they go have lunch or over night, and don't mind if it's gone when they get back. Two of the commercial services want us to buy the wood, one of them for $200 a "cord". Many turners elsewhere have relationships with tree services and the services drop stuff on the end of their driveway--often more than they can use, but that's better than not getting any. Be your charming self and reach out. You can find stuff if you look.

OR you could schedule a play date with Robo and drive up to Eugene when he's got some myrtle/bay laurel. That's a wood that won't make you hassle over cracks.
 
Back
Top