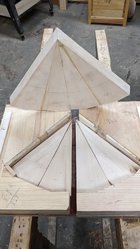
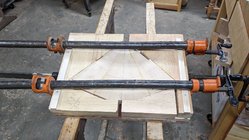
The June 2022 issue of American Woodturner article titled "A Table Saw Sled For Precision-Cut Staves" and I am in the process of developing what I view as a better way. The 2 photos show the first trial using basswood planed to 1 1/8" (28.575 MM) thick and cut to 3 7/8" (98.425 MM) wide.
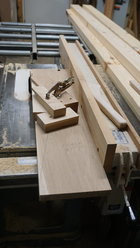
This photo shows the angle cutting jig just imagine a long board clamped in place the with the right hand on the clamp pushing forward and against the fence and the left hand supporting the end of the board the cut is made. The next step is to set the cut off piece and the board next to each other on a flat machine surface and mark the second piece for cut off on a miter saw. The final step is to repeat until enough segments have been cut. The point in the center of the wide end is nothing more then a 90 degree cut with the sloped side against the miter saw fence. The only waste will be the saw cuts and the little triangles from the end.
The jig was made using a digital protractor to lay out the position for the fence, then screw the fence down with the clamp attached. The length of the segment can be adjusted simply by moving the stop block however the clamp may need to be repositioned. The angle to set is 2 times the Miter angle listed on the chart in the magazine (the jig shown was made to 21.8 degrees).
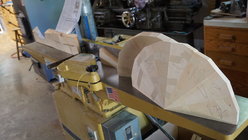
The angles are made on the jointer using the blade angle from the chart. The white pine plank on the outboard table was used to verify the angle by checking with the digital protractor and the depth was set to assure that the entire edge is angled. The segment is placed as shown with the grain parallel to the edge up so the angled grain is cut on the shear then the piece is flipped end for end for the second edge angle. The tapped up assemblies on the inboard table indicate that no adjustment to the angle is necessary ince they both sit flush on the machine table.
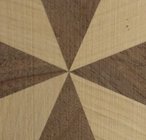
This is one of several pie segment experiments that did in September 2021 to see if I could make the point come together accurately and the segments were cut using a similar jig, but they are flat so 360 / 8 = 45 degree or twice the miter angle as listed for zero slope. The glue up was simpler in that I glued up 4 pairs using clamp blocks that allowed clamping pressure to be perpendicular the the joint so I could more easily align the points then make an accurate 90 degree cut to spread the correction error over at least half of the pieces. The trimmed 1/4 sections were then glued into halves and trimmed as necessary and lastly the corrected halves were glued together.

This photo shows the angle cutting jig just imagine a long board clamped in place the with the right hand on the clamp pushing forward and against the fence and the left hand supporting the end of the board the cut is made. The next step is to set the cut off piece and the board next to each other on a flat machine surface and mark the second piece for cut off on a miter saw. The final step is to repeat until enough segments have been cut. The point in the center of the wide end is nothing more then a 90 degree cut with the sloped side against the miter saw fence. The only waste will be the saw cuts and the little triangles from the end.
The jig was made using a digital protractor to lay out the position for the fence, then screw the fence down with the clamp attached. The length of the segment can be adjusted simply by moving the stop block however the clamp may need to be repositioned. The angle to set is 2 times the Miter angle listed on the chart in the magazine (the jig shown was made to 21.8 degrees).

The angles are made on the jointer using the blade angle from the chart. The white pine plank on the outboard table was used to verify the angle by checking with the digital protractor and the depth was set to assure that the entire edge is angled. The segment is placed as shown with the grain parallel to the edge up so the angled grain is cut on the shear then the piece is flipped end for end for the second edge angle. The tapped up assemblies on the inboard table indicate that no adjustment to the angle is necessary ince they both sit flush on the machine table.

This is one of several pie segment experiments that did in September 2021 to see if I could make the point come together accurately and the segments were cut using a similar jig, but they are flat so 360 / 8 = 45 degree or twice the miter angle as listed for zero slope. The glue up was simpler in that I glued up 4 pairs using clamp blocks that allowed clamping pressure to be perpendicular the the joint so I could more easily align the points then make an accurate 90 degree cut to spread the correction error over at least half of the pieces. The trimmed 1/4 sections were then glued into halves and trimmed as necessary and lastly the corrected halves were glued together.

