• We just finished moving the forums to a new hosting server. It looks like everything is functioning correctly but if you find a problem please report it in the Forum Technical Support Forum (click here) or email us at forum_moderator AT aawforum.org. Thanks!
  • Beware of Counterfeit Woodturning Tools (click here for details)
  • Johnathan Silwones is starting a new AAW chapter, Southern Alleghenies Woodturners, in Johnstown, PA. (click here for details)
  • Congratulations to Dave Roberts for "2 Hats" being selected as Turning of the Week for April 22, 2024 (click here for details)
  • Welcome new registering member. Your username must be your real First and Last name (for example: John Doe). "Screen names" and "handles" are not allowed and your registration will be deleted if you don't use your real name. Also, do not use all caps nor all lower case.

Basket Illusion

Joined
Jul 27, 2005
Messages
279
Likes
1,842
Location
North Ogden, Utah
Alright, I have the bottom colored and burned. Only a few steps left (but watch your step, they're big ones).
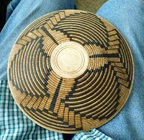
DSCN0084.JPG
Next I'll do the braided rim. There are several great ways to do the rim, both in authentic Native American baskets and in these basket illusions. And some basket illusionists even leave the rim natural wood or just colored a solid color. They all look good but as I've said a few times in this follow along project I want to try for something that looks authentic. So I'll be doing a braided design. It's not terribly difficult but it is pretty tedious. I do mine in steps or more like laps around the rim. I draw it freehand and there will be distinct inconsistencies in it just because I'm not very good at drawing. But if you look at real baskets those inconsistencies are there too, partly because they're hand made and because of the inconsistency of the material they worked with. So I prefer doing them freehand.

More to come...
 
Last edited:
Joined
Jul 27, 2005
Messages
279
Likes
1,842
Location
North Ogden, Utah
I draw the weave design in 4 laps around the rim. It's hard (at least for me) to draw a straight line on a curved surface. And it gets even harder when you need to draw 28+ inches (the circumference of a 9" basket) of lines about 1/8" apart at an angle and parallel to each other. So I've found that drawing each line in two parts makes it easier. If you remember back near the beginning of this adventure, just as we finished drawing the index lines, I drew a line around the center of the rim of the basket. That was for a starting point for these lines we're about to draw. By getting a comfortable hold on the basket with one hand and resting you other pencil holding hand on the basket to keep it steady, you can draw a few lines, rotate the basket a little, draw a few more, and so on until you're all the way around the rim. Holding the same hand position for the entire rim helps keep the lines somewhat consistent. I don't measure the angle but I seem to gravitate to something close to 45 degrees. I begin each line at the center line of the rim and draw towards the inside edge of the rim bead. When I make it all the way around I finish each line out to the edge of the rim bead with a second lap around the rim. This is undoubtedly confusing so I've taken a couple of photos of what this looks like.
DSCN0085.JPG DSCN0087.JPG

When you've finished this first line, you start drawing a second line to complete each braid. The second set of lines are for the most part perpendicular to the first. Again, a couple of pictures explain it better than I can.
DSCN0089.jpg DSCN0090.jpg

You might be thinking that drawing this entire design and rim braid on the basket is overdoing being cautious. But I do because a mistake it's so hard to fix a mistake. If you have to scratch off a part of the design that is wrong, it will leave a scratched surface on the wood that will show up on the finished basket. And if you try just burning the braid without lines to guide you and screw up, there really isn't a fix that will hide a burn line in the wrong place. So that's why I do it this way. I'm kind of prone to screw ups and lapses in concentration. I do quite a bit of erasing before I get it right.
More to come......
 
Last edited:
Joined
Feb 24, 2024
Messages
4
Likes
3
Location
Midland, MI
Curt and Gibbs, thank you both for taking the time for this thread and the videos respectively.

An open question what do others use for their finish? I watched how you did it Gibbs and I will give that a try. I have had mixed to poor results with some Krylon sprays so would like to hear what others use for their basket illusions
 
Joined
Jul 27, 2005
Messages
279
Likes
1,842
Location
North Ogden, Utah
Curt and Gibbs, thank you both for taking the time for this thread and the videos respectively.

An open question what do others use for their finish? I watched how you did it Gibbs and I will give that a try. I have had mixed to poor results with some Krylon sprays so would like to hear what others use for their basket illusions
Gregg, I've also had a few problems with Krylon matt finish but I also had some that turned out really well. I don't know for sure why I've had mixed results but that's usually operator error when something like that happens with me. But I quit using it anyway. I'll jump ahead of where I'm at in this follow along and just say that I now use a coat of Watco natural danish oil, letting it dry for a week or two, then a coat or two of Minwax satin rattle can lacquer. I haven't had any disasters with that.
 
Joined
Jul 27, 2005
Messages
279
Likes
1,842
Location
North Ogden, Utah
So, now that the braided design is drawn on the rim it's time to burn the design. I use a small PJL skew burning pen. It has a curved edge and I sharpen that edge with a diamond card so that it makes a nice, fine line. I also use low heat with the burner. Use a scrap of wood to play with it abit before you start on the rim. The heat needed will vary with the type of wood you've used along with the grain direction, much like most things work with wood. Again, I find it easier to burn the lines in sections so I usually make 4 or so laps around the rim. This takes a little practice but you'll figure out what works best for you. I begin much like I did with drawing the lines, burning from the center towards the edge of the inside of the rim bead. When that's done I burn the opposite line again form center towards the outside edge. And then I just complete each line in a couple more laps. It works best to the last little bit of each line working from the other direction so you don't slip and burn into the first bead of the basket. At this point the braided rim will look something like this.
DSCN0091.JPG
After all that's all done I like to add some small lines that give the braid a more realistic look, as if the braided fibers have splits and imperfections from the braiding. So that usually works best for me with 4 more laps around the rim and looks like this.
DSCN0093.JPG
You're probably thinking this seems like a lot of going around in circles and you're right. The rim bead takes more time for that small area than any other part of the basket. But I think the rim is what brings the whole thing together and makes it a basket. So I think the time it takes is worth it.

That about wraps this project up except for applying a finish. One last time I'll repeat that I'm going for an "old, used" looking basket. So what I like to use is one coat of Watco danish oil. Depending on the wood, this will darken and give a yellowish tinge to the wood. After it has dried for a week or so I spray it with Minwax rattle can spray lacquer. Some don't like that, I do. If you don't like it, use something that you like. It will still look great. I've used lacquer in gloss, semi-gloss, and satin, I've used Krylon Matt finish with great results and poor results. I suspect the problems (clouding) I've had with Krylon Matt were something I did wrong, old finish, not shaking the can well enough, or maybe even not letting the Danish oil dry long enough. And I've use the Minwax rattle can water based poly with good results. So use whatever you've gotten good with, it won't matter. There's only one combination I will tell you to steer clear of. If you decide to use alcohol based markers (Sharpie, Copic, Prismacolor) don't use lacquer. The colors will run.

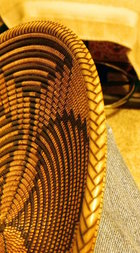
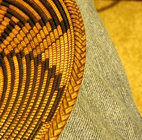
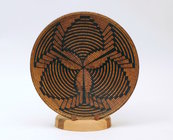
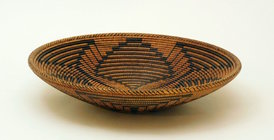
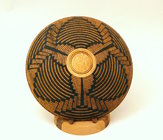
So, just like that, a piece of wood became a 3 Petal Squash Blossom basket. I put the Danish Oil on this tonight but when it's had a couple days to dry I'll add a photo of the finished basket. Thanks for following along.
 
Last edited:
Joined
Apr 30, 2022
Messages
455
Likes
2,274
Location
Beavercreek, OH
Website
www.ovwg.org
So, now that the braided design is drawn on the rim it's time to burn the design. I use a small PJL skew burning pen. It has a curved edge and I sharpen that edge with a diamond card so that it makes a nice, fine line. I also use low heat with the burner. Use a scrap of wood to play with it abit before you start on the rim. The heat needed will vary with the type of wood you've used along with the grain direction, much like most things work with wood. Again, I find it easier to burn the lines in sections so I usually make 4 or so laps around the rim. This takes a little practice but you'll figure out what works best for you. I begin much like I did with drawing the lines, burning from the center towards the edge of the inside of the rim bead. When that's done I burn the opposite line again form center towards the outside edge. And then I just complete each line in a couple more laps. It works best to the last little bit of each line working from the other direction so you don't slip and burn into the first bead of the basket. At this point the braided rim will look something like this.
View attachment 61840
After all that's all done I like to add some small lines that give the braid a more realistic look, as if the braided fibers have splits and imperfections from the braiding. So that usually works best for me with 4 more laps around the rim and looks like this.
View attachment 61841
You're probably thinking this seems like a lot of going around in circles and you're right. The rim bead takes more time for that small area than any other part of the basket. But I think the rim is what brings the whole thing together and makes it a basket. So I think the time it takes is worth it.

That about wraps this project up except for applying a finish. One last time I'll repeat that I'm going for an "old, used" looking basket. So what I like to use is one coat of Watco danish oil. Depending on the wood, this will darken and give a yellowish tinge to the wood. After it has dried for a week or so I spray it with Minwax rattle can spray lacquer. Some don't like that, I do. If you don't like it, use something that you like. It will still look great. I've used lacquer in gloss, semi-gloss, and satin, I've used Krylon Matt finish with great results and poor results. I suspect the problems (clouding) I've had with Krylon Matt were something I did wrong, old finish, not shaking the can well enough, or maybe even not letting the Danish oil dry long enough. And I've use the Minwax rattle can water based poly with good results. So use whatever you've gotten good with, it won't matter. There's only one combination I will tell you to steer clear of. If you decide to use alcohol based markers (Sharpie, Copic, Prismacolor) don't use lacquer. The colors will run.

So, just like that, a piece of wood became a 3 Petal Squash Blossom basket. I put the Danish Oil on this tonight but when it's had a couple days to dry I'll add a photo of the finished basket. Thanks for following along.
Excellent tutorial Curt!
 
Joined
Jul 27, 2005
Messages
279
Likes
1,842
Location
North Ogden, Utah
All good stuff, what type of Pyrography tips do you use?
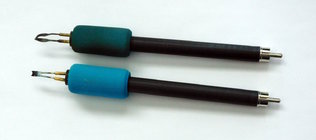
Sorry Bill, I almost forgot to show the pens.
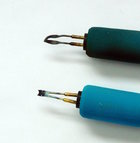
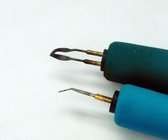
These are the PJL pens that make this process much easier. The are a fixed tip pen, not interchangeable, and are a very nice quality pen. The only thing I'll do differently if I ever have to buy any more is I'll get the foam insulation on the entire length of the pen. They get a little hot when you're using them for prolonged periods.
DSCN0117.JPG DSCN0115.JPG
The bead burning tip is bent on an angle that makes it comfortable when burning the thousands of little lines.
DSCN0116.JPG
 
Joined
Nov 26, 2023
Messages
39
Likes
456
Location
Placitas, NM
I've thought about documenting the steps of my style of basket illusion for a while and thought this would be a good a place to give it a try. Keep in mind that there are probably as many different ways to do this as there are people doing it and mine is only one of them. And I also need to give credit and thanks to those who taught me most of this. I was first inspired by Jim Adkins several years before I ever tried this myself. And to this day I still think his baskets are the most realistic I've seen. Steve Mawson has also been a huge inspiration to me and also become a good friend. Harvey Meyer, although he does mostly a different style of basket illusion, is the one that made the light come on in my head and finally understand how to get the design on the wood. His YouTube videos on basket illusion are well worth watching. So this is all mostly information I'm passing along to anyone else that may take an interest in this type of woodturning embellishment and not anything that I have "invented". So anyway, here we go.

This is going to be a smaller basket, about 9" diameter and 2" deep made from a piece of kiln dried hard maple that has just a little bit of spalting. When making a basket I'm trying to create something that looks old, maybe well used, and usually in the style of a desert southwest Native American made basket. So I don't mind a little bit of figure or color variation or the spalting in the wood I use. In fact for me personally I think it makes a more realistic basket. But in reality, if you were to hold one of these basket illusions up next to an authentic Native American basket they're not really even close to looking real. I like making them though and as tedious as they can be I find working on them to be very relaxing.

In this first photo, I have the blank mounted using the big screw that comes with most chucks. I'm using the tailstock with a revolving cup center just to make it a little more stable.View attachment 61362

From here I just turn the outer shape and make a tenon as I would on any other bowl. There's no point in sanding this because the beading process will remove the surface anyway.View attachment 61363

Because this bowl will have a braided rim design I now turn the outer part of the rim using a 3/8" beading tool that I made from a worn out 3/8" spindle gouge. D-Way makes beading tools in many sizes and I'm sure their 3/8" tool would work great here but I'm kind of frugal and made my own from a worn out spindle gouge. I don't know the angles of the grind other than to say they are similar to the D-way tool as it comes new. These beading tools are used with the flute down, as a scraping tool and work best with light cuts that just make those angel hair shavings.View attachment 61364View attachment 61365
HI Curt,
Pretty awesome process documentation and nice of you to share the steps you use to produce your basket illusion pieces! I found it very interesting! Thanks - Dave
 
Joined
Nov 26, 2023
Messages
39
Likes
456
Location
Placitas, NM
I'm so glad that Gibbs Hansen commented here. Karl, your baskets are exactly what I was talking about when I mentioned the intricate designs and color palettes. I just couldn't remember your name in my forgetful mind. Thanks for commenting.
Also David Bartell's clean, crisp designs are beautiful especially on his signature mesquite forms.
If I'm not mistaken - wasn't it Gibbs Hansen that had basket illusion work on the cover of Craft Supplies catalog? I kept that catalog cover for a long time because I found it fascinating -- unfortunately, I somehow misplace it during my last cross country move. It provided inspiration for me - it was one of the first times I saw a basket illusion piece and I knew that whenever i got a chance, that I wanted to try to learn the technique!
 
Last edited:
Joined
Jun 5, 2023
Messages
121
Likes
693
Location
Portage, MI
Joined
Nov 25, 2021
Messages
1
Likes
0
Location
Everson, WA
Nice job and very informative. I have been doing basket illusion pieces for about 11 years now and like Curt said, I have developed my own process. If you're interested you can find my tutorial on You tube.
Just do a search for "GibbsArtWood"
I can attest his tutorial on YouTube is one of the best for basket illusion.
 
Joined
Jul 27, 2005
Messages
279
Likes
1,842
Location
North Ogden, Utah
After reading so many great comments on Karl Hansen's video tutorial I took the time to watch all eight episodes. All I cans say is WOW! His is a different style than what I do but it just might be the best Basket Illusion out there.
 

Michael Anderson

Super Moderator
Staff member
TOTW Team
Joined
Aug 22, 2022
Messages
1,360
Likes
3,922
Location
Chattanooga, TN
Just read through the rest of the project. Curt, great job! Your follow-along was very easy to follow and answered all of the questions I had in my mind. I like your process and your intention of creating something authentic. Beautiful final piece. Thanks for taking us along on the journey.
 
Joined
Jan 19, 2024
Messages
41
Likes
110
Location
Hattiesburg MS.
Curt, a very well done presentation. At this point, I don’t know wether to give you a cussing or a high five! Just had to give this a go and I think I’m hooked!
Burning lines, for those interested. Playing cards did not work well for me. The lady at klingspor didn’t know paper backed sandpaper from a dead trout. Tried a piece of poster paper that was in the shop and there you go. Works like a charm. Much cheaper than sandpaper and no need to ruin a good set of cards.
Thank you for directing me on another path of this wonderful passion!
 
Back
Top