bit of dilima
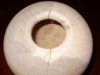
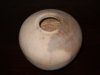
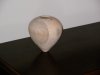
turned some green maple yesterday
it went though some distortions yesterday afternoon and last night(wish i took pictures), it seems to have stablized this morning, but i probably will not work on it til monday
what to do???
v cuts??
deer hide collar???
rawhide lacing??
i have some liquid frisket i could use around crackes to do something?
other, your suggestion, thank in advance
Attachments

Last edited: