• It's time to cast your votes in the July 2025 Turning Challenge. (click here for details)
  • Congratulations to Michael Foster for "Costa II" being selected as Turning of the Week for July 28th, 2025 (click here for details)
  • Welcome new registering member. Your username must be your real First and Last name (for example: John Doe). "Screen names" and "handles" are not allowed and your registration will be deleted if you don't use your real name. Also, do not use all caps nor all lower case.

Bowl Design (Why are the best ones the ones that want to screw up at last minute)

Joined
Jan 4, 2021
Messages
25
Likes
15
Location
Lanark, ON
Hi Guys,
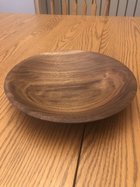
So after getting some feedback on some bowls I had posted earlier ( https://www.aawforum.org/community/threads/production-turning.19163/ )
I decided to try again after investing in a better round carbide tool. So this one I was happy with the shape and I also sanded up to 600 (in lieu of the comments on my sanding scratches when doing only to 320 ) So in my mind my shape was way better and finish looked better to me as well.

LOL...
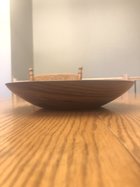
So now for where I screwed up... I got it all finished with beeswax and mineral oil and went and took it into the house and set it on the table..... AND.... It don't sit flat.. I'm like what did I do wrong now!!!!!:mad::mad:. Turned it over and here when I was trying to make the bottom inside the mortise curve like the outside I neglected to check the height of the curve. Long story short the bottom curve was out past the edge of the mortise!!.
SO... Now I'm faced with...
1. Keep it like it is for a display piece that I like the looks of. And Learn for next time.
2. Attempt mounting it in my cole jaws and risk screwing it up due to the lack of success/experience I have using them.
3. Sell as a wobble bowl!! :D

Any input, advice, criticism (helpful please ) welcome as always

Sheldon
 

Attachments

  • Top View.jpg
    Top View.jpg
    381.5 KB · Views: 106
  • Bottom View.jpg
    Bottom View.jpg
    393.1 KB · Views: 106
  • Side View.jpg
    Side View.jpg
    160.8 KB · Views: 103
Wood moves ... you can't stop it ... and bowls will warp. Depending on how much it wobbles and how much material there is in the rim, I might go the Cole Jaw route.
 
The mark of a craftsman is how well he fixes his mistakes :)

I’m getting plenty of practice improving on how I fix mine. Each project is a new learning experience.

If I were you I’d mount it in the Cole jaws and just trim a little bit off the bottom to level it and feather that cut in gently to the sides. No concern about cutting through as the bottom lip has plenty of thickness with the recess.

Good luck! And nice grain pattern in the first pic, God’s the artist and you revealed his work well.

Happy Easter
 
I would definitely use the Cole jaws and gently cut the bottom flat with a spindle gouge. Measure the depth first and see how much wood you have to work with in the center. You can do it.......gently.
 
That crack is a deal killer....... :(

On my wall I've written: "Don't mess with it, reject it!"

Don't ever settle for less than your best work, and you'll be much happier in the long run.

-----odie-----
 
wow, very nicely done.. what I'd do is sand down the hump in the bottom of the bowl til it sits flat - if you have a small 1" or 2" sanding disk in a drill it'd go much faster , and won't have to scuff your finish on rim with cole jaws . Although the crack would be disappointing... (but then, I have actually sold a bowl that I threw in the scrap pile, when someone liked the shape and grain so much they dug it out and asked "how much" , I jokingly said "5 bucks" and they handed me a fiver...... ) Looks like you have considerably improved your skill, and a pretty decent curve (better that I used to turn so early on in my learning curve...pun intended...)
 
I didn't see that crack across the bottom until Odie mentioned it. I agree. That crack will open up at some point, because wood moves. For a marketable piece, all people will see is that crack, and in this country, that is viewed as a flawed piece. The sole exception to that rule is in Emiliano's world, were Pewa across cracks are standard in the Hawaiian bowls, but they also are challenging to cut and insert cleanly. I have never been able to sell a bowl that has had a 'fixed' crack. No amount of turquoise, faux gold fill, coffee grounds and glue can convince people that it is anything but a crack.

I forgot to mention, significant improvement in bowl form over your last walnut bowls. Well done.!
 
You are making progress! Its good to keep some pieces around for a while that you learned lessons from. Its good to practice a “correction method” for the future. Unlike a varnish finish which can add structural strength to cracks, min oil wont, so the crack will be an issue. Your choice what to do with it.

You are early into the quest. Focus on learning vs being perfect, ie keep attempting “the perfect thing” but dont get down about mistakes unless you keep repeating them.
 
There is another possible solution for a scenario like this. Take another piece of wood and turn a small and thin ring sized to fit the recess. Glue this on as a new foot.
 
I can't really tell from the pictures, but what is actually making the bowl rock? If the outside of the recess is convex, then if you have an angle drill, some 80 grit can change that angle pretty easily, and then sand up to 320 or so. If the bottom of the recess is domed, then the 80 grit may also solve that problem. Other than that, wood does move, and one day it might sit flat, then the next day, it will rock. All of mine rock because I turn green to final thickness and let them warp. Only way to get one that will not rock is to do a 3 legged bowl, because one thing I remember from high school 'Gee, I'm a tree' is that 3 points make a plane...... You will remember this on the next bowl you make.

I also take cracked wood and burn it. Just not worth the extra time to repair cracks. Don't make as many bowls as I used to, but had one show where I would take my 'rejects' with none over $5. They would be gone in about 2 hours.... Good for taking out to the garden, dog or bird food scoop, and other things.

robo hippy
 
If it cracks while turning, and I can't turn it out, in the firewood stack it goes. Sand the bottom hump out, easy-peasy. If I finish a bowl then it cracks, I leave it sit on a shelf in the house. Some continue cracking so it goes in dumpster, I don't want to burn any finish/chemicals in the fireplace. IF the crack slows down, I use it in the shop as a utility bowl. I've had friends stop by and see those an grab them, some just add character which some love. Your cracked bowl I would use in the house until it cracked beyond use, doesn't look too bad to me!
From Amyzon, I picked up a Mega Jumbo Jaw and Oneway Stronghold Chuck. Makes turning/repairing bowls like that very easy and does not damage the rims. I use it to remove all my bowl tenons.
 
Last edited:
Any input, advice, criticism (helpful please ) welcome as always
You’ve done what looks like a nice surface and shape in the photos. +1 for turning experiences

You have also discovered. Another reason why I use tenons :-)
A recess often wastes more wood than a tenon.
 
Clamp a full sheet of 150 sandpaper on a flat surface then with both hands on the bowl move it back and forth against the paper without allowing it to rock. check it regularly on another flat surface or make a pencil line all the way around the base and when the line disappears completely it should be flat.
 
I can't really tell from the pictures, but what is actually making the bowl rock? If the outside of the recess is convex, then if you have an angle drill, some 80 grit can change that angle pretty easily, and then sand up to 320 or so. If the bottom of the recess is domed, then the 80 grit may also solve that problem. Other than that, wood does move, and one day it might sit flat, then the next day, it will rock. All of mine rock because I turn green to final thickness and let them warp. Only way to get one that will not rock is to do a 3 legged bowl, because one thing I remember from high school 'Gee, I'm a tree' is that 3 points make a plane...... You will remember this on the next bowl you make.

I also take cracked wood and burn it. Just not worth the extra time to repair cracks. Don't make as many bowls as I used to, but had one show where I would take my 'rejects' with none over $5. They would be gone in about 2 hours.... Good for taking out to the garden, dog or bird food scoop, and other things.

robo hippy
The bottom curve inside the recess curves out past the recess.
 
You are making progress! Its good to keep some pieces around for a while that you learned lessons from. Its good to practice a “correction method” for the future. Unlike a varnish finish which can add structural strength to cracks, min oil wont, so the crack will be an issue. Your choice what to do with it.

You are early into the quest. Focus on learning vs being perfect, ie keep attempting “the perfect thing” but dont get down about mistakes unless you keep repeating them.
So that crack is filled with black CA glue. Will that hold it maybe or is it still likely to come apart?
 
Cracks have become a proud point for many new woodturners. Just look at reddit woodturning and you'll see 2/3 of the work on there has cracks. Many highlight the cracks and are as pleased as punch. I'm agree with the comments here, no place for a crack in fine work. I don't see ceramic or glass artists selling cracked work, but in this world of shipping pallet furniture, cracks are moving up on the hit parade!
 
So that crack is filled with black CA glue. Will that hold it maybe or is it still likely to come apart?
Hard to predict. Climate it is kept in, seasonal moisture, etc. A sealing finish also slows down moisture movement, mineral oil doesnt. Keep it around and see what happens. Epoxy is much better for structural integrity.
 
Back
Top