• July 2025 Turning Challenge: Turn a Multi-axis Weed Pot! (click here for details)
  • Congratulations to James Seyfried for "NE Red Oak II" being selected as Turning of the Week for July 21, 2025 (click here for details)
  • Welcome new registering member. Your username must be your real First and Last name (for example: John Doe). "Screen names" and "handles" are not allowed and your registration will be deleted if you don't use your real name. Also, do not use all caps nor all lower case.

Bowl Finish Follow Up

Joined
Jul 11, 2022
Messages
7
Likes
9
Location
St. Louis, MO
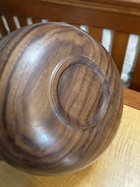
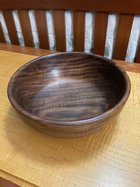
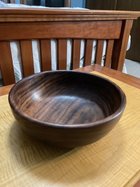
I posted a question a week or so ago as a new turner asking about the compatibility of finishes with Yorkshire Grit. As was suggested, I wiped it down with mineral spirits. I then applied a 1:1:1 blend of tung oil, satin poly and mineral spirits before using a beall buff to apply wax. In the end, I'm pretty happy with how it turned out.

Constructive criticism is always welcome and appreciated.

Thanks,
John.

PS My photography skills are even more inferior than my turning skills
 

Attachments

  • image0.jpeg
    image0.jpeg
    47.1 KB · Views: 64
  • image1.jpeg
    image1.jpeg
    45.2 KB · Views: 63
  • image2.jpeg
    image2.jpeg
    47 KB · Views: 63
Hey John......ditto on the photography skills. I'm not good with a camera, either.... :(

In my opinion interiors of bowls look better, if they are one continuous curve. Yours has a rather abrupt transition from the interior wall to the bottom of the interior.

Can I assume you used a chuck in the expand mode to mount this bowl?

My bowls were often the same way at one time. I have no idea what your procedures to make a bowl are, but if you are forming a general shape of the exterior prior to working on the interior, you may be able to change the possible interior shape by taking more wood away on the exterior close to the tenon, or recess. This will force you to have a more continuous curve on the interior, as you match the interior shape to the exterior shape.

Just a thought...

-----odie-----
 
Thanks, Odie.

I turned the outside after mounting the blank on a faceplate. The interior was turned with a chuck in compression mode. I see what you mean about the flat interior, and appreciate the suggestion. My goal on this one was to ensure that my walls were of uniform thickness, and I think I accomplished that. Your suggestion gives me something to shoot for on the next one.

Much appreciated,
John
 
I think it looks great except for the flat id bottom - same as @odie. If you make a “V” cut above the top of the jaws, it takes the OD in at a higher point, allowing a continuous curve inside and maintaining wall t. Then shape the foot as desired. Ellsworth shows the cut in his book.
 
Thanks, Doug. I'll have to check out the book by Ellsworth. I'm still not 100% confident with a bowl gouge, so any tips are helpful.

In the meantime, I've started my next bowl and will keep all of this in mind.

John Leech
 
I ha
Thanks, Doug. I'll have to check out the book by Ellsworth. I'm still not 100% confident with a bowl gouge, so any tips are helpful.

In the meantime, I've started my next bowl and will keep all of this in mind.

John Leech
I have the David Ellsworth book and find it very helpful. Likewise Richard Raffan's book "Turning Bowls"
 
I then applied a 1:1:1 blend of tung oil, satin poly and mineral spirits

Curious how many coats you applied. I have 4 coats of a similar mix on a piece of maple (saturating, letting soak, then wiping off) and it's still looking kinda dry. I realize different woods are different, but still just wondering for reference.
 
I applied 4-5 coats. One coat (the third, I believe) I didn't rub in well, so it had 'nibs' on it when it dried. I sanded it down and then reapplied, so I'm not sure if you'd call that a coat or not since I took part of it off. I then Beall buffed it, skipping the white diamond. I skipped the white diamond because I had heard that it didn't always play well with walnut and would sometimes get embedded in the pores.
 
Thanks for the reply - lovely soft sheen on your piece and I'm no where close to that but I'll keep going. No idea if there is enough variation in tung or poly to contribute to differences but I'm using Hope's pure tung oil, Minwax clear polyurethane, and odorless spirits in a 1:1:1 ratio.
 
I applied 4-5 coats. One coat (the third, I believe) I didn't rub in well, so it had 'nibs' on it when it dried. I sanded it down and then reapplied, so I'm not sure if you'd call that a coat or not since I took part of it off. I then Beall buffed it, skipping the white diamond. I skipped the white diamond because I had heard that it didn't always play well with walnut and would sometimes get embedded in the pores.
Try a bit different application technique - its the same as danish oil - flood your finish on, keep the wood wet (keep adding finish) for 10 min or longer, the idea being to saturate the wood, then wipe off. You will get some bleed out, check it once an hour and just wipe off the bleed out. Let it cure and buff. You can add more coats but it doesn't gain much if the wood was truly saturated.
 
Last edited:
When I started turning my teachers (years of experience) advised to keep utilitarian items, like bowls, with a simple, food grade finish. I frequently use Mahoneys Walnut Oil, or Tried and True original. Wipe it on, rub it in and you are done.

I appreciate having a simple finish, no buffing (some do buff), food safe and simple to apply additional oil as the bowl is used. The Walnut Oil will pop the grain and provides some longevity as a wood conditioner.

I find I enjoy having the additional time turning vs. laboring over mixing chemicals and fussing over a finish.

On decorative/artistic pieces I'm typically in with a poly or Tung Oil product.

This is just the way I do it, and everyone has their favorite go-to finishes. Good-luck to you!
 
Back
Top