
-
March 2026 Turning Challenge: Olla! (click here for details) -
Congratulations to David Wyke, People's Choice in the February 2026 Turning Challenge (click here for details) -
Congratulations to Dave Bell for "Torus Teapot" being selected as Turning of the Week for March 9, 2026 (click here for details) -
Welcome new registering member. Your username must be your real First and Last name (for example: John Doe). "Screen names" and "handles" are not allowed and your registration will be deleted if you don't use your real name. Also, do not use all caps nor all lower case.
You are using an out of date browser. It may not display this or other websites correctly.
You should upgrade or use an alternative browser.
You should upgrade or use an alternative browser.
Bowls from a board don´t have to be conical
- Thread starter Lennart Delin
- Start date
Roger Wiegand
Beta Tester
The zebrawood make a great looking bowl! Thanks for this method.
Thank you for sharing this technique.
Thanks for the file. I’ve been looking for this info to try a bowl from a board!
Paul
Paul
Beautiful bowl!
Zebrawood Is a beautiful wood and I like what you have done with a flat board. Well done.
Lennart, excellent presentation. Could you provide a close up or two of the cutting tool you have made? One of our guild members adapted the Oneway Drill Wizard with a metal cutting cutoff tool successfully to cut rings of variable angles. I have always wanted to do one, but have never tackled. Even have a piece of maple I bought years ago for the very purpose. Spent a week in Sweden in the early 70s on a training course in Bromma. Still great memories of Stockholm!
Sorry for my ignorance, but could you explain further now you cut the varying angles in your project? Your bowls look great and the project begs for a try in the future. Thanks Steve
Thank you Lennart! That's an excellent tutorial. I want to give it a try.
The shaft is from a broken one hand clamp, with a piece of HSS soldered on. The important part is to get good clearance. A traditional diamond shaped parting tool can easily be modified also.Lennart, excellent presentation. Could you provide a close up or two of the cutting tool you have made? One of our guild members adapted the Oneway Drill Wizard with a metal cutting cutoff tool successfully to cut rings of variable angles. I have always wanted to do one, but have never tackled. Even have a piece of maple I bought years ago for the very purpose. Spent a week in Sweden in the early 70s on a training course in Bromma. Still great memories of Stockholm!
James Krenov, the world famous cabinet maker lived in Bromma.


Thank you Lennart. You have a new Follower on IG.
Thanks Lennart.
I gave it a try. And it works quite well. I dont have your large faceplate though and it tore out quite a bit on the back. I assume that part of the reason for the large faceplate is to stop that tear-out.
I gave it a try. And it works quite well. I dont have your large faceplate though and it tore out quite a bit on the back. I assume that part of the reason for the large faceplate is to stop that tear-out.

The tool above was purchased about 25 years ago there is no name on it and I am sure that they are no longer available. The tool holds a 1/16" (1.6mm) wide machine lathe cutoff knife and I have cut off the lower part of the blade for clearance when cutting into a turning disk. The wooden depth stop was made for the last application that I found a use for it, which was the Hans Weissflog technique.
For the bowl from a board technique I removed the depth stop and made a guide that can be set for the desired angle and allows linear travel only. The first test of the setup was to cut the first ring at 58 degrees on a 10" (254 MM) diameter X 5/8" (16mm) thick birch disk. The test was successful without any catching or binding and the amount of material removed was barely more than what a saw kerf would be. The next step will be to cut the remaining rings and maybe go onto a harder wood.
Last edited by a moderator:
Looks like a very delicate/fragile cutter. With only 16 mm thick board and 58 dgr, you can only make about 6 mm thick rings, so very little is left for final cuts on the glued up piece.The tool above was purchased about 25 years ago there is no name on it and I am sure that they are no longer available. The tool holds a 1/16" (1.6mm) wide machine lathe cutoff knife and I have cut off the lower part of the blade for clearance when cutting into a turning disk. The wooden depth stop was made for the last application that I found a use for it, which was the Hans Weissflog technique.
For the bowl from a board technique I removed the depth stop and made a guide that can be set for the desired angle and allows linear travel only. The first test of the setup was to cut the first ring at 58 degrees on a 10" (254 MM) diameter X 5/8" (16mm) thick birch disk. The test was successful without any catching or binding and the amount of material removed was barely more than what a saw kerf would be. The next step will be to cut the remaining rings and maybe go onto a harder wood.
The 58 degree cut was because I tried to use an arc rather then a parabolic shape or in other words I don't follow directions very well.Looks like a very delicate/fragile cutter. With only 16 mm thick board and 58 dgr, you can only make about 6 mm thick rings, so very little is left for final cuts on the glued up piece.
I have since improved my guide and successfully cut the first ring at 51 degrees from 20 mm thick 8 pie segmented piece in walnut and birch then it was supper time. The plan is to stager the joints during the glue up to hopefully over come the tendency of pie shaped segments to crack with the inevitable movement in the wood during the coming cold season.

How about some more info on & pic's of that tool holder you are using?
I can do that however it is a work in progress. Yesterday when I set up for that first cut at 51 degrees I set the degrees on the holder then maneuvered the banjo line up the starting point of the cut without altering the angle which was very difficult to do. The solution was to machine the sides of the banjo then I made an insert for the lathe bed that will keep the banjo at 90 degrees to the bed so after the next angle is set it is just a matter of sliding the banjo along the insert until the cutter is positioned for the next cut.How about some more info on & pic's of that tool holder you are using?
I will take the camera out with me tomorrow and try to get some pictures of all the parts.
As a side note can anyone that knows and understands photography recommend a lens for closeups using my Sony Alfa 6000.
Making jigs can be a lot of fun, but in this case there is really no need. Set an adjustable bevel after the drawing and use the bevel for aiming the cutting tool. You can see this in the Instagram link I posted above. Each ring takes about a minute to cut, including setting the bevel.
The first pic is the 90 degree alignment jig, which is helpful in that you can set the angle on the guide then move the banjo in and out without affecting the angle.How about some more info on & pic's of that tool holder you are using?

The second pic is the guide by itself.

One word of caution if you make big bowls. In the memo I used a ring thickness of 8 mm as example. Considering a little misplacement when you glue up and a little clean up of the surface, this is enough for about 5 mm final wall thickness. Finishing the outside is no problem. However, when you come to turning the inside you have only maybe 6 mm thickness far down into the bowl, so you cannot as usual reduce the wall thickness in the upper part with solid support below. Either make the rings a little thicker or make sure you have some means of supporting the walls while turning the inside, or you may get severe vibration problems.
I found that out on Thursday but I was able to remove most of the effects using a burred scraper at a sheer angle and my left hand in a leather glove against the out side.One word of caution if you make big bowls. In the memo I used a ring thickness of 8 mm as example. Considering a little misplacement when you glue up and a little clean up of the surface, this is enough for about 5 mm final wall thickness. Finishing the outside is no problem. However, when you come to turning the inside you have only maybe 6 mm thickness far down into the bowl, so you cannot as usual reduce the wall thickness in the upper part with solid support below. Either make the rings a little thicker or make sure you have some means of supporting the walls while turning the inside, or you may get severe vibration problems.
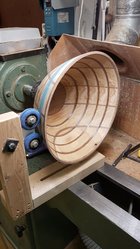
Example of using a steady rest for a large bowl 37x20 cm. This is before starting to turn the inside. Initial ring thickness just over 8 mm, now 6-7 mm. The blue tape is to prevent marring the finished outside. The last picture shows the finished foot/tenon used for holding the bowl when turning the inside.
Attachments


Thanks for this, Lennart. I just pulled down your PDF. Adding it to the list of 'Round Tuit' projects - the ones I want to do when I get 'round to it. 
Making more Round Tuits for craft shows is also on that list.....
Making more Round Tuits for craft shows is also on that list.....
Thanks for posting Lennart.This is a short description of how I make bowls from a board, cutting out the rings on the lathe with varying angles.
I made a short video showing how I cut the rings manually on the lathe by just aiming after an adjustable bevel.
View: https://www.youtube.com/watch?v=Olz24sre01I
Love the guides and various methods........My first attempt was done with Baltic Birch ply, black veneer and Walnut.
I have been trying to understand bfb. I see the lines on the board. How are you measuring that and figuring that out. Tat is where I lose it. I've made a couple of boards and the walls are so thin. It's my figuring and measuring that I know I don't get.I made a short video showing how I cut the rings manually on the lathe by just aiming after an adjustable bevel.View: https://www.youtube.com/watch?v=Olz24sre01I
There is a thorough description earlier in the thread https://www.aawforum.org/community/attachments/bowl_from_board_ver3_eng-pdf.38850/I have been trying to understand bfb. I see the lines on the board. How are you measuring that and figuring that out. Tat is where I lose it. I've made a couple of boards and the walls are so thin. It's my figuring and measuring that I know I don't get.
Hi Lennart,
Thanks for posting this video. One thing I don't see mentioned is how you remove the bowl from the backing that was originally glued in place with hot melt glue. Do you turn away the glue joint?
Thanks for posting this video. One thing I don't see mentioned is how you remove the bowl from the backing that was originally glued in place with hot melt glue. Do you turn away the glue joint?
You can turn away the joint, but much easier is to dab on some denatured alcohol. Then you can just peel off the glue.Hi Lennart,
Thanks for posting this video. One thing I don't see mentioned is how you remove the bowl from the backing that was originally glued in place with hot melt glue. Do you turn away the glue joint?
Thank you! Will try it today on some maple burl.You can turn away the joint, but much easier is to dab on some denatured alcohol. Then you can just peel off the glue.
I was just starting to work on this approach and found you. ThanksI updated the memo with a more detailed description of drawing the shape and cutting the rings.
Nice article. Thank you
Thank you for taking the time to document and then share your method.
Updated versions of the memo and video with more details about cutting rings. I also add the Excel spreadsheet for BFB and segments calculation. The spreadsheet calculates the steepest possible slope and a parabola and a catenary for this. Seems Excel files is not allowed, so zipped the file.
Video how I cut rings
Video how I cut rings
Attachments
A well documented explanation!

