• Congratulations to Phil Hamel winner of the April 2025 Turning Challenge (click here for details)
  • Congratulations to Steve Bonny for "A Book Holds What Time Lets Go" being selected as Turning of the Week for 28 April, 2025 (click here for details)
  • Welcome new registering member. Your username must be your real First and Last name (for example: John Doe). "Screen names" and "handles" are not allowed and your registration will be deleted if you don't use your real name. Also, do not use all caps nor all lower case.

Bowls warping

Joined
Mar 3, 2021
Messages
22
Likes
9
Location
Burnsville, NC
So I've been trying to finish my rough turned bowls from last year but the warping is beyond what I thought. I left 15 to 20% to be safe just because I'm still new.
These things are warping to oval.
What do you guys do to keep them kind of round? I've used anchor seal on the end grain, wood glue, paper bag with shavings.. you name it.
 
You can’t really do much to prevent the warp It is just inherent to the wood that the radial vs tangential Directions will shrink differently when drying. Some woods are worse than others, but all of the will likely oval to some extent. The secret is finding the sweet Spot between the bowl being thick enough to return and thin enough so it won’t crack as it warps. The rule of thumb is 10% of the diameter for the wall thickness and that has generally worked well enough for me.
 
Yup - what Kent said.

It's Wood. It Moves. Period. What has to be learned is how to work with what wood you have- As noted - some woods move a lot, some don't. Some will crack no matter what you do, so early on have to learn to recognize when some particular blanks are simply firewood. Generally when turning green (or unknown status) woods, unless I plan on a once-turned and let 'er warp deal, I, too , follow that 10% rule (roughly) and then set them aside until I feel wood has stabilized (there's many ways, I do it by monitoring the weight in grams of a given blank til weight stops changing) , then throw it back on the lathe for finish turning. That 10% rule does not always work, I have had bowls get so oval that by the time I finished turning, the inside is bigger than the outside... But as a rule of thumb, 10% is a pretty decent goal for rough turning (as long as it is *consistent* from rim to include tenon) to minimize (you'll never eliminate it) cracking and warping.
 
What do you guys do to keep them kind of round? I've used anchor seal on the end grain, wood glue, paper bag with shavings.. you name it.

They have to warp as they dry.

What I do is reverse chuck the dry bowl, line up the rims and cut the rim flat. This get the bowl into balance weight wise.
The turn the outside and return the tenon.
With #2 jaws I make the green tenon 2.5” diameter so there is always a 2” tenon in the dried tenon.

In the thread on working with green wood I have a video from a demo mounting and returning a very oval 11” bowl..
 
You dont “keep them round”, you make them round again by turning a 2nd time once dry, hence the term “2 turn” bowl or item.

The various drying approaches are mainly to prevent cracking, and can reduce warping some, by slowing the evaporation process. Warping and crack control are driven by wood selection and how the blank is cut.

Put the dried blank between centers using a friction chuck, turn the tenon and lower OD round/flat, turn the bowl around and mount in the jaws, complete the rim top, OD, then ID.

Another approach is to turn wet wood to a thin wall (1/8” to ~1/2” depending on size), let it dry, accept the warp, and sand and finish. Some sand wet wood. Tough/impossible to get a flat rim - depends what you want.
 
Measure across the narrow and the oblong widths of the bowl and calculate how much wood you have to work with when you turn
it the second time. Making these measurements will help you determine how careful you need to be in turning it round on the inside
and outside of the bowl. Take as little as possible until you are sure you have enough wood to make your finishing cuts on both sides.
You usually end up losing some of the top rim of the bowl where it has warped the most, part of the process for all of us.
 
It might help to know what wood you've had problems with. Also, could someone from Carl's neck of the woods :cool: suggest local woods that would move less, so he can focus on those?
So far I have used Cherry (this was the easiest to work with, Ash (warped more than 10%, Beech (warped somewhere in between cherry and ash) and poplar (dont get me started on this one. warps beyond what one could imagine).
All these are from my property so I'm not spending money on the practice wood.
 
The shape and where in the tree the wood comes from is the mayor reason wood warps more or less, and yes some wood species will move more than others, a knot in a side of the blank can really make for twisting and warping, I have a couple pictures here that show the different reasons why these pieces did warp and twist.

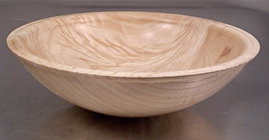
Two pictures that show a more stable shape, one is once turned Poplar the other twice turned White Ash.
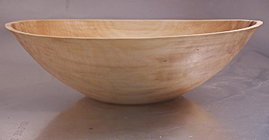
Large Poplar bowl.jpg White Ash with a strong shape.jpg
A platter like flat shape that has some twisting grain and knots will warp guaranteed, like this crotch feather grain and some knots as well, it became a wall hanging ;-)).
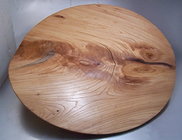
Crotch Feather in a flat shape will war.jpg

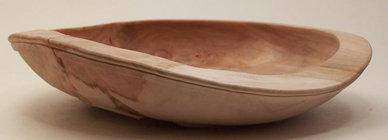
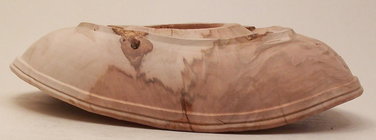
Here is another reason foe some warping, this is once turned Apple wood, where the center part is dark hearth wood and a wide area of sapwood, the sapwood is shrinking while the long grain heart wood is not, and so the sapwood side pulls the bowl into the shape you see.
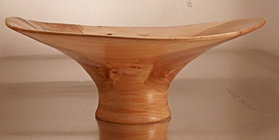
Applewood bowl.jpg
This Elm wood bowl is twisted for the warped grain that shrunk and twisted this bowl, were with straight grain this would not happen like this.
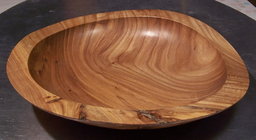
Warped Elm bowl.jpg
And then there is the wood that will twist and warp badly for where the wood came from, first off this is from wild Canada Plum and it's prone to warp, on top of that this came from the top of the root burl, mostly underground but for a small part, it really did a job on itself as you can see.
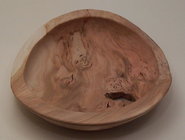
Canada plum burl.jpg Canada plum burl warped.jpg Warped & twisted Canada plm burl.jpg

A thicker wall does not help with keeping the wood stable more likely the opposite, a 10% wall thickness for twice turned is plenty for all woods I know of, slow drying in a paper bag (nothing like curls or sawdust added !!) will give the wood to dry best also no sealer on the bowl if bag drying,
That is my experience and I have lots of that :-)
 
Last edited:
I usually rough in my bowls a little thicker than I really need to, but keep the thickness pretty much the same. After I true up the tenon and start taking off the first layer of old wood, I sometimes change the shape of the bowl depending much on the wood appearance and features. It does not take that long to cure an extra 3/8" of wood.

I always turn green wood, sometimes when doing a natural edge, I once turn but usually cure with white glue painted inside and out of the whole bowl. Used to use Anchorseal but the turners here convinced me to try the glue. Much cheaper and success rate is better. Wood will move as it dries and shrinks, a bowl begins to look like a football. Roughly 1" per 12" bowl diameter, again I like the flexibility of having a little extra for the different bowl edges and a bead I have started putting around most bases I do so I usually add a 1/4-3/8" to that.

I have not tried much of the bag drying that Leo does, maybe when our stores catch up with the rest of the world that has gotten tired of all the plastic bags, I can get a free supply and try it for myself...too cheap to buy them.
 
I have not tried much of the bag drying that Leo does, maybe when our stores catch up with the rest of the world that has gotten tired of all the plastic bags, I can get a free supply and try it for myself...too cheap to buy them.
I prefer the bags. Think through the cost and time per piece you use to coat with glue. Dont forget the cost of the brush and the time to clean it. Bags are reusable, (cant say how many times, but many of mine have done 10+ pieces), no coating time, no time waiting for the glue to dry, no glue mess, no clean up time. I typically double bag, so 2 bags/piece, 10 uses or more, pretty cheap, no clean up, very quick - use 2” painters tape to close them and write weight on the tape.

I bag 1 turn items as well to help with cracking, I turn stuff with the pith in, knots, etc that need help staying together. Do you glue coat 1 turn items? The sealed surface would be a pita to sand and prep for finish.
 
I liked Leo's comments and agree with most of them.

A couple of comments from someone who still has a lot to learn (that would be me):

1) My experience says it's all about the species. Apple? Very difficult. Honey locust? Best results I've ever gotten. Other woods - results vary by specific type of piece and cut (burl, slab, flat sawn, quarter sawn and of course the most common type - No clue how it was cut.
2) 3 years ago I took a class with Stuart Batty . We had a virtually unlimited supply of dead green honey locust and elm. The pieces I turned were coated with anchor seal and shipped back to me to finish at home. Very little warping with the honey locust. Elm? OMG! Lots of warping including a demo piece that Stuart turned to about 1/4" thickness. I got that piece and thought I had a real treasure but now I have to decide whether the extensive warping turns it into trash. It didn't crack but it's wildy oval now. My own elm pieces warped so badly that some could not be turned true after drying.
3) I signed up for an AAW session in MArcvh of 2022 - AAW Presents: Cutting the Best Bowl from a Tree with Dale Larson. Great insight into the difference knowledgeable cutting makes in how the wood reacts as it dries. I was quite annoyed that AAW took down the replay video within a month or so because I couldn't watch the whole session live. When I had time to go back and finish watching (maybe 60 days later), it was gone. I did get good value from the first hour or so that I watched. Larson recommended a book "Turning Green Wood by Michael O'Donnell" which has been really great. Lots of discussion about warping during drying. Lots of information about how important the positioning of the cuts is in the final results. Great book, heartily recommend.
4) I have recently started experimenting with burying green turnings in silica beads, based on a AAW article. First result pretty good. Dries rough turned bowls to 10-12% in less that a week. Lots more to learn but It has been a promising start. The initial bulk buy of silica beads, $88 for 8 lbs, stung a bit but they can be dried and reused many times.
5) And yes, wood is a natural material so under the best of circumstances is has the final say.
 
Glen Lucas has a great video on a jig to mount rough turned, out of round pieces which permits the remounting and returning the tenon round. Once that is again round you can return the outside and inside of the bowl. There is no way to completely stop wood bowls from "reshaping" during drying as other posters have said.

I have had success in minimizing this using silicon drying beads. Generally a fairly green bowl can be dried within about 3-4 days to its point of equilibrium with your environment. Once that is done, you can get the teneon and bowl returned round if that is what you want to do. I have found that this method really doesn't result in too much warping, but it is really only a good option for smaller pieces that can be easily contained in covered buckets or bags placed insided of an appropriate sized box.

Some changes in shape can be pleasing. It depends on your taste and what you want to do with the bowl or hollow form after turning; for example, carving, painting, airbrushing, etc. All of these can be enhanced with a bowl or form that isn't perfectly round. Again, it depens on your taste. Some people like the "perfect" shapes, others like variety in shape. I personally like some variation because it makes each piece a little more unique. It's great to get a perfectly round bowl sometimes, but for me, that's mainly to prove to myself I can do that.
 
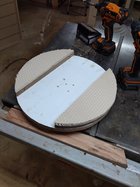
I make flat rim and natural edge bowls, hollow forms of many sizes and shapes, vases, etc. I tried many methods for returning the tenon round, and settled on friction chucks that locate somewhere in the bowl ID (closer to center tends to work best - less warping), and in or around the vase/HF hole. Mine (some pictured below) are direct thread using a Beal tap for the threads. I tried using a tenon & chuck approach, and found that between not having the right jaws on the right chuck at the right time, and then issues with runout, I would try the direct thread route - more hassle to make (a 1 time thing), a lot easier to use, and they always run true. No pad is needed for a rough out (and many times I just use the tops of jaws) but for finished pieces some type of pad is needed - rubber mat, leather, paper shop towel all work. The less compressible the pad is, the better.

1656096640343.jpeg
 
Back
Top