• Beware of Counterfeit Woodturning Tools (click here for details)
  • Johnathan Silwones is starting a new AAW chapter, Southern Alleghenies Woodturners, in Johnstown, PA. (click here for details)
  • Congratulations to Mark Hancock for being selected as Turning of the Week for July 22, 2024 (click here for details)
  • Welcome new registering member. Your username must be your real First and Last name (for example: John Doe). "Screen names" and "handles" are not allowed and your registration will be deleted if you don't use your real name. Also, do not use all caps nor all lower case.

Camera vs laser for visualization

Joined
Feb 18, 2023
Messages
752
Likes
1,465
Location
Orange, CA
Should be an interesting discussion.

With a captured hollowing system, either a camera or laser would be helpful for visualization to guide wall thickness.

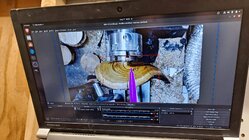
I just watched Trent Bosch’s video re his visualiser camera setup and another video by someone else regarding laser adapted to a captured system (Elbo2). Being a (now ex-)urologist used to “reaming” out prostates using a camera to see in real time, much like a hollow form, it sure seems more intuitive than the laser visualization.

Bosch’s system looks great though I wonder if a larger monitor could be used—his is 15 inches. One would then need to add the protective screen to the monitor that one draws on.

Opening up this subject for discussion, as I have lots to learn before the deep dive . . . .
 
Joined
Nov 27, 2021
Messages
72
Likes
249
Location
Silver Spring, MD
Website
discord.gg
The laser requires an offset relative to the tool. A camera doesn't (other than being aligned with the tool). Like a lot of folks, I did a home-built camera system using a USB webcam, laptop, and wall-mounted monitor that I already had in my workspace. Using OBS I can project the camera onto the monitor with an overlay of the current tool I'm using. I could only find the first picture I took when I set it up. I added distance indicators around the tool images later on.
 

Attachments

  • hollowing.jpg
    hollowing.jpg
    383.3 KB · Views: 48

hockenbery

Forum MVP
Beta Tester
TOTW Team
Joined
Apr 27, 2004
Messages
8,800
Likes
5,217
Location
Lakeland, Florida
Website
www.hockenberywoodturning.com
Bosch’s system looks great though I wonder if a larger monitor could be used—his is 15 inches. One would then need to add the protective screen to the monitor that one draws on.
Trents visualizer system is the greatest advancement in hollowing since the bent bar.
Trent is a genius for inventing it.
Think of the thousands of folks doing hollow forms who have video cameras.
Trent thought of using video to measure wall thickness. Drawing an outline of the tool tip on the screen. Then drawing the thickness offset around the tool tip using a ruler from the tool tip.
I came up with the idea of putting the offset on a card so you can traces the offset on the screen. Trent uses cards now.

When Trent first showed me the system. I understood how it worked but couldn’t believe it. So incredibly simple and so absolutely perfect in measuring wall thickness.

With a captured hollowing system, either a camera or laser would be helpful for visualization to guide wall thickness.
Calipers are the minimum, Lasers are good improvement, The visualizer is perfection….
I hollowed for 15 years with a laser and was confident and good enough with
it to do demos at reagional and AAW symposiums. Using the laser mounted on the Jamison handle.
Now I demo with the visualizer.
Besides helping me the audience can see where I’m working inside the form and see how thick the wall is.

With the video I was amazed at how my confidence went up. I do curved forms With the laser I have to rest the laser to where I’m cutting on the tool tip to get an accurate measurement. If you do cylindrical forms you don’t have to change as you cut near the tip of the tool all the time.

As I work around the form with a laser and had to reset the laser I would continue hollowing until I had to blow out chips.
With my experience i was confident I wouldn’t blow through the side but a little anxiety builds up.
Also with a wide form I’d have to use a mirror to see the laser on the bottom side of the curve.

The visualizer is a fantastic tool for hollowing.
 
Joined
Feb 18, 2023
Messages
752
Likes
1,465
Location
Orange, CA
The visualizer is a fantastic tool for hollowing.
This is the conclusion I’m reaching and I appreciate your experience. Does the visualizer adapt to the Jamieson and Elbo hollowing systems—or just the Bosch? Is the 15 inch screen size adequate? Thanks again.
 
Last edited:
Joined
Apr 27, 2004
Messages
170
Likes
3
Location
Casselberry, FL
I agree with everything Al said. I too switched from laser to a Visualizer type setup.
I am a retired urology operating room registered nurse. As a urologist, with your video skills I feel it would be a very smooth transition into video hollowing.
My monitor is an older square Dell and it provides all that I need to see.
 

hockenbery

Forum MVP
Beta Tester
TOTW Team
Joined
Apr 27, 2004
Messages
8,800
Likes
5,217
Location
Lakeland, Florida
Website
www.hockenberywoodturning.com
This is the conclusion I’m reaching and I appreciate your experience. Does the visualizer adapt to the Jamieson and Elbo hollowing systems—or just the Bosch? Is the 15 inch screen size adequate? Thanks again.
I used the visualizer with the Jamieson.
Trent can give you advice on connecting it.

Screen is plenty big enough if you locate it somewhere close to the headstock.
I have mine just behind the headstock when I’m using it
 
Joined
Jul 18, 2018
Messages
1,114
Likes
1,978
Location
Baltimore, MD
1717961962150.jpegHere’s my setup. I’m by no means expert with it, but after a little over a year using it, I’m yet to blow through the side of a hollow form. I turned a housing for an old USB camera that fits nicely in the laser holder on my Trent Bosch rig. ( I’ve been at the receiving end of my urologist’s laser hollowing, and while the result was terrific, I’d much rather be holding this tool!).
 

john lucas

AAW Forum Expert
Joined
Apr 26, 2004
Messages
8,417
Likes
3,799
Location
Cookeville, TN
My visualizer is seriously jury rigged. A cheap 15" monitor. Inexpensive camera module. Had to buy 3. On was too wide angle and the second came with no schematic and 6 wires.had no idea how to hook it up. Theast one is a little to wide angle but works.
 
Joined
Oct 27, 2022
Messages
37
Likes
46
Location
Auburn, CA
The laser requires an offset relative to the tool. A camera doesn't (other than being aligned with the tool). Like a lot of folks, I did a home-built camera system using a USB webcam, laptop, and wall-mounted monitor that I already had in my workspace. Using OBS I can project the camera onto the monitor with an overlay of the current tool I'm using. I could only find the first picture I took when I set it up. I added distance indicators around the tool images later on.
I gather with your system you don’t draw an outline of the tool on the screen but somehow capture a picture of the tool and superimpose it on the video. Am I correct? Not familiar with OBS but is that relatively easy to figure out or do you need to have specialized knowledge to do that? Do you just estimate the wall thickness from the screen?
 
Joined
Aug 14, 2009
Messages
2,189
Likes
1,281
Location
Peoria, Illinois
You can do a DIY camera for less than $20 if you have an old laptop or USB TV. There is no software or proprietary hardware in the Bosch system. This has been discussed a LOT of times here. I was one of the first people to do a DIY system and was personally attacked for saying the Bosch system was way over priced. But my $15 system has worked for over a decade now.
 
Joined
Nov 27, 2021
Messages
72
Likes
249
Location
Silver Spring, MD
Website
discord.gg
I gather with your system you don’t draw an outline of the tool on the screen but somehow capture a picture of the tool and superimpose it on the video. Am I correct? Not familiar with OBS but is that relatively easy to figure out or do you need to have specialized knowledge to do that? Do you just estimate the wall thickness from the screen?
Yes, the images are superimposed on the video. OBS is pretty easy to use. It is basically just setting the camera device then dragging in the images. The images I use have basic distance measurements, depending on what thickness I am trying to achieve.

Screenshot from 2024-06-09 18-40-06.png
 
Joined
Mar 12, 2023
Messages
47
Likes
171
Location
Stillwater, OK
Joined
Nov 15, 2020
Messages
488
Likes
362
Location
Huntington, VT
One thing that is essential to both laser and video indicators is that the mounting system must be solid and reliable. If the camera or laser drifts and is not indexed to the tool position, bad things will happen. It is a good idea to retract the cutter every so often and get a visual check that both are aligned, especially if you are experiencing any vibration or get a catch. My Clark two point camera mount is reliable but it never hurts to check.
 
Joined
Apr 20, 2006
Messages
1,303
Likes
1,064
Location
Erie, PA
I'm the opposite of all above. I tried the visual way back when. I have been hollowing with the Monster Hollowing Systems (both articulated and captured) since I got them in 2009. I had always used lasers with them and when the visual thing started I put one together and tried it out. My results were that I did not care for it as I had to watch the screen instead of the piece. I feel the wires and the screen were just accidents waiting to happen. It did not improve my hollowing as I could hollow to the same thicknesses as I could with the laser. I was and am more comfortable looking at the wood I am hollowing as there is just less distraction. I easily go to 1/16" and have gone thinner but going thinner can make the wood flex and I've gotten pieces that 180° apart from flexing of the wood that it is very very thin. A 1/16 to 3/32 piece is more than thin enough and easily accomplished with the laser. I am sure some of you have heard me pontificate about this before.
 
Joined
Jan 3, 2015
Messages
151
Likes
72
Location
Western Ma.
I’ve done about 1/2 dozen hollow forms. One without laser or camera came out very good about 1/4-1/2” thick but I was satisfied. Then a friend told me what to get for a camera setup, less than $100. It takes a little getting use to( watching monitor not the piece) but not had. I’m really amazed how easy it is. The only way it could be cooler is if someone figured out how to add chips flying of the screen. I use a 10” monitor that sits on my headstock.
 

Dave Landers

Beta Tester
Joined
Dec 1, 2014
Messages
873
Likes
2,836
Location
Estes Park, CO
Website
dlwoodturning.com
I had to watch the screen instead of the piece
Reminds me... A friend of mine told me about a hollow form demo he did. Middle of the hollowing portion of the demo, someone asked a question - they noticed he had his eyes closed. He said he couldn't see what was happening inside anyway, so it didn't matter. Closing his eyes helped him concentrate on the sound and feel.
 
Joined
Feb 5, 2012
Messages
4
Likes
2
Location
New York
I bought a small camera on Amazon and a tft display, I mounted it near my lathe. I do not need a computer to use it, as it directly feeds to the tft display. I have a Monster articulating setup, I mounted the camera to where the laser use to go. The camera was $9.99 https://www.amazon.com/gp/product/B07RQLNBQM/ref=ppx_yo_dt_b_search_asin_title?ie=UTF8&psc=1, and the tf display was $71.99.. https://www.amazon.com/gp/product/B07RQLNBQM/ref=ppx_yo_dt_b_search_asin_title?ie=UTF8&psc=1. I bought a longer video cable, and all works perfectly. I put a plastic screen protector over the screen, and I use a dry erase marker to trace out the tool, For a total about $100..
 
Joined
Aug 14, 2009
Messages
2,189
Likes
1,281
Location
Peoria, Illinois
I’ve done about 1/2 dozen hollow forms. One without laser or camera came out very good about 1/4-1/2” thick but I was satisfied. Then a friend told me what to get for a camera setup, less than $100. It takes a little getting use to( watching monitor not the piece) but not had. I’m really amazed how easy it is. The only way it could be cooler is if someone figured out how to add chips flying of the screen. I use a 10” monitor that sits on my headstock.
A 1/2" thick wall may cause trouble with some species in a once turned hollow form. Especially in the bottom. I gain a real sense of pleasure when people react when they pick up one of my hollow forms with 3/32" walls. They just can't believe the light weight and it becomes a real nice selling point for me.
 
Joined
Jan 3, 2015
Messages
151
Likes
72
Location
Western Ma.
I say 1/2”, but really doubt it is. More than likely closer to 1/4”. No problems with it cracking, been 5 years now. Was just intered with my MIL.
 
Joined
Jun 17, 2021
Messages
58
Likes
38
Location
Calgary, CA
I have the Simon Hope deep hollowing system. I originally bought the laser version that I used on just one project. I then saw the camera system and converted. I have now used it on multiple projects and would never go back to the laser version. I have made several adapters that enable me to hollow through a small (20mm) opening. I usually aim for 3-4mm wall thicknesses.
 

john lucas

AAW Forum Expert
Joined
Apr 26, 2004
Messages
8,417
Likes
3,799
Location
Cookeville, TN
#15 What a great addition to this discussion thread. I have seen this done with a red Christmas tree light. What type of bulb do you use?
The lights inside work great on light colored wood. Not as good on dark wood and wood that has knots or dark areas can fool you. I rigged one up after taking a class with Frank Sudol. I used a 12 volt tail light bulb because it handles the vibration.
 
Joined
Feb 21, 2011
Messages
336
Likes
298
Location
Elkhart, IN
Website
www.riccsdesigns.com
You will get lots of info with this topic. I can add a coupke thoughts on my personal experience.

1) Monitor size - I had a homemade system with a 10" security monitor that a lot of the online "how to's" suggested using. I am legally blind so it was too small for me to see comfortably. I then upgraded the monitor to a used 20" flat screen TV. It was fine for viewing but bulky and in the way when not hollowing. Too large to leave mounted on teh headstock of my PM3520 when not hollowing. I was able to acquire a slightly used Bosch Visualizer. His 14" monitor is a nice balance for my vision issues to be able to see and not too large/bulky when not hollowing. I leave the Bosch monitor mounted on the headstock and just cover it and swing it out of the way when not in use. The bigger tv/monitor was too big and in my limited basement shop I just didn't have the extra few inches between the lathe and the wall so I couldn't swing it fully out of the way.

2) The laser works fine. But it only references one spot on the cutter tip. On small cutters that is fine. But on larger things like a teardrop scraper that I use to smooth and clean the insde ridges with I have to be careful when getting close to the bottom. Since the red dot of the laser only references a small part of the large teardrop cutter I don't know exactly where the rest of the cutter edge exactly is. So going down the sidewall to the bottom you have to be careful the larger edge of the cutter doesn't hit the interior bottom and cause a catch. With a video system (Visualizer or homemade) you draw the shape/size of the cutter on the tv screen. It's wasier to reference the and "visualize" the whole cutting edge in the interior.
 
Joined
Mar 17, 2006
Messages
230
Likes
107
Location
Canton, Connecticut
When using my home grown "visualizer", instead of drawing on the monitor screen each time, I created images of the cutter with an outline of the wall thickness using PowerPoint, and printed them as transparencies. I have a separate one for each of the different wall thicknesses (first turned is 1/2" and second turning is 1/8", 3/16", or 1/4"). I choose the wall thickness I want and tape the transparency to the screen.
 
Joined
Mar 19, 2016
Messages
1,250
Likes
1,370
Location
Haubstadt, Indiana
I just draw on my screen cover each time. To me it is no big deal. Lay a template under the cutter and use a china marker (grease pencil) and trace the thickness I want. I switched from the dry erase as the dry erase markers dry out and grease pencil is much cheaper.
 
Joined
Aug 14, 2009
Messages
2,189
Likes
1,281
Location
Peoria, Illinois
The lights inside work great on light colored wood. Not as good on dark wood and wood that has knots or dark areas can fool you. I rigged one up after taking a class with Frank Sudol. I used a 12 volt tail light bulb because it handles the vibration.
I watched JoHannes Michelsen panic in a hat making demo when he saw a line of light show up. What really happened was that he opened up a bug hole. With the light on and at speed it looked like he cut through the wood.
 
Joined
Feb 26, 2019
Messages
1,877
Likes
1,469
Location
Lebanon, Missouri
I used the laser that came with my Jamieson system for a couple of years, then did a diy camera system. Haven’t used the laser since, but the laser support and mount hold the camera. My system has no pc - just a monitor, signal converter, and camera. I had the monitor (old vga 20”), the converter and camera were ~$65 5-6 yrs ago.

I cant use software to superimpose the cutter. Rather than draw the tool outline, I made target charts with the center dia equal to the cutter dia, with rings around the center spaced at 1/8”, 1/4”, or 1/2”, depending on distance from the edge of the center, to show wall thickness. The charts were printed on clear transparencies. I select the chart for the tool being used and tape it to the screen, and align the tool to the center.

I mostly use a 6mm cupped cutter or hss 3/16” sq tool bit, and they are close enough to use the same chart. I also use a 9mm flat carbide, and it has a chart. The cart does have to drawn to the scale created by the camera lense and the camera distance from lathe center. This is easily determined by putting a ruler under the camera at CL, then using another ruler to measure the ruler image on the screen to determine the magnification, or scale, on the screen. It only has to be done once for each camera height you use.
 
Joined
Jan 24, 2022
Messages
235
Likes
319
Location
Bainbridge Island, WA
I just draw on my screen cover each time. To me it is no big deal. Lay a template under the cutter and use a china marker (grease pencil) and trace the thickness I want. I switched from the dry erase as the dry erase markers dry out and grease pencil is much cheaper.
Tried dry erase, grease pencil, and a few other things before settling on a wet erase marker for drawing on the screen. Won't wipe away or smear while dry. The slightest damp on a cloth will clean it right off. Easy on, easy off and reliable in between!
 
Joined
Jun 2, 2021
Messages
193
Likes
325
Location
Kingsville, ON
I bought a small camera on Amazon and a tft display, I mounted it near my lathe. I do not need a computer to use it, as it directly feeds to the tft display. I have a Monster articulating setup, I mounted the camera to where the laser use to go. The camera was $9.99 https://www.amazon.com/gp/product/B07RQLNBQM/ref=ppx_yo_dt_b_search_asin_title?ie=UTF8&psc=1, and the tf display was $71.99.. https://www.amazon.com/gp/product/B07RQLNBQM/ref=ppx_yo_dt_b_search_asin_title?ie=UTF8&psc=1. I bought a longer video cable, and all works perfectly. I put a plastic screen protector over the screen, and I use a dry erase marker to trace out the tool, For a total about $100..
Brian how did you connect the power for this camera?
 
Joined
Jun 2, 2021
Messages
193
Likes
325
Location
Kingsville, ON
Bought the camera you suggested and found a 18 inch monitor at the thrift store for 7.99 that had an RCA jack input. Camera was 16.99 in Canada. Found a old dc adapter for power. Works great, just have to rig it up for my Trent Bosch hollowing system. Great advice everyone!
 
Joined
Feb 5, 2012
Messages
4
Likes
2
Location
New York
Last edited:
Back
Top