Recent Richard Raffan Youtube video inspiring me to try "carving" three feet on bottom of green wood bowl I'll be turning in the next few days. I don't recognize the thick blue pad he is using, may be a product found in Australia. If anyone has done this here in the states, what did you find to abrade green wood, hopefully on right angle drill, without being too aggressive? Thank you.

-
March 2026 Turning Challenge: Olla! (click here for details) -
Congratulations to David Wyke, People's Choice in the February 2026 Turning Challenge (click here for details) -
Congratulations to Tim Connell for "Black Locust Basket Illusion Series #4" being selected as Turning of the Week for March 16, 2026 (click here for details) -
Welcome new registering member. Your username must be your real First and Last name (for example: John Doe). "Screen names" and "handles" are not allowed and your registration will be deleted if you don't use your real name. Also, do not use all caps nor all lower case.
You are using an out of date browser. It may not display this or other websites correctly.
You should upgrade or use an alternative browser.
You should upgrade or use an alternative browser.
"Carving" Tripod Feet on Bowl Bottom
- Thread starter Don Stephan
- Start date
Recent Richard Raffan Youtube video inspiring me to try "carving" three feet on bottom of green wood bowl
Can you post a link to the video you mentioned? I'd like to see what he does! Might be fun to try it.
About 10 years ago John Lucas came to the Knoxville club to show us how he makes bowls with carved handles and feet. Inspired me to make one. Unfortunately I chose dry Bradford Pear wood which is quite hard so it took a LONG time to carve and smooth. Did some stippled texturing too. I think I showed these photos before:
The turning:

The end result. Mistakes were made. Expectations adjusted.
Not entirely thrilled with the result (or the perspective of the large photo) but it's done.

JKJ
Going from memory, it may be something like this wheel, a sanding flap wheel. Versions are available for drills and angle grinders.

Another example-
And other sources... I've never used them, but watching Raffan, they work fast and show no mercy. Experiment, and master them on practice wood before going at them on a keeper project. Raffan uses those in several projects, search his name and that bowl style on youtube for more videos. In some, he shows detailed methods of their use.
Ceramic Shredder Flap Discs 4-1⁄2" x 7⁄8" (Type 29) 5X LIFE!
HIGH DENSITY ABRASIVE FLAP DISCS These flap discs are perfect for removing large amounts of material and for shaping or smoothing wood & metal. They are manufactured for rapid stock removal while delivering exceptionally fast and cool cuts. They are offered in Ceramic with grits ranging from 36...
www.combatabrasives.com
Another example-
https://www.northerntool.com/products/klutch-flap-disc-4-5in-dia-7-8in-arbor-60-grit-type-29-6172567
And other sources... I've never used them, but watching Raffan, they work fast and show no mercy. Experiment, and master them on practice wood before going at them on a keeper project. Raffan uses those in several projects, search his name and that bowl style on youtube for more videos. In some, he shows detailed methods of their use.


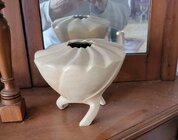
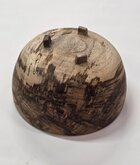
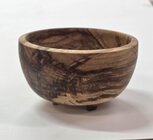
This is an end grain bowl still mounted for doing the outside turning. The first picture is the tenon used to hold it for doing the inside and after the inside was complete I put it into a brown paper bag to slowly dry. The second photo after drying and removing the tenon marking the feet. The third photo shows the feet cut and beginning to remove the material between the feet.
Perfect, Tim. At 3:39 he quickly explains it is a non-woven paint stripping pad, like this example-
https://www.empireabrasives.com/4-x-5-8-easy-strip-and-clean-disc/ These may use silicon carbide abrasive, more suited for metal than wood. But at 10000rpm on an angle grinder, it will effectively remove anything that gets in its path.
Otherwise, he did say, and show, he usually uses the flap wheels I showed above, which will likely be ceramic abrasive (more suited for metals, but will eat wood, too, esp. if sterate to release wood dust) or maybe aluminum oxide (best suited for wood). Later on he is using typical velcro sandpaper discs as he often uses.
That right angle Makita drill ain't cheap...
john lucas
AAW Forum Expert
- Joined
- Mar 25, 2008
- Messages
- 317
- Likes
- 303
- Location
- Suwanee, GA
- Website
- www.mikepeacewoodturning.com
A coping saw is what I use also and it is surprisingly quick assuming your blade is not worn out like mine typically is!I use coping saw to roughly out the feet. Then I use wood rasp to get closer. Follow that up with sandpaper spray glued to sticks. Here's my latest one.
For those of you who use a coping saw--are you just using it to cut alongside the feet, or are you also cutting out the ridge of wood in between the feet?
john lucas
AAW Forum Expert
I cut away everything staying far enough from my lines so I can sneak up on the final shape with wood gasps and sandpaper glued to sticks.
For those of you who use a coping saw--are you just using it to cut alongside the feet, or are you also cutting out the ridge of wood in between the feet?
That's what I did for the one I showed from Bradford Pear in post #2 - coping saw, then rotary cutters, then rasps, files, sandpaper. For me the the trickiest thing was turning turning the curves above and below the feet so they would be smooth and continuous when done. I made some templates to help. I cheated a bit on the handles - instead of making a smooth curve I made a textured band - took longer but was easier!
I watched the other JJ turn a teapot. Between the handle and spout he cut with the gouge as when turning, but turned the piece by hand to cut just a partial circumference. I haven't tried that.