• July 2025 Turning Challenge: Turn a Multi-axis Weed Pot! (click here for details)
  • Congratulations to Kent Reisdorph for "Sugarberry Bowl" being selected as Turning of the Week for July 14, 2025 (click here for details)
  • Welcome new registering member. Your username must be your real First and Last name (for example: John Doe). "Screen names" and "handles" are not allowed and your registration will be deleted if you don't use your real name. Also, do not use all caps nor all lower case.

Centering bowl grain

Joined
Jan 19, 2024
Messages
182
Likes
1,108
Location
Hattiesburg MS.
When I turn a bowl with the tenon on the bark side of a blank, getting the H grain pattern centered is a bit of hit and miss for me. When cutting blanks I try to get the pith equal distance from the edges. I turn between centers so that I can adjust it if needed.
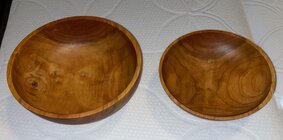
Below are two pics. One a hit, one a big miss. Obviously, I’m missing something. Usually my misses are small but still noticeable.
Any hints appreciated.

IMG_2610.jpeg
IMG_0742.jpeg
 
Hmm. Usually I think the trick to it is, when you go to start between centers, you'd put the pith against the drive center, in which case I usually always centered on the pith, and then adjusted it as close to dead center of the blank as I could (while still lining up on the pith) and then I made sure the "faces" (facing headstock) were parallel - Only problem with that is, when you're working with blanks that the pith is off center (often in branch wood) so the trick there is in cutting the blanks out of the log to begin with if you know ahead of time you want it to be bark side tenon, then you'd split the log such that it would center the pith on the 2 blanks, I would think? Other than that, I really don't know - when I started out, I never even paid attention to getting the grain pattern centered, but more often than not, it came out that way, and I couldn't really tell you why, other than possibly when I first started cutting logs into blanks I picked up on the idea of getting it to where splitting at the pith would put the pith at center of the blanks that result... ?

I never really considered it myself, otherwise I just seemed to naturally get balanced grain for the most part out of the blanks I cut, so if I had to explain why, I could only say "pure luck". I'll have to experiment with some of those ideas myself (Although I am sure there's plenty of experienced turners who could tell you just how to get them consistently centered...) but I'd have to say it starts at the first cut when you split the log down the pith...
 
Sections of log seldom are perfectly round. Before studying the end grain I'll draw a 1-2" diameter circle around the pith. If the circumference of the section is round, parallel "pith" cuts can be made anywhere and symmetry should be good. If for example the section of log has an oval end grain shape, bowl grain symmetry suggests making the pith cuts through the minimum or maximum diameter. when the circumference is asymmetric, either make the best choice for parallel pith cuts and expect the bowl grain symmetry won't be ideal, or make non-parallel pith cuts striving for symmetric outer edge about center line of each blank.
 
Sections of log seldom are perfectly round. Before studying the end grain I'll draw a 1-2" diameter circle around the pith. If the circumference of the section is round, parallel "pith" cuts can be made anywhere and symmetry should be good. If for example the section of log has an oval end grain shape, bowl grain symmetry suggests making the pith cuts through the minimum or maximum diameter. when the circumference is asymmetric, either make the best choice for parallel pith cuts and expect the bowl grain symmetry won't be ideal, or make non-parallel pith cuts striving for symmetric outer edge about center line of each blank.
Don, I think I’m doing what you’re saying. I try to cut the blank to have an equal measurement from pith to edge on both sides. Sometimes it’s parallel, sometimes not. As you say, depends on the log. I’m usually pretty close on centering the grain. We are our worst critics. Being off just a little bugs me. I did have a thought after reading these replies. Once cut, draw a perpendicular line from center of pith to the edge on both ends. Line these up on the bark side and that should be where the tailstock goes. Always working towards the perfect bowl. I’m sure I’ll die still looking for it.
Thanks!
 
I think you’re doing it right be initially centering the pith with the chainsaw cut.

After that you might also look at the depth and curve of the bowl to get the grain result you want. If your curve arc from rim to bottom of bowl is a larger radius than the trees rings you’ll get the X pattern. If your curve is about the same radius as the rings you get a ~single growth ring left to right across the bowl. If grain radius is much larger than curve radius you’ll get ~ circles (not as tight as if you put pith at bottom of the bowl, an exaggeration of this).

The two cherry bowls pictured were just turned a couple weeks ago from the same log (don’t recall if opposed or different section). The one on the left is 9.5” with a 3.75” depth, it essentially follows the tree ring radius. The one on the right is 8.5” with a 2.75” depth, a shallower bowl radius which crosses the rings and provides the X.
 

Attachments

  • IMG_5756.jpeg
    IMG_5756.jpeg
    493.2 KB · Views: 50
Obviously, I’m missing something. Usually my misses are small but still noticeable.
Any hints appreciated.
You are on the right track.
It starts with blank selection and cutting. Symetrical matching grain on each end of the log sections..

Set the spur drive centered in the Mille growth ring

Fine tuning - early in the roughing I line up the grain near the future foot. Find one growth ring
I do a two axis adjustment. Get the end grain points of the growth ring vertical and adjust to equidistant from the center line.
Turn to put these two aligned points horizontal. Then adjust the two side grain point equidistant from the centerline in keeping the two end grain point horizontal.

Turn the area with the adjusting growth ring vertical smooth and check. Fine tune again if needed.

Practice with NE bowls helps. Here the growth ring for aligning I use is where the bark meets the wood.
 
Last edited:
Excuse this poor drawing, I'm sitting in a seminar and I'm using what I've got. I think this drawing will help some of the explanations from above.

Think of a chicken egg laying on its side. It has a skinny end and a fat end. Cut your log, through the pith, to separate your skinny end of the egg (narrow spaced growth ring side of log) from the fat end of the egg (widely spaced growth ring side of log). This will really help getting that bowl blank mounted on the lathe to get symmetry in the final cut growth ring patterns. You may still need to adjust the mounted blank as you cut, but they should be minor. Asymmetrical grain patterns in your bowl occur when your log cut runs perpendicular in any direction other than the cut line in this drawing.
1000009666.jpg
 
Last edited:
I think you’re doing it right be initially centering the pith with the chainsaw cut.

After that you might also look at the depth and curve of the bowl to get the grain result you want. If your curve arc from rim to bottom of bowl is a larger radius than the trees rings you’ll get the X pattern. If your curve is about the same radius as the rings you get a ~single growth ring left to right across the bowl. If grain radius is much larger than curve radius you’ll get ~ circles (not as tight as if you put pith at bottom of the bowl, an exaggeration of this).

The two cherry bowls pictured were just turned a couple weeks ago from the same log (don’t recall if opposed or different section). The one on the left is 9.5” with a 3.75” depth, it essentially follows the tree ring radius. The one on the right is 8.5” with a 2.75” depth, a shallower bowl radius which crosses the rings and provides the X.
Don, thank you for that explanation. I have seen that but didn’t know why. Now I know. Your photo on the left. That is what I call an H pattern in the bottom. Dead man sprawled on the ground may be more descriptive. It may be the angle of the photo but it seems in the picture that it should be a little more to the right to be centered. This is what I am talking about. Thanks for the explanation on the relationship between curve arc and radius.
 
All good advice, but the terminologies are hard to follow, is it apple or orange. Here is a video I did to show the balanced bowl grain. As others describe you start with the chainsaw cut and adjust from there between centers. Both your bowls had not been turned with the pith in the middle. see video.
 
Excuse this poor drawing, I'm sitting in a seminar and I'm using what I've got. I think this drawing will help some of the explanations from above.

Think of a chicken egg laying on its side. It has a skinny end and a fat end. Cut your log, through the pith, to separate your skinny end of the egg (narrow spaced growth ring side of log) from the fat end of the egg (widely spaced growth ring side of log). This will really help getting that bowl blank mounted on the lathe to get symmetry in the final cut growth ring patterns. You may still need to adjust the mounted blank as you cut, but they should be minor. Asymmetrical grain patterns in your bowl occur when your log cut runs perpendicular in any direction other than the cut line in this drawing.
View attachment 72278
Steve, yes, I understand that. I think my problem is in the fine tuning. Drawing looks pretty good! With my hand tremor, it would be a masterpiece.
 
All good advice, but the terminologies are hard to follow, is it apple or orange. Here is a video I did to show the balanced bowl grain. As others describe you start with the chainsaw cut and adjust from there between centers. Both your bowls had not been turned with the pith in the middle. see video.
Lyle, Bingo! A picture is worth a thousand words. Thank you Sir!

Thanks to all for the replies. I have learned a bit from all of them. Now let’s see if I can put this in to practice.
 
Yeah, that fine tuning can drive a turner nuts. It's not just adjustments on the 12:00/6:00 axis and 9:00/3:00 axis. There's the need to change to a completely different axis. Think of holding the blank between drive centers, and the need to set one, or both, of those center to a new rotation point. Ahhh! Sharpie marks on the blank may help keep orientations under control.
 
I never worry about it. Some turners are obsessed with it. For me, my first goal is to get the most out of every log section I mount on my lathe. I do not like to waste wood. Some times the grain is centered, some times not. Since I once turn my bowls, the warping is the highlight of my work, not grain orientation. If it is a smaller log section like Steve shows in his drawing, then most of the time I will select the grain orientation before I cut up the log section. You can get pretty close that way. If you get lucky, and/or eyeball it well, the grain will be centered.

robo hippy
 
Back
Top