• July 2025 Turning Challenge: Turn a Multi-axis Weed Pot! (click here for details)
  • Congratulations to James Seyfried for "NE Red Oak II" being selected as Turning of the Week for July 21, 2025 (click here for details)
  • Welcome new registering member. Your username must be your real First and Last name (for example: John Doe). "Screen names" and "handles" are not allowed and your registration will be deleted if you don't use your real name. Also, do not use all caps nor all lower case.

Coloring epoxy for voids help

Joined
Feb 21, 2011
Messages
391
Likes
358
Location
Elkhart, IN
Website
www.riccsdesigns.com
I have done a couple searches for tutorials/instructions primarily focued for turners on coloring epoxy to fill voids, but not having much luck. While I have done the occasional filling with epoxy & coffee grounds or india ink with 5min or 15min epoxy. I have also used the turquoise inlay resin priduct on a couple things. But, I have found that it is so thick it doesn't flow well into the smaller crack very well.

I have a walnut platter that has an interesting void and crack that I would like to fill with something more of a contrasting accent. My thoughts are blue/green colored epoxy like on the common epoxy river tables, or maybe something bright gold/brass metallic with mica powders.

While I have seen some youtube turners fill voids with epoxy I really haven't come across a tutorial type video or instructions. Yes, I know every void will be different and require different amounts to fill so there will not be exact "recipes" to fit every occasion. But, at least basic ratios or formulas and processes would be helpful.

Would prefer epoxy as I have turned polyester blanks for stoppers and such before and find it brittle and easy for chip out. But open to expert opinions & advice.

Plus something that doesn't require a pressure pot or vacuum chamber.

Lastly, my shop is in the basement so willing to pay extra for a low odor brand of epoxy.

Thanks
Ricc
 
I have mixed all kinds of things to color epoxy. I like Trans Tint dyes the best. One thing I like to do when filling around knots is to make the epoxy translucent so it picks up some of the color from the knot. I've used powdered tempera paint. Crushed up chalk. Different metal powders. Shoe dye. Even used some oil paint. Do a test. Some mixtures changes the drying time.
 
I have a walnut platter that has an interesting void and crack that I would like to fill with something more of a contrasting accent.

Always a challenge to find a compatible contrasting color.
You can have a “River” that dominates to the point of having the walnut be a supporting element.

Or have it be a subtle feature.

Black or darker browns work most of the time and appear somewhat natural.
 
For (often silly) tests of using various household stuffs to color resin, check out Peter Brown's Dye Trying series on YouTube
I used some mixol dye a couple of days ago and it says can be used with epoxy but it's still sticky so I probably didn't get the epoxy mixed up enough you think or is it from maybe the cabosil that I used to make it like peanut butter so it would stick?
 
One thing that helps liquids flow and fill deeper voids is lower viscosity. You can make epoxy thinner by warming it prior to mixing. A hot water bath is easy, but slow. 10-12 SECONDS in the microwave for each component can warm them, and thin them, so when you go to apply you're using 3-in-one oil or maple syrup thickness, instead of peanut butter. The epoxy will cure a little faster, but not so much that it will make a difference in this application. Only you can judge if this will be helpful in your situation.

Also, it seems to me that frequent users of epoxy for fillers have commented that you shouldn't try to fill a deep void in one application, but build up layers, as needed.
They weren't deep voids, just I had some on the inside and some on the outside to fill so I made it like peanut butter so it wouldn't run. I ended up covering with some clear packing tape anyway to hold it in place. Now like I said it's still sticky so I figure I didn't get the epoxy mixed enough.
 
Have used stains and shoe polish with reasonable results. Lately have used Mica Powders and have very good results. I have not been able to do it yet but as I understand very small amounts can be used to get a flair of color in clear or swirls of different colors. I did note on my last effort I missed a spot and mixed a little more but apparently different amount of powder and the color was slightly different. You can get 36 colors on Amazon for 14 and many other combinations which I think are also varying weights.
 
I use Alumilite epoxy to fill voids and when I want to tint it I've been using Jacquard brand Pearl Ex Powdered Pigments. I really how well this tint works with the alumilite. It's a dry powder that you mix in, the more you add the more opaque it is and more bright the colors are. You can mix tints together and swirl colors, I find mixing the different colors in separate containers with resin before I swirl them together works best. Here's some examples of how the tint looks and yes I like blue. :)

IMG_20201006_154959162.jpg IMG_20181026_173527083.jpg PXL_20230716_231916610.jpg
 
If your looking for a transparent color alumilite makes a transparent dye that is extremally concentrated. for a 1/2 quart pour it only takes a tiny bit less then a drop to color it and still be able to see through it. If you want bright colors with lots of pearl swirls eye candy has a massive line of mica powders.
 
If your looking for a transparent color alumilite makes a transparent dye that is extremally concentrated. for a 1/2 quart pour it only takes a tiny bit less then a drop to color it and still be able to see through it. If you want bright colors with lots of pearl swirls eye candy has a massive line of mica powders.
Eye Candy Pearls look fun, thanks for the rec. :)
 
I tried various types of paints and fillers, including “organic” stuff like coffee grounds. Settled on Transtint dyes and/or mica powders as favorites. With one of the thinner epoxy mixes the powder could settle out, not sure as I havent used the thin epoxies.

The mica powder sampler sets mentioned earlier are great - can figure out what colors and effects you like and just get those later on. It doesnt take much of the powder to get a pretty much opaque look, so a little goes a long way.

Transtint dyes are very concentrated, and are very versatile - will mix with water (wb finishes), alcohol (shellac), lacquer thinner (lacquer), and epoxy, potentially other finishes I havent tried. The creator, Jeff Jewitt (Homestead Finishing) has an additive that is supposed to make the dyes work with oil based finishes. Havent tried it, I use powder oil based dyes for that.
 
Alumilite is NOT low odor. I wear a mask when I work with it.
What type? I use the "amazing clear cast high gloss" and haven't really noticed a bad odor or much of one at all. This came off amazon though so maybe age affects it?

I'm only using small quantities though.
 
What type? I use the "amazing clear cast high gloss" and haven't really noticed a bad odor or much of one at all. This came off amazon though so maybe age affects it?

I'm only using small quantities though.
That's the same one I use and the fumes give me headache. I have to wear my respirator or I can't work with it.
 
What ever resin or epoxy you use its going to give off fumes as part of the reaction that makes it cure. You always want to do it in a well ventilated area and wear a respirator with some type of voc filter in it. There are plenty of youtube creators that work with resin that have chronic problems now from not using proper PPE.
 
If half the epoxy you used on a project cured/hardens like you expect and other spots are still sticky, is there hope for the sticky? Heat, time? Or just chalk it up to lesson learned and toss it?
 
it is easy to fill cracks/voids with color & resin if you thicken it 1st so you can apply like drywall compound - this is the resin thickening agent I use -


for color I use pigments made for resin -

https://www.amazon.com/Resin-Obsession-opaque-color-pigments/dp/B016NH0J90/ref=sr_1_4? - along with "Jacquard Pearl Ex Pigment" available in a rainbow of colors also on Amazon

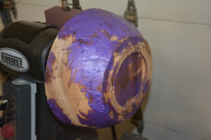
here is a twice turned bowl with outside defects filled -

1689676601544.png
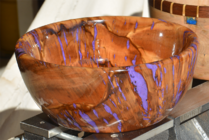
turn off excess, sand then mount on chuck via bottom mortise - turn inside to final thickness then repeat the fill process - here it is finished -

1689676761674.png
it only takes 10-15 minutes to mix, color and apply - what takes the most time is carefully turning off the excess without going too deep and opening up some voids again

it is very simple/easy process, I like the end results and it lets me use wood that is otherwise headed for the burn pile
 
If half the epoxy you used on a project cured/hardens like you expect and other spots are still sticky, is there hope for the sticky? Heat, time? Or just chalk it up to lesson learned and toss it?
If epoxy doesn't harden, it means you failed to mix it correctly, or it was too cold. Different epoxies have different tolerances for being off from the recommended proportions, and some are extremely demanding. A few are proportioned by weight of the components, but most are by volume, as you know. If some of the epoxy from a mix cured and the rest of it failed to cure, it means you didn't mix it thoroughly.

Two other comments on mixing epoxy: 1. To reduce the number of bubbles, stir v e r y s l o w l y. Maybe 50 circles in one direction and 50 circles in the opposite direction. It might take 2 of your minutes of working time. You can also blow through a straw or coffee stirrer on the surface of the epoxy and the bubbles will rise to the surface and break.
2. If you mix the epoxy in a 'thin' layer on aluminum foil, the time to set up will be a little bit longer than if you mix it 'taller' in a cup.
Another trick to bubbles after the pour - get one of those little butane torches at the dollar store and a very light quick swipe with the lit torch will quickly bring out and pop most bubbles (a swipe about a little faster than you might move a rattle can of spray paint) as long as you don't focus flame in one spot for any amount of time, it'll not burn. (Works with most long set epoxies, not so well with the 5 minute epoxies, and I have no data on the acrylic resins - which are different animal from epoxies, though many folks use the term interchangeably....)
 
If epoxy doesn't harden, it means you failed to mix it correctly, or it was too cold. Different epoxies have different tolerances for being off from the recommended proportions, and some are extremely demanding. A few are proportioned by weight of the components, but most are by volume, as you know. If some of the epoxy from a mix cured and the rest of it failed to cure, it means you didn't mix it thoroughly.

Two other comments on mixing epoxy: 1. To reduce the number of bubbles, stir v e r y s l o w l y. Maybe 50 circles in one direction and 50 circles in the opposite direction. It might take 2 of your minutes of working time. You can also blow through a straw or coffee stirrer on the surface of the epoxy and the bubbles will rise to the surface and break.
2. If you mix the epoxy in a 'thin' layer on aluminum foil, the time to set up will be a little bit longer than if you mix it 'taller' in a cup.
I checked the bowl a little bit ago and the sticky parts are hard, couldn't dent with my fingernail anyway just sticky. Could the clear packing tape I put over it have done something to it? I'll give it another couple of days before I start digging on it.

This was just alumilite clear cast and I mixed it I thought long enough before I added my dye, some glitter, and then cab-o-sil to thicken it up.
I would give it another day and see what it does. Maybe wipe it with some dna if it still feels tackey.
 
I had this happen so I just removed part of the layer and poured fresh in carefully. There is a slight irregularity but Even I have to look hard to see it. Oh the pour came out crystal clear even thought the surface was rough. Was using Clear Cast
 
Another trick to bubbles after the pour - get one of those little butane torches at the dollar store and a very light quick swipe with the lit torch will quickly bring out and pop most bubbles (a swipe about a little faster than you might move a rattle can of spray paint) as long as you don't focus flame in one spot for any amount of time, it'll not burn. (Works with most long set epoxies, not so well with the 5 minute epoxies, and I have no data on the acrylic resins - which are different animal from epoxies, though many folks use the term interchangeably....)

A heat gun/torch will pop bubbles but you have to be careful as it is easy to over do it and too much heat can damage the resin and/or cause it to setup too quickly. A few years ago, I saw a video of a guy in an obvious commercial setting using a plastic spray bottle to LIGHTLY mist the surface with Acetone to pop bubbles - I tried it & that works much better. Obiviously in a well ventilated environment but no risk of damaging the resin with heat. Only thing to be careful about is not to use it to late in the hardening process as it will cause ripples in the surface of the resin that may not completely flow back out.

FYI - my all plastic spray bottle from HomeDepot has been in use for at least 2 years and it is unaffected by Acetone.
 
I’ve not used Epoxy for many years but when I did I used Wests, it’s very good stuff.


My old next door neighbour ran a fibreglass supplies outlet and he suggested for reliable colouring it’s best to use proper Epoxy pigment. There are of course cheaper alternatives but the Epoxy may not fully cure. There is also a specific amount of pigment that shouldn’t be exceeded or this too can affect curing. I think it’s 5% by weight.
 
Back
Top