I switched a couple of years ago. There are several paths one can follow depending on whether a computer or tablet will be used. Those can use usb cameras or borescopes. I did not want a computer device to be necessary.
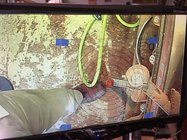
I used a small Swan surveillance type camera, ~ 1-1/4” square and ~3/4” tall. It was ~$40 but is no longer available. I cut down a piece of square stock leaving a mounting square on one end and ~3” dowel that fir in the laser mount. 3m emblem tape has held the camera well. Just depends on the shape of the camera what you need to do to mount it.
I had an old flat 20” flat screen monitor with vga input. I found a signal conditioner, bnc camera input to vga output, with an internal power supply for the camera, camera rca power plug plugs in. ~$20 on amazon. There are all types of cameras and signal conditioners available - home surveillance is big business. For $65 and the monitor that was useless otherwise, I have a nice system. It is head and shoulders above using a laser
Pay attention to the lens. I forget all the stuff I looked up about fov and magnification, but I think my camera is 90 deg fov. The tighter the fov the more magnification it will have - just depends on what you want. The distance from lathe center to the lens also determines the size of the image. My magnifies ~3:1, which I like when doing thin walls.
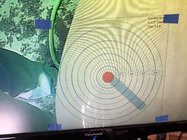
There are several ways to represent the tool position on screen. I chose to draw up a target and color print it on a transparency. I have 2 sizes, 6mm and 9mm, for the bullseye, as I use those sized tools. The transparency is just taped to the screen, no drawing required. Pics below

")
