• July 2025 Turning Challenge: Turn a Multi-axis Weed Pot! (click here for details)
  • Congratulations to James Seyfried for "NE Red Oak II" being selected as Turning of the Week for July 21, 2025 (click here for details)
  • Welcome new registering member. Your username must be your real First and Last name (for example: John Doe). "Screen names" and "handles" are not allowed and your registration will be deleted if you don't use your real name. Also, do not use all caps nor all lower case.

Crushgrind Bore Dimensions - Best Practices

Joined
May 29, 2022
Messages
115
Likes
22
Location
Nashville, TN
Instead of resurrecting an old thread link here I wanted to start fresh. Don't know who's still around.

I'm looking for current best practices to make the Crushgind mechanism's 2 main bores. I have the notch tool for the "clips", I do not plan to use glue.

From that old thread:
Most, but not all, instructions for making CrushGrind@ mills provided by US suppliers specify 1) a 1⁹/₁₆” diameter hole in the mill body for the grinding mechanism, 2) removal of the spring clips from the grinding mechanism and 3) use of epoxy (or similar) to secure the grinding mechanism in the mill body. These same instructions specify 1) a 15/16” diameter hole in the mill cap for the stopper, 2) removal of the spring clips from the stopper and 3) use of epoxy (or similar) to secure the stopper in the mill cap. One can make a very nice pepper/salt/spice mill using these instructions. But there is a better way! It’s the no epoxy-required way.

The manufacturer’s recommendation for the diameter of the hole in the mill body for the CrushGrind@ mechanism is 38mm (1.496”). I am good with calling that 1½” (1.500”). The manufacturer’s recommendation for the diameter of the hole in the mill cap for the stopper is 22mm (0.866”). I am good with calling that 7/8” (0.875”).

I have a new crushgrind mechanism and their current instructions. I'm trying to optimize the forstner bits I need to do this as I plan to get some higher end Bormax 2/3 forstners.

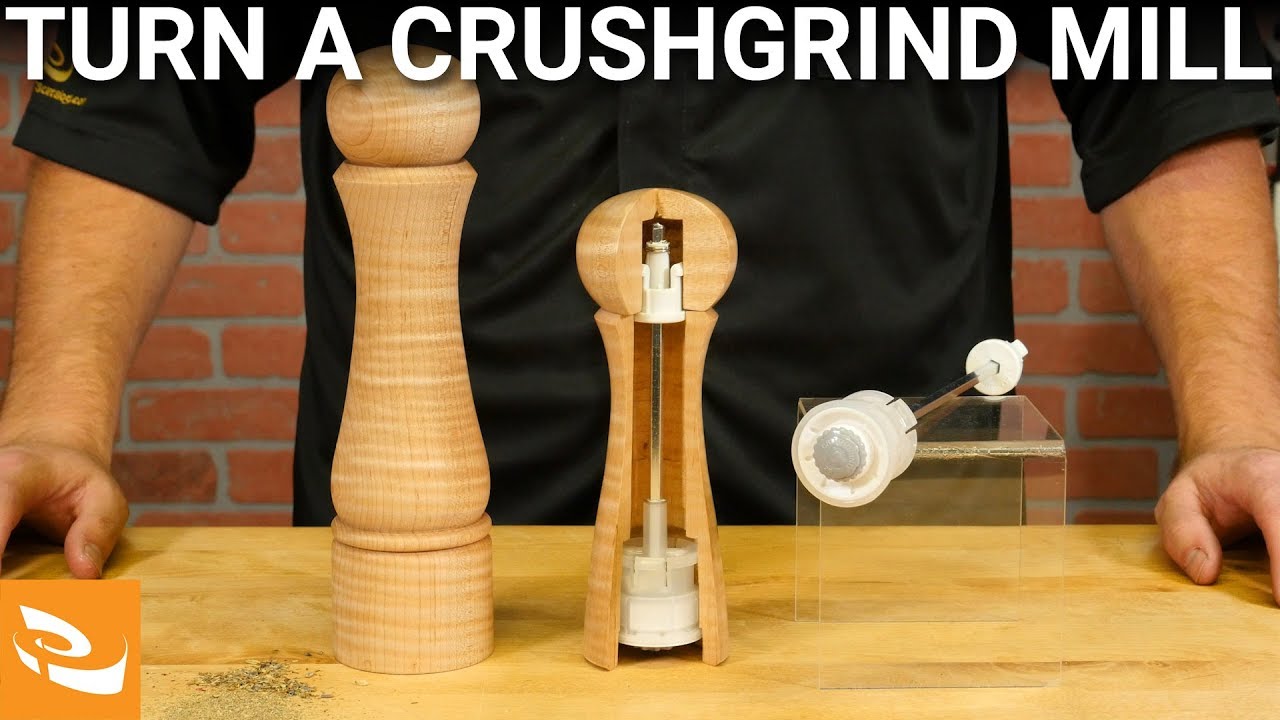
For the CrushGrind® Shaft instructions, they call for 22mm and 38mm bores to fit the Crushgrind's upper and lower bodies, as John Mentioned in the past. I have a mechanism in hand that I'm measuring. The measurements in the instructions are pretty much the diameter of the respective bodies not including the anti-rotation ribs meant to penetrate wood.

Researching the woodturning community, I see some people/videos using SAE bits that are a 1/16" larger than those recommended bores (15/16 vs. 7/8 and 1-9/16 vs 1-1/2"), and John who posted with certainty to use the size bores in the instructions (7/8" and 1-1/2"). I saw where Brian Horais (RIP) cut the anti rotation ribs off and used 1.5" bores. I'll be using hard woods and I'm concerned those anti-rotation ribs are not going to make that much of an indentation. So, I can press one of these into the 38mm/1-1/2 bore for example, but I'm worried about damaging the mechanism as those ribs aren't going to cut their depth, I don't think.

Anyone have current guidelines and experience with the bores that are best to use? Without using glue.

I've considered using the Woodcut tools Mill to do these. I've encountered more than one person who said they had it but didn't use it preferring the finish of forstners. I like that it is adjustable and I can tweak it, but I can't see it giving as good a cut finish as a good forstner. Expensive to try and see.

Gonna try to tag other knowledgeable parties from that old thread:
@John King
@Tony Rozendaal
@Glenn Lefley
@Brian Deakin
@Gord Cameron

Appreciate everyone's input on the best 2 bores for this mechanism's 2 inserts.
 
Last edited:
I'm not entirely sure why you tagged me in this post but here is my experience FWIW.

I still use epoxy with my CrushGrind Mechanisms, but as far as the bore size is concerned...

For the stopper, I use 7/8, and use a arbor press to press the piece into the bore without removing any tabs or anti-rotation ribs. This is after getting one back where the white driver piece had come out of the bore after I had cut off the ribs and the tabs. The anti-rotation ribs deform when I press the driver into the bore - in hard woods they certainly do not make indents into the wood.

For the grinder mechanism, I now use 1-9/16 (or a metric equivalent). I use relatively inexpensive carbide bits sourced from Amazon. This is after having more than one instance where I used the 1-1/2 bore and the bottom lip on the mechanism broke after the wood moved ever so slightly after drilling. Using the 1-9/16 seems to eliminate that problem and I can pop the mechanisms in and out easily with hand pressure until the last time I pop them in and use epoxy to secure them. Again, I no longer remove any ribs or tabs.
 
Tony I tagged the people from the one of the old threads who seemed would have some experience with them. Your input/experience above is what I was looking for. Appreciate that.
 
The mistakes I made when first making pepper mills were
(1) Turning the middle of the peppermint too thin At it widest point taking including the reassessingand the inside wall it is 55mm wide
So you need to keep the minimum thickness of the mill at least 60mm Otherwise you will cut the mill in half
(2) Not allowing sufficient length for the top and tenon and parting off
( 3) Important to use a cone centre(or make your own) to remount the pepper mill in the bottom opening after drilling to keep the entire mill square
(4) Take care cutting clean tenons and mounting the wood to ensure emerging mill is square on the chuck
(5) Take care parting off the top of the mill Suggest do not have entire mill on lathe at this point in the process Only the top
If the length of the top is over length this allows you to adjust the length to the matching mill of the same size
 
Last edited:
Pease note I live in the United kingdom I use 22mm 38 mm and 45mm forstner bits Metric bits more are readily available

The through hole is 1/16 inch (not critical )
Please see pdf below

This is the most useful image I have found
Please note you need to drill the 19mm (at 45mm) then an additional 29mm +5mm (at 38mm) total distance 53mm then cut recess
For the top drill 19.8 mm cut recess then drill smaller hole additional to accommodate tail for top mechanism
I think the tail length may be 10mm

file:///C:/Users/brian/Downloads/crushgrind%20image%20for%20keith.pdf
Thanks Brian. I understand re metric. That 38mm bore is the primary one in question. That 38 works for you then I take it? That’s the one tha matches the mechanism dimension if you remove the ribs.

Note l: The pdf link didn’t work. Looks like a link to your c drive. I am interested in seeing what you meant to post.
 
Last edited:
Yes that’s the link I posted in original message. But there’s some variation in what people use vs the 1.5” and 7/8” bores John mentions. I’m after what everyone else is doing.
I've only made a couple of pepper mills but I used the directions from Craft Supplies USA (where I bought my CrushGrind from). They're basically the same as John's.
 
I've only made a couple of pepper mills but I used the directions from Craft Supplies USA (where I bought my CrushGrind from). They're basically the same as John's.
Actually, they use 1-9/16 vs the 1-1/2 John uses. They are one of the sources that led me to the concern. They glue theirs, so maybe that's why they chose the looser fit.
 
Last edited:
Thanks Brian. I understand re metric. That 38mm bore is the primary one in question. That 38 works for you then I take it? That’s the one tha matches the mechanism dimension if you remove the ribs.

Note l: The pdf link didn’t work. Looks like a link to your c drive. I am interested in seeing what you meant to post.
Please try this link
If you copy and paste line beolw

Visio-Crushgrind Boring.vsd


Canadian Woodworking and Home Improvement Forum
https://forum.canadianwoodworking.com › fetch


PDF

Base Boring. 22. 28. 14.8. 5. Cap Boring. 19. 5. 5. 29. 19.8. Tool.

Visio-Crushgrind Boring.vsd

 
Please try this link
If you copy and paste line beolw

Visio-Crushgrind Boring.vsd


Canadian Woodworking and Home Improvement Forum
https://forum.canadianwoodworking.com › fetch


PDF

Base Boring. 22. 28. 14.8. 5. Cap Boring. 19. 5. 5. 29. 19.8. Tool.

Visio-Crushgrind Boring.vsd

Thanks Brian. I do have that document. Appreciate the send.

I'm gonna go on and order the 22 and 38mm Bormax bits. I think I'm going to make a special guide tool to cut some very small grooves for the ribs using my D-way point tool as a broach of sorts. I think that result in a very good fit.
 
My "go to" reference is Turning Salt & Pepper Shakers and Mills by Chris West. Check out CrushGrind@ Mechanism, p 130 and Mill Projects (CrushGrind@ mechanism), p 138. All you need to know.

Measurements for my CrushGrind@ mills follow (pdf files). Photos of some of my work also attached. - John
 

Attachments

  • CrushGrind Body.pdf
    CrushGrind Body.pdf
    991 KB · Views: 8
  • CrushGrind Cap.pdf
    CrushGrind Cap.pdf
    862.3 KB · Views: 9
  • Suzie Salt Mill 1st Place September 2015 GCWA.jpg
    Suzie Salt Mill 1st Place September 2015 GCWA.jpg
    236.6 KB · Views: 7
  • Julie and Leslie Salt MIlls 1st Place July 2016 GCWA.jpg
    Julie and Leslie Salt MIlls 1st Place July 2016 GCWA.jpg
    164 KB · Views: 7
Re my last post these are the Crushgrind Wood version with no mechanism poking out of the top. I don't cut the tabs off they are there for a reason, just made a recess tool from an old carpenter chisel on the grinder. Pics are from a couple of non traditional style/shape. The big one is around 33 inches tall in quilted ash. In my opinion they are the most superior mechanisms out there by far, super adjustable and guaranteed for life. I would never use anything else, definitely worth the extra.money. I'm not the best photographer, the photos don't really do them justice.
 

Attachments

  • 20241030_080734.jpg
    20241030_080734.jpg
    326.4 KB · Views: 16
  • 20240210_131619.jpg
    20240210_131619.jpg
    322.1 KB · Views: 16
I'm out of town right now but the tool I use has a cutting edge on the left side of the tool and it was made for that type of kit I think. When I get home I'll let you know for sure.
When you get back, I meant what drill size are you using for the top part of the mechanism? I’ve got the notch scraper from Sorby if that’s what you thought I meant.
 
Back
Top