• Beware of Counterfeit Woodturning Tools (click here for details)
  • Johnathan Silwones is starting a new AAW chapter, Southern Alleghenies Woodturners, in Johnstown, PA. (click here for details)
  • Congratulations to Keven Jesequel for "Big Leaf Maple" being selected as Turning of the Week for April 15, 2024 (click here for details)
  • Welcome new registering member. Your username must be your real First and Last name (for example: John Doe). "Screen names" and "handles" are not allowed and your registration will be deleted if you don't use your real name. Also, do not use all caps nor all lower case.

Entry cut trouble

Joined
Jun 10, 2021
Messages
135
Likes
181
Location
Oregon City, Oregon
Greetings rotational gurus,
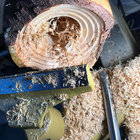
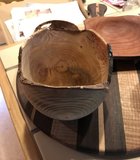
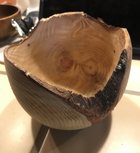
I’m having an ongoing issue with the entry cuts in some irregular natural edge bowls that I’m working on. The material is Mugo Pine and at first I was trying to “ride the bevel” and the gouge would get slammed, then I’ve started to do a scraping cut with the tip of my swept bask gouge which seems to help. Im wondering if it would work to sneak up on the edge from inside the bowl.
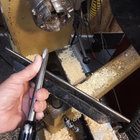
Getting the thickness of the rim established before going deeper into the form would be preferred method but I’m having trouble knocking the edge into tomorrow. When the rim has 2 coplanar edges isn’t as big a problem.
Also, sometimes I loose track of where the tip of the tool is and bang it into the bowl, creating more problems! That issue I’m making some headway on.
Best, Spike
 

Attachments

  • CF6190C4-CB72-46DE-BAFE-91BBFFB5FF90.jpeg
    CF6190C4-CB72-46DE-BAFE-91BBFFB5FF90.jpeg
    566.5 KB · Views: 72

john lucas

AAW Forum Expert
Joined
Apr 26, 2004
Messages
8,333
Likes
3,586
Location
Cookeville, TN
That can be tricky. Put the flute at 3 oclock. Then use an underhand grip with your thumb backing the gouge. Start the cut extremely light pushing in as gently as you can. Try not to put any pressure on the bevel. With a natural edge bowl you will have to maintain this light cut until you are past all the air gaps and onto solid wood.
 

Attachments

  • 20211006_140717.jpg
    20211006_140717.jpg
    610.1 KB · Views: 35
Joined
Jan 22, 2009
Messages
444
Likes
680
Location
Crossville, TN
What John said. In addition, think of the bevel as a line extending from the tool. That is the line that you want to enter the wood perpendicularly. It's easy to think of the cut going in the direction of the shaft of the gouge when in fact it goes in the direction of the bevel.
 
Joined
Jun 10, 2021
Messages
135
Likes
181
Location
Oregon City, Oregon
Thanks a bunch, Bill, I have used a version of the parting tool approach, using the gouge at 12 oclock and using a scraping cut, but i have a little difficulty with that when there is only 1 “wing” on the edge of the bowl.
John, thanks for that, I sort of know that method, but am having a difficult time with it on these highly irregular rims! And my thumb keeps asking me what the heck I’m asking!
Ron, I have been working on that technique and have to keep reminding myself of it!
 
Joined
Mar 16, 2018
Messages
29
Likes
21
Location
White Rock, BC
Bill, I've used the parting tool method for several years. However, just last week while cutting a maple bowl with heavy bark and a 2" difference in the live edges, I snapped my 1/8" diamond parting tool. As with all these incidents, I can't really be sure what happened. I suspect the tip striking the wood after an air gap combined with the extra drag on the sides as it re-entered the higher wings, was just too much for it. I should mention that it was not one of the top name manufacture's tools. In hindsight, I should have cleared away the centre wood in stages rather than trying to get a clear cut through the whole circumference.
 
Joined
Feb 28, 2021
Messages
1,221
Likes
1,055
Location
Roulette, PA
Website
www.reallyruralwoodworks.com
What John and Ron said, plus it helps to have a strong light positioned such that you can clearly see the "shadow" edge of the bowl (typically angled from underneath, or behind the bowl) , the rest of it is just tool control practice -anchor tool to the rest, no death grip on things, practice run with lathe off to make sure you can sneak the tip in just a millimeter or less at a time, practice that several times to get a smooth steady advance (moving the tip a quarter inch might take you several seconds) once you feel you can do that, keeping the same pressure and motions memorized, turn on the lathe and keep your eyeball focused on the *edge shadow* of the highest point of the bowl edge and allow your muscle memory to slowly move the tool into your line of sight, with some practice it gets to be pretty easy.. start with your wall thickness plus maybe a quarter inch eyeballed in, then once you can get the cut started, just keep that steady incremental motion with tool locked down to tool rest (sharp gouge helps since if it is dull you tend to "push" the gouge to cut, which makes you jump heavily into "air") I start mine from about 1/2 inch from the rim towards the inside, and just work towards center a 16th of an inch at a time until the center is down to solid wood (no air) then start angling the cuts in from that same starting point until I more or less am following my outside contour, then I'll resharpen and start my finish cuts , working in from that 1/2 inch wall thickness to final thickness the same way, until my wall meets solid bowl wood all the way around- after that I never ever touch the wings again(helps if you get some bright colored tape applied to the wing edges for better contrast)
 
Joined
Apr 5, 2011
Messages
353
Likes
187
Location
Delray Beach, FL
What John said but for wood that is to curved on the outside (diameter of tree or branch) you must start toward the center and work out as you remove wood. This will cut down the bounce of the tool and make the job easier on the thumb. Also with the flute at 3 o'clock put the ground part of the flute parallel to the axis so it goes straight in. (handle away from you).

Stu
 
Joined
Sep 9, 2010
Messages
284
Likes
198
Location
McKinney,Texas
1. With handle level adjust tool rest so That the gouge tip is on center and the flute is at 3 o’clock ( AM or PM makes no difference).point the bevel in the direction you want to cut. Since you are starting a cut and have no bevel support you must support the gouge tip firmly with your left hand as described by @john lucas above. Make a short entry cut 1/16” is plenty now you have a place to rub the bevel then you can make the rest of the cut normally or abnormally what ever the case may be.
 

hockenbery

Forum MVP
Beta Tester
TOTW Team
Joined
Apr 27, 2004
Messages
8,629
Likes
4,971
Location
Lakeland, Florida
Website
www.hockenberywoodturning.com
The interrupted cut on a natural edge rim may be the most difficult cut to master in Woodturning.
lots of good advice.
i start hollowing by using the Tail center for support and removing wood about an inch from the side wall.
i leave mass in the base. Can increase the lathe speed
i then begin cutting the side wall to thickness.

it may help to see how I do it. This video is a crotch bowl but the cutting technique I use is same for a half log bowl


Here is a screen shot of the entry cut on the side wall. Bevel is lined up with the outside wall.
T733634F4-025D-4042-B63F-E0B5395584E4.jpeg
 
Last edited:

Donna Banfield

TOTW Team
Joined
May 19, 2004
Messages
511
Likes
1,351
Location
Derry, NH
My preferred method for making those final cuts on the wall is a fresh scraper that I'm holding at a 45 degree angle to the surface of the wood I'm cutting - which turns it into a shear cutting tool - or a 3/8" bowl gouge that I free-hand sharpen so that there's a minuscule micro-bevel. I can use that gouge with the flute facing the interior, and not get a catch, because the bevel is about 1/16th inch. That gouge is also presented at about a 45 degree angle. But very small cuts are the rule.
 
Joined
May 4, 2010
Messages
2,446
Likes
1,872
Location
Bozeman, MT
Lots of good advice above, Spike. Just to make sure it's clear, the gouge should be in the fully 'closed' position--that means the flute should be pointing horizontal to the floor. In theory, when you look down, you should not see into the flute. And the bevel should be parallel with the lathe axis, or pointing 'straight in'.
 
Joined
Nov 22, 2009
Messages
232
Likes
167
Location
Midland, MI
It looks like part of your blank has figured, crotch grain which is harder to cut and makes your job tougher.

Lots of good advice above. Probably what I say will repeat some of it.
1. Entry cuts are easier at higher speed. If you have room to turn up the rpm safely, try that.
2. Make sure your gouge is sharp.
3. Make sure your gouge is traveling in the right direction to be rubbing (gliding) the bevel. One way to do this is to turn the lathe off, then place the gouge so the bevel is flat on the cut you just finished. Keep that angle as you restart the lathe. (Or adjust it slightly if the previous cut wasn't quite in the direction you wanted.)
4. Make sure the top of your tool rest is smooth and doesn't have any notches that the gouge can catch on. Consider getting a tool rest with a hardened steel rod on top like Robust and Steve Sinner sell.

I saw a demo by Chris Ramsey making a large N.E. bowl. He used the gouge as a scraper for the final inside cuts on the wing/entry. He rolled the gouge so the flute was at about 10:00 and scraped with the left wing. I can't remember if he dropped the tool rest to get some shear angle. Anyway, the result was a very clean surface with no tool marks or tear out.
 
Joined
Aug 14, 2007
Messages
5,480
Likes
2,832
Location
Eugene, OR
I used to use the flutes at 3 o'clock method, but have switched. I saw a turner from our club use a method where the flutes were almost straight up, leaning only slightly away from the high noon position, and the side bevel pointed in the direction you want to go. This does not want to catch and skip, and I can't really figure out why. "Totally and in all ways inconceivable" and I do know what that word means.... Try it on standard bowls first before graduating to NE bowls.

For the flutes at 3 o'clock, experiment with a flat blank. If you use a 40/40 grind, with the handle at a 40 degree angle to the flat part of the bowl, nothing happens when you try to cut because the bevel is rubbing. The bevel is at 0 degrees, which is different to handle angle. As the bevel to wood angle increases, the severity of the dig in increases with max dig in at about 45 degrees. Once you get past that point, the dig in decreases, and by the time you get to 90 degrees, it doesn't dig in at all. The trick is to find that angle that perfectly matches the wall angle. If you go slightly past that angle, there is almost no dig in at all, but the bevel angle is aiming to go through the wall. Too shallow of an angle and you dig in and catch. Too deep of an angle and the gouge wants to go through the wall. It takes practice, and being able to feel that perfect angle. You can experiment with this at SLOW speeds.

robo hippy
 
Joined
Jun 10, 2021
Messages
135
Likes
181
Location
Oregon City, Oregon
Wow, lots of great advice! Thanks to you all!
i will sand after it dries, but this is this mornings work.
The wall thickness is pretty uniform at 3/16”, and the bottom is 5/32”, I got a little ambitious towards the end!
 

Attachments

  • 46EF1455-B188-4AAD-920F-4CE00D48D404.jpeg
    46EF1455-B188-4AAD-920F-4CE00D48D404.jpeg
    365.7 KB · Views: 42
  • 4227C9CF-6FCD-4B88-803D-5B8A833BEB5A.jpeg
    4227C9CF-6FCD-4B88-803D-5B8A833BEB5A.jpeg
    277.3 KB · Views: 40
Last edited:
Joined
Aug 12, 2012
Messages
34
Likes
17
Location
London
Website
www.turnedwoodenbowls.co.uk
Lots of advice, lots of solutions! Another one to try is to put the toolrest into the bowl, parallel and close to the wall at the top. Aim the bevel. Have the gouge handle low. Then it can’t cut through the wall or fall into the air gap without first going through the toolrest. Keep the flute facing to the right.
 
Joined
Feb 12, 2018
Messages
411
Likes
249
Location
Millington, TN
Lots of advice, lots of solutions! Another one to try is to put the toolrest into the bowl, parallel and close to the wall at the top. Aim the bevel. Have the gouge handle low. Then it can’t cut through the wall or fall into the air gap without first going through the toolrest. Keep the flute facing to the right.
I can’t understand how doing this prevents cutting through the wall. A picture would be a big help. Thanks.
 
Joined
Jun 10, 2021
Messages
135
Likes
181
Location
Oregon City, Oregon
What I have learned since this project:
Speed is your friend- I have been too conservative with speed, Nova chuck manual gives max speed for turning bowls of 5 or 6 hundred rpm, another source says bowls of x diameter safe speed is similar, getting it up to 10 or 11 hundred makes the entry cut much easier for me, and i don’t get catches on the wings!
Roughing between centers works great with good size chunks and allows repositioning blank for best shaping at both ends of the blank. No need for woodworm screws.
Balancing the blank while it is just held with the tips of the centers allows higher speeds from the get go, speeding up the roughing dramatically!
This all plus a few others from watching a couple of Lyle Jamieson videos.
 
Joined
May 4, 2010
Messages
2,446
Likes
1,872
Location
Bozeman, MT
Be careful holding wood by just the tips of the center points, Spike. The wood can slip out and give you a good whack, possibly in a sensitive spot. NAMHIK :rolleyes:

With care, you can remove the center point in the tail center and hold the blank with just the cup, and still be able to move things around. I just leave the center point in, and make a new hole as I adjust, and this serves my purposes OK.
 
Back
Top