My eyesight has reached the point that it is difficult to see very fine scratches. I can take the item outside when the sun is visible, but need to know about what type lighting will reveal these tiny scratches. Any ideas are welcome.
-
July 2025 Turning Challenge: Turn a Multi-axis Weed Pot! (click here for details) -
Congratulations to James Seyfried for "NE Red Oak II" being selected as Turning of the Week for July 21, 2025 (click here for details) -
Welcome new registering member. Your username must be your real First and Last name (for example: John Doe). "Screen names" and "handles" are not allowed and your registration will be deleted if you don't use your real name. Also, do not use all caps nor all lower case.
You are using an out of date browser. It may not display this or other websites correctly.
You should upgrade or use an alternative browser.
You should upgrade or use an alternative browser.
Fine Scratches on Finished Item
- Thread starter Jerry Bridges
- Start date
If money is not an issue - https://www.festoolusa.com/products...nspection-light/201938---stl-450-usa#Overview
Actually any strong raking light will help show up scratches. I just use a small led flashlight.
Actually any strong raking light will help show up scratches. I just use a small led flashlight.
- Joined
- Apr 27, 2004
- Messages
- 9,239
- Likes
- 5,898
- Location
- Lakeland, Florida
- Website
- www.hockenberywoodturning.com
.
Optivisors helped me a lot.
Cataract surgery gave me younger eyes.
I am a firm believer that Sunlight does cause scratches.
My eyesight has reached the point that it is difficult to see very fine scratches.
Optivisors helped me a lot.
Cataract surgery gave me younger eyes.
I am a firm believer that Sunlight does cause scratches.
Thanks,
I have been through the cataract surgery. It really helped me to see true colors. And, I believe you when you said sunlight causes scratches.
I have been through the cataract surgery. It really helped me to see true colors. And, I believe you when you said sunlight causes scratches.
john lucas
AAW Forum Expert
You need a point source light. A small light that's easily movable so you can change the direction easily. I have one that has a goose neck and magnet. The light is about 2" in diameter and focused so it shows up scratches.
I am going blind due to a very rae form of melanoma behind my eyes and also have trouble with scratches so I bought a sanding tool it takes all the grades of paper is orbital and when used I defy any one to find a scratch it is non powered and not expensive.
john lucas
AAW Forum Expert
we need to ask George Wertzal how he does it. He is totally blind and his pieces don't have scratches.
What tool are you referring to?I am going blind due to a very rae form of melanoma behind my eyes and also have trouble with scratches so I bought a sanding tool it takes all the grades of paper is orbital and when used I defy any one to find a scratch it is non powered and not expensive.
Which one exactly?I bought a sanding tool
I don't recall who taught me this, but a single light source makes a huge difference. What you're seeing when you can see a scratch is actually a minute shadow created by the scratch. When you have multiple sources of light coming from different directions those shadows disappear and fool you into thinking they're gone.
That is why checking in the sun shows them up. It acts as a point source light, I think.I don't recall who taught me this, but a single light source makes a huge difference. What you're seeing when you can see a scratch is actually a minute shadow created by the scratch. When you have multiple sources of light coming from different directions those shadows disappear and fool you into thinking they're gone.
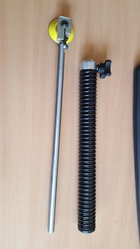
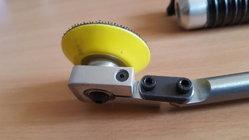
I use the random orbital sanders or inertia sanders . Bought a couple for external work and then made a dozen or so as I developed the internal model. This what I ended up with and it works extremely well, producing a scratch free finish. This head is 50mm dia [ 2"] with a velcro pad to attach the sand paper. The handle is 30cm or 12" and the extendable rod is 1/2" stainless or 4140 high tensile extends a fur 12" beyond the length of the handle


The sanding tool i was talking about is or rather looks the same as the one that Hughie has put a picture up of. Mine came with four wheels of two different sizes I buy rolls of diamind silicone paper various grades and cut my own disks these last alot longer than the one that come with the tool.
Cheers Mike
Cheers Mike
As far as I am concerned, the reason 'sunlight causes scratches' is because natural sun light is what our eyes have evolved to see in, and most of the light bulbs do not compensate for this. I think the LED lights have been worse about this than the other lamps, but they are catching up. There are a number of natural spectrum lights out there, and some are even called therapy lights for those who suffer from being inside and out of natural light. Ott lamps have been used for a long time by the needle point and quilter people. I have been using Blue Max lights for a number of years, which are florescent types. The bulbs in it put out a lot of light, but the head is fairly heavy, and sags over time, and the pole the light sits on is rather thin so it gets wobbly after a lot of use. I went back to them and they talked me into "Bright reader Natural Daylight LED Floor lamp by Home Concept. #LED101". I got a couple of desk top ones as well. I have been using the desk top one on my sharpening station for my flat work tools, and really like it. Haven't put the floor lamps together yet though.
Other than that, having prescription glasses rather than the reading glasses from the big box stores is a big help. Or, just take it out into the sun light....
I did a bowl turning demo over on the Oregon Coast last weekend, and used the quote about taking a piece into the house on a sunny day. One common question is 'what grit do you start sanding with?'. I try to avoid 80 grit because some times the 80 grit scratches are harder to get out than the tool marks and tear out. If I do start at 80, I go to 100, then 120, then 150, then 180 and up. May be redundant, but you spend a lot of time removing 80 grit scratches with 120....
robo hippy
It's hard NOT be be overly analytical about sanding. Question one has to be: are you sanding wood or finish? Assuming "wood": on the lathe or off the lathe?
If "on" the lathe, the resulting scratches will be in a pattern. No matter how fine the abrasive, it's visible (take a look at a CD or DVD)
If "off" the lathe, it's all about abrasives (low-end aluminum oxide or the good stuff), mechanized sander or hand, and technique.
As with most of us, I'm still working on achieving that perfect curve with no tool marks. But if a few tool marks persist, "on lathe" may be required - I will use a die-grinder with 180-grit with minimal pressure and then finish "off lathe" with a 3/32"-orbit DA and super sharp silicon carbide. After that, all I sand is finish.
I was a picture framer for 25 years. I owned the shop. We had a full on woodworking shop as well. A raking light is the best way to look for any type of defect. It also pays to tilt your work at different angles with the light in a fixed position. Spectrum is also VERY important when lighting anything for inspection. Light color wood verses darker woods reflect back all kinds of different information. Look close, take your time and if needed use a fixed magnifying glass based on your own level of OCD. Me? I am nuts! Being a picture framer you are inviting trouble to be scrutinized in what you present. They put their nose on the glazing looking for specks of dust. Then they start looking at your woodworking efforts. Did I mention OCD? It became a real problem. Still is….
TS
Portland
TS
Portland
