• Beware of Counterfeit Woodturning Tools (click here for details)
  • Johnathan Silwones is starting a new AAW chapter, Southern Alleghenies Woodturners, in Johnstown, PA. (click here for details)
  • Congratulations to Peter Jacobson for "Red Winged Burl Bowl" being selected as Turning of the Week for April 29, 2024 (click here for details)
  • Welcome new registering member. Your username must be your real First and Last name (for example: John Doe). "Screen names" and "handles" are not allowed and your registration will be deleted if you don't use your real name. Also, do not use all caps nor all lower case.

First time with the Center-Saver

Joined
Nov 2, 2005
Messages
224
Likes
1
Location
Lancaster, PA
Website
www.gvpencheff.com
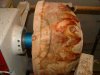
Well I broke down and ordered a McNaughton standard system a couple weeks ago from LV. When it arrived the tool rest post was missing. Joy. Had LV send me a post which arrived mid week last week and I finally had a chance to try the thing out on Sunday. Jet 1642, 1 1/2 hp version, Talon chuck with #3 jaws, 11" diameter by 7" thick black walnut blank. Blank has been on the shelf, Anchor Sealed for a couple months so it wasn't sloppy wet.

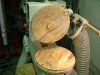
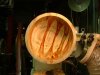
I was successful. I did manage to stall the lathe about three times though, had the blank pop out of the chuck twice, once tearing up the tenon. CA glued the tenon back together and finished it up. Waste ejection seemed to be the biggest problem. I think one of the stalls was caused by a log jam of shavings. Is that typical or was this just ornery walnut?

When I was done and cleaning up I discovered that the set screw that holds the tool rest assembly together had worked itself out. Found it amongst the shavings. Yikes! I'm surprised the assembly held together under all that stress having a screw missing. Like me. Think I'll put a drop of nail polish down that chute to prevent a reoccurrence.

I seemed to have the most trouble achieving a smooth feed of the tool into the work. The blade seems to stick in the gate. Should I lube that with something? Also the blades in my kit are black and on the Kelton website they're all nice and shiny plain steel. The black paint is already coming off the one blade I used. Should I speed that removal?

Looking forward to digging into my stash of Box Elder with this thing next weekend.
 
Joined
May 29, 2004
Messages
995
Likes
2
Location
billerica, ma
Got the McNaughton myself and have had limited sucess. Things that help alot are frequently clearing the shavings by removing and reinserting the tool (while running) because this is one of the biggest sources of stalls/snags. Second, give everything a good rub down with paste wax. You would not believe how much better this makes the tool work. Almost eliminates stalls, as you have a smooth feed rather than tiny and jerky insertion.

Dietrich
 
Joined
Feb 19, 2006
Messages
170
Likes
0
Location
Phoenix, AZ
Folks also recommend an extra cut on the outer side of the kerf to help the shavings flow out with centrifugal force. Lubrication definitely helps with getting the tool through the gate. Also be sure that the tip of the tool when fully extended through the gate hits the center line. This will help eliminate any catching, etc. towards the end of the cut. One thing that I found that I was doing wrong before, was pulling the tool to the side, rather than pushing it forward through the gate.
 
Joined
Oct 4, 2005
Messages
156
Likes
0
Location
KCMO
Website
www.zionfire.com
Wasn't there something on the McNaughton video about changing the shape of the cutting edge of the knives to help with chip ejection? Have you made that modification?
 
Joined
Nov 2, 2005
Messages
224
Likes
1
Location
Lancaster, PA
Website
www.gvpencheff.com
DeanGThomas said:
Wasn't there something on the McNaughton video about changing the shape of the cutting edge of the knives to help with chip ejection? Have you made that modification?

Didn't have to. The new sets come with the diamond shape cutters. The Mike Mahoney video was recommending owners of the original set of knives reshape their old style cutters to the new style. Speaking of that, I found that video only marginally helpful. And overpriced.

If I have a chance I'm going to try another blank tonight. I'm going to cut a beefier tenon on the blank, wax those blades and the gates and keep a spritz bottle of WD40 handy, go slow and clear the waste often. Everyone who has one of these things has mentioned the learning curve. So I'm-a-learnin'.
 

Bill Grumbine

In Memorium
Joined
Feb 1, 2005
Messages
419
Likes
0
Location
Kutztown, PA
Website
www.wonderfulwood.com
Greg, there are a couple of things you can do to make your experience go a little faster and easier.

Lubrication helps. I spray my knife and gate with WD-40 before I start coring.

Back the knife out and clear the chips on a regular basis.

You may need to stop the lathe and readjust the tool rest. The force of coring can cause it to move outward so that the knife is binding against the outside of the kerf.

Make sure the tip of the knife is dead on center with the handle up tight against the gate. This eliminates bucking.

There is another video out there that goes through the basics.

Bill
 
Joined
Nov 2, 2005
Messages
224
Likes
1
Location
Lancaster, PA
Website
www.gvpencheff.com
Couldn't wait for the weekend

Just had to try my hand with the Center Saver again tonight. Started in on a couple pieces of the Box Elder I scored a couple weeks ago. First piece was very spalted and was a bear to core. Makes for pretty wood but it's so punky the waste kept jamming in the kerf. Followed all suggestions. Waxed the blade, WD40'd everything in sight. Tool tip set to dead center.

After dinner I grabbed another chunk that looked solid. Wasn't until I rough shaped the bottom that I discovered what's in the first photo below. Is that "wind shake?" Anyway the McNaughton straight blade came in handy parting off that portion of the blank and I was able to proceed to core the remainder. This wood was still quite wet and the coring went better.

Sure is purdy wood :D
 

Attachments

  • BE2.jpg
    BE2.jpg
    16.5 KB · Views: 334
  • BE3.jpg
    BE3.jpg
    21 KB · Views: 326
  • BE4.jpg
    BE4.jpg
    18.1 KB · Views: 337
Last edited:
Joined
Feb 19, 2006
Messages
170
Likes
0
Location
Phoenix, AZ
That is some beautiful wood! From the looks of things, looks like things went fairly smoothly this time around.

Another thing that can contribute to binding is if the wood has internal stresses that are being relieved as you core. It doesn't sound like you have that going on, but something to be aware of in the future. I ran into that when coring some olive. The only thing I found that worked for that was to take a 2nd cut to widen the kerf so the blade fit better.

I have also heard of people using squirt bottles with water that the used to lubricate the kerf. Haven't tried it myself.
 
Joined
Jun 9, 2004
Messages
1,223
Likes
49
Location
Haslett, Michigan
Wind shakes

I'd guess that's what you'd call it, but in the 3-4 different sourses of box elder I've had, there is the tendency for the more degenerate wood to split this way (circumferentially rather than the typical cracks). Are wind shakes really from outside "trauma" (ie. wind) or just plain degeneration???? Gretch
 
Joined
May 29, 2004
Messages
995
Likes
2
Location
billerica, ma
I got the Mahoney video with my system and didn't find it that helpful either. Not much detailed explanation as to why he did things when he did. Seemed to me that he's so good with and comfortable with the system that lots of stuff comes naturally to him now. That doesn't always make for good instruction as you leave out important stuff cause it just doesn't occur to you.

Looks like you're getting the hang of it though.

Dietrich
 
Joined
Nov 2, 2005
Messages
224
Likes
1
Location
Lancaster, PA
Website
www.gvpencheff.com
Mahoney baloney

dkulze said:
Seemed to me that he's so good with and comfortable with the system that lots of stuff comes naturally to him now. That doesn't always make for good instruction as you leave out important stuff cause it just doesn't occur to you

You hit the nail on the head D. Maybe I should make a vid showing how not to use the system. That way others won't feel like complete morons when they plunk down $300 and discover this particular piece of gear is indeed finicky and does have a steep learning curve. And it takes practice and patience.

I have made progress. I haven't completely ruined any blanks, haven't bent any blades, haven't broken any belts, have no bruises. I don't have the approach angle (for lack of a better term) problem figured out yet because I seem to be coring too deep and barely leaving enough bottom thickness in the "master" blank.

And I've only been able to get one core out of a blank. Odd, considering Mahoney can get fifteen 1/32" thick NE bowls out of one chunk of wood. And it looks so easy!

:rolleyes:
 
Joined
Feb 19, 2006
Messages
170
Likes
0
Location
Phoenix, AZ
That is one misleading thing about the gallery section at the end of the video. Those bowls are not done with the widely available McNaughton systems. He had the company make him a special set of thin blades. They won't sell them in general, because of liability concerns, etc.
 
Joined
May 4, 2005
Messages
203
Likes
1
Location
Derby, Kansas, USA
Center Saver

I got my McNaughton at SWAT this year. I have rough turned two blanks that were large enough to use the system with.

I found the Mahoney DVD helpful, but not overly helpful. Setup and watching it in use were the best helps. Also the hint of hollowing the inside bowl before starting any coring.

I marked out 3 bowls in my first blank. I got 3 bowls. Stacked them together and it looked like I had missed one. I realized marking them out - on the face of the blank - that I was going to go very thick. 1st time etc etc. So that seems to be what happened.

My second blank I marked out 4 bowls. It was slightly larger. I marked the bowls slightly closer also. I got three bowls .... and one large funnel. :mad:

OK! I could have gotten 4 bowls - it just didn't make the final curve.
The directions said -- 1 blank saved for each 1 1/2 of blank thickness. That piece of info help me mark out where to start each cut.

The info I need is more about when to choose which cutter? Small curve, medium curve, large curve. I used the medium curve for all 6 bowls and the funnel.

I also need some more practice.

I like the system. It was easy to set up. It was easy to use. Bill G says let the cutter do the work --- he is right. Mahoney says clear the shavings - he is right.

Anyone with some other experience?

John :)
 
Last edited:
Joined
Nov 2, 2005
Messages
224
Likes
1
Location
Lancaster, PA
Website
www.gvpencheff.com
stnick said:
My second blank I marked out 4 bowls. It was slightly larger. I marked the bowls slightly closer also. I got three bowls .... and one large funnel. :mad:

OK! I could have gotten 4 bowls - it just didn't make the final curve.

Thanks John, I needed to hear that :)

I like the system too. Beats the heck out of shoveling all those curlicue shavings up off the floor and out from behind the lathe.

I feel the 12" dia blanks I have to work with so far are too small for the smallest of the Standard sized blade set so I've order a couple of the curved blades from the "mini" set and expect them to arrive early next week (takes forever for stuff to get to PA from UT). I'll post my results here.

I also have ordred B.G.'s new vid in which he demos the Center-Saver and gives some tips. I'm hoping to gain a little more insight from that.
 
Back
Top