• It's time to cast your votes in the July 2025 Turning Challenge. (click here for details)
  • Congratulations to Michael Foster for "Costa II" being selected as Turning of the Week for July 28th, 2025 (click here for details)
  • Welcome new registering member. Your username must be your real First and Last name (for example: John Doe). "Screen names" and "handles" are not allowed and your registration will be deleted if you don't use your real name. Also, do not use all caps nor all lower case.

Form critique/feedback

Joined
Nov 22, 2021
Messages
7
Likes
4
Location
Toronto, Ontario
I'm looking for some feedback on my first 2 attempts at this bowl shape. The first one is turned from hard maple and it seems like the better of the two (?). The second one is turned from oak but something is off about the top curve. I dont think it mirrors the bottom curve as well as the first bowl does. Any input would be appreciated.

Hard Maple Dish 9" X 2"

Screenshot_maple1.jpg

Screenshot_maple2.jpg


Oak Dish 7" X 2"

Screenshot_oak1.jpg

Screenshot_oak2.jpg
 
Looks like you tried to start both with the same bottom profile, basically, but the rim diameter being smaller forces the curve to be sharper on the oak... that plus the smaller foot on the oak accentuates that sharper curve.. Just my thoughts.. Nice turnings, otherwise.. Love the maple one.
 
I agree with the other Brian that the transition into the rim on the oak is too sharp. The maple looks perfect. I goofed around with PowerPoint artistic effects and found this way to highlight the curve differences. It might also be partly camera angle. you have a nice definition between the rim and the inside of the bowl. You might try sloping the rim slightly to give it more interaction with the inside curve.

curves.jpg
 
Maybe it's my imagination, but it looks like the top rim on the oak is a little narrower than the maple, and the inside contour a little steeper just below the rim. This latter part may be optical delusion related to the markedly different grain of the woods. Neither of these are criticisms, just observations.
 
Your insinks are correct. The maple bowl is a better shape. It may be the angle of the photo but the rim looks like it turns down slightly and if that's the case, I think the design would be stonger if it turned up just very slightly or was straight. Just my reaction. BUT, darn nice for your first bowls. You have a good eye.
 
I compared the two forms like @Brian Nowak-Thompson .

Here I put a straight line along the wall
The oak has a long flat. The maple has no noticeable flat
2A322C64-E81B-476F-AD21-BFE64B540552.jpeg

On this one I traced the curve on the maple with an apple pen.
I copied the traced curve and moved it to the oak bowl.
One thing to consider. The volume of the oak bowl will decrease if you follow the red curve.
It will hold less soup if cut to the red curve.
815A0F13-E586-4B1C-AADF-32E0653CC11C.jpeg
 
A way to turn consistent ogees.
I remembered that Jimmy Clewes using a simple plan to turn a ogee in workshop using a cove and bead.
Google found the details for me.
Google knew Gregg Potter used Jimmy’s plan and showed it in a demo which is written up here

15EF1138-9D6D-41E2-B0C3-F7B579C0E946.jpeg
 
Last edited:
I have to agree with everyone the continuous curves on the maple are much more pleasing to the eye. The base on the maple looks a little too large and the base on the oak too small, so a compromise between the two might be about right. The edge or top lip of both bowls seams a little heavy so maybe a continuation of the inside curve leading to a smaller edge would solve that.
All that said you are on the right track both in your design choices and seeking input from others.
 
You dont say what the intended use is for the bowls. IMO Bowls for functional use need different design details vs items for decor/display.

The maple bowl wide foot is good for a bowl used to eat or serve at the table, too wide for decor. The oak foot is the opposite. With the small foot, the side transition lift needs to occur quicker - there is a long flat then moves upward. This would slope the wall more and reduce the ogee radii, in line with what Hockenberry drew.

The rims on both are ok for functional serving bowls, too thick for display/decor.

Good 1st attempts. Its good to “bracket” a design - a bit too much and a bit too little can show where “just right” is.
 
The edge or top lip of both bowls seams a little heavy so maybe a continuation of the inside curve leading to a smaller edge would solve that.
I have to revise my own comment because I never had even looked at the top view to see that the inside contour did not parallel the outside so if it had then my comment would work.
 
This comment is from someone who gets it right sometimes and just as often ends up turning the bowl smaller to reshape it when things just don't work. Lately I have been very careful to maintain a continuous curve. It seems, (as mentioned by others) that the oak bowl doesn't manage that .

My bowls don't often have as much of a well defined base as yours and I am used to that look. To say it another way, my bases are there but pretty much hidden in under the curve of the bowl, not as deep/high as yours.

Seems that most others liked the horizontal width of your bowl rims. I found them a bit wide. Didn't hold my interest or maybe detracted from the inside shaping. I say this partly because I didn't understand whether the wide rim was intended as utilitarian or an intentional design element. For quite a while I have liked a modest finger hold for both utility and interest.

I am beginning to work on adding some interest to the rims of my bowls. I am about to try to learn knurling for a bowl with a rim as wide as yours. That will be strictly for interest, not utility.

As I looked for pictures to illustrate what I have written I have realized that I now depend a great deal on character in the wood to make up for my own lack of artistic flair. When turning relatively plain work, that's where I try extra hard to include a design feature because the wood by itself doesn't hold the eye for long.

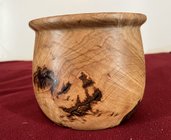
Attached picture shows the finger rim that I like sometimes. Not as an example of what a great turner I am, just the particular appearance of the finger rim.

I'm with several others - if those are your first two attempts you'll be awesome after a bit more time on it.

Like I said, take it for what it's worth. I'm not qualified to critique anyone else's work!
 

Attachments

  • AAW1.jpg
    AAW1.jpg
    316.2 KB · Views: 15
Chay,
Thank you for providing the starting point for an interesting and educational thread. At this point, you may be feeling like you stepped in front of a crowd of strangers and dropped you pants. Hopefully, you have heard from several commenters that the bowls are very nice and excellent work for first ogee bowls.

Ogees are really hard and I personally get them wrong more often than I get them right. I have previously heard that using a formula, such as presented above by Al Hockenbery, can make them more reliable and I'm going to try it, (if I can figure out what the pictures suggest o_O).

Again, please know that we think you're doing well and appreciate the chance to learn that you gave us by inviting feedback.
 
First, I am delighted to see you concentrating on form. So many new turners get excited about turning fast, that they forget to make nice forms. I agree with the comments above, and I URGE you to get this book by the incredible Mr. Raffan: https://www.amazon.com/Art-Turned-B...7868823&sprefix=richard+raffan,aps,529&sr=8-1 This is an updated copy of "Turned Bowl Design" and has better pictures and updated narrative. Either one is a great addition to your library.
 
Just last night I received a copy of the Raffan book, and in 20 minutes of perusing it, found a tremendous amount of insight. But what was better, is that he shows it in ways that make it clear and dare I say, obvious. Definitely answered a lot of nagging thoughts I had with some of my turnings, and gave me some ideas of where I am on the turning continuum. Thanks, @Brent@TurnRobust for the push.
 
Here's a method of designing smooth transitions between curves (arcs). In CAD they would be tangent arcs. You need a compass and a ruler, just like you played with in grade school.

Draw an arc, red in the picture. Use your ruler to draw the blue line, the blue line goes through the center of the red arc and the end of the red arc. The important part is that ANY arc that makes a smooth transition (tangent) to the end of the red arc HAS to have a center point on the blue line.

Here I drew an ogee. Looking up the definition of ogee, it's an "S" curve. I didn't see any rule saying an ogee had to be made up of two arcs of the same radius. The second arc, the dotted green one completes the ogee. I chose a point on the blue line as the center for the green arc. I made a guess that the green arc's radius would look good at about half the radius of the red arc.

tangents.JPG
 
Back
Top