• July 2025 Turning Challenge: Turn a Multi-axis Weed Pot! (click here for details)
  • Congratulations to James Seyfried for "NE Red Oak II" being selected as Turning of the Week for July 21, 2025 (click here for details)
  • Welcome new registering member. Your username must be your real First and Last name (for example: John Doe). "Screen names" and "handles" are not allowed and your registration will be deleted if you don't use your real name. Also, do not use all caps nor all lower case.

Help with hollow form interior tool marks

Joined
Feb 1, 2023
Messages
11
Likes
187
Location
Eston, SK
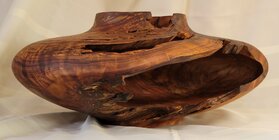
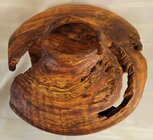
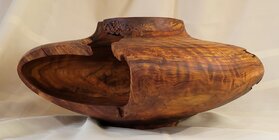
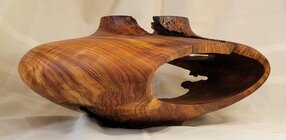
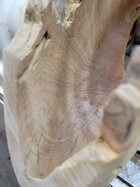
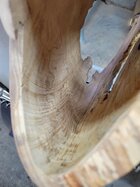
Hello everyone, i'm in need of some advice as to how to remove the tool marks on the interior of void-filled hollow forms. This is a piece of western red cedar I believe that I was told got cut off the tree 25 years ago and left in the shade. As a result of this, it had a rather large amount of rot present within as well as significant insect damage.

I understand that cut planning and a well controlled finishing cut is always the best way to limit tool marks and sanding and employ that constantly but this wood was just too rotten and still green for a finishing cut at this thickness. I hollow freehand with a large simon hope hollowing tool and touching this with that at this stage will produce tool marks no matter how I try to approach it.

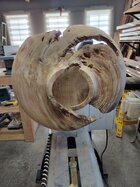
In retrospect, I just didn't really have the appropriate gear to take on a 20" x 8" hollow form with voids and rot when I began this project and only got to this stage through stubbornness. However, i'd still like to complete the piece and get it to the gallery for a show which means these toolmarks have to go. Thankfully the voids offer pretty good access to all of the interior surface, however hand sanding these out is going to be an extremely long and tedious process.

Any tips and tricks?, Ingenious ideas? Perhaps just the hard truth of the 6+hour hand sanding job ahead of me? Haha. I have a rubber ball on a stick with sandpaper glued onto it but it isn't safe to sand this interior with the lathe running, it would risk the piece and perhaps personal injury.
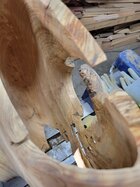
 

Attachments

  • 20240925_173316.jpg
    20240925_173316.jpg
    294.4 KB · Views: 80
  • 20240925_173326.jpg
    20240925_173326.jpg
    278.1 KB · Views: 78
  • 20240925_173339.jpg
    20240925_173339.jpg
    364.4 KB · Views: 78
  • 20240925_174048.jpg
    20240925_174048.jpg
    450.2 KB · Views: 80
Wet cedar is hard to turn without some tear out on any turning. Sanding with the lathe spinning is going to be extremely difficult as whatever holds the abrasive will want to bounce in and out of the voids. I would have used a tear drop scraper blade, with a negative rake bevel on it with my hollowing tool before taking off the lathe. The only option I see now, is to use a 2"pad on an extension bar and sand off the lathe. I have used that arrangement on the drill press so I can hold the vessel with both hands.
 
While turning I use small curved scrapers held in stout tools such as the large gooseneck Sorby tools made for this. Mine came with a teardrop and a round scraper (as well as hollowing bits). I also cut out and grind my own scrapers from cabinet scrapers, more flexible than the Sorby scrapers, sometimes useful. Between the gooseneck and straight shaft versions, i’ve been able to reach almost anywhere I needed. There are also small versions of these tools. I could take some photos when I get time.

Some Sorby tools with teardrop and shop-made scraper tips:
Sorby_scraper_tips_20240925_235258cs.jpg
For hand smoothing through the voids I’ve used sandpaper fastened around or fastened over some foam on the end dowel rods. Also, I sometimes use a Grex pneumatic sander with long extensions holding a 1” sanding disk. (running at very slow speed)

I also have a reciprocating pneumatic file that is sometimes useful and can save a lot of time. Might reach through some of the voids. However the files that came with it are not very long.

Those little sanding “sticks” sold at carving shops are nice too. Those I have use very narrow sanding belts stretched around a plastic “stick”, made so the belt can be rotated to expose fresh sandpaper as one section gets worn.

You can sometimes use a strip of flexible sandpaper, perhaps torn from a sanding belt, threaded through hard-to-reach places to sand the inside by alternating pulling on one end then the other.

Is it something you can sand blast? Sand blasting can result in a very interesting surface, accentuating the grain. Works better on some types of wood than others.

JKJ
 
Last edited:
I would have use a teardrop scraper to smooth the surface. I do not sand the inside of hollow forms.

One thing that I have done on forms with lots of voids is to bleach the inside. This brightens the inside to emphasize the voids. The bleaching also raises the grain a bit making the surface look smoother. Cedar may be a too light in color to bleach.

I you have experience with torching surfaces. This might be an alternative to sanding also iit would give a contrast in color for the inside. It’s not a first torching project.

If you have card scrapers and can get your hand inside the form you might be able to use them on much of the surface.

If you have a flexible shaft tool like a foredom you may be able to use it inside the form to sand with the 3M bristle discs.
 
Last edited:
i have used Black Gesso inside hollow forms if the surface just does not want to even out. It is so dark that you cannot see contours without a bright light.
 
I would use a teardrop scraper like the Sorby hook tool has. Freshly sharpen the scraper do you have a good burr, hold it downhill from your tool rest and take a light cut. Good luck. If you want a good video on the subject, I recommend this one
View: https://youtu.be/TpKnwUO0TYY
 
I use a 1” sanding disc on a rotary tool w/ an extension shaft. If you use a soft pad under the disc, the centrifugal force of the rotary tool will make the disc spin in a conical shape, which allows you to sand at nearly a 90 degree angle. Works like a charm.

Some tight spots may still need a touch of hand sanding, but the 1” disc can get into most places.
 
As open as this is I'd lean to the sandblasting idea JKJ mentioned. Contrasts of smooth and textures always work sculpturally . If the wood would bleach well, sandblasting and bleaching the inside would give one more contrast. It could all be done in the time it would take to adequately sand tear out.
 
I’d caution against sandblasting unless you are sure you won’t change the character of the piece in ways you won’t like.

When I was learning not to blow dust off thin hollow forms, i blew a hole in one with just air pressure.

I suspect you could easily blast holes in the soft spots and certainly blast away the edges of the voids. A different look you may or may not like.

Also getting a consistent looking blast surface will be difficult since getting the blast gun at the same distance and angle will be impossible. You would likely not be able to see what the blasting is doing and Shooting at oblique angles is marginally effective.
 
Last edited:
I use a 1” sanding disc on a rotary tool w/ an extension shaft. If you use a soft pad under the disc, the centrifugal force of the rotary tool will make the disc spin in a conical shape, which allows you to sand at nearly a 90 degree angle. Works like a charm.

Some tight spots may still need a touch of hand sanding, but the 1” disc can get into most places.

I bought a set of 3" 2" and 1" mandrels and pads for my sanding. I looked at the 1" and thought, "Pretty useless." Now I know better!
 
I bought a set of 3" 2" and 1" mandrels and pads for my sanding. I looked at the 1" and thought, "Pretty useless." Now I know better!
When a piece gets thin and starts to flex a bit as it spins, even tear drop scrappers can be risky and still don’t leave a perfectly smooth finish (although I suspect practice and patience would mitigate that over time). I find that using the small sanding pads with the flex extension gives me the most precision and control, while eliminating the chance of a catch. That’s the technique I’ve used on the last few void forms I’ve posted in the gallery.
 
Wow, so much excellent advice in this thread! I extend many thanks to all of you.

When I made this post, I was halfway through an idea I had: wrapping the form in plastic, filling the form with sand and tumbling it for a few hours, which smoothed up the inside surface to the touch quite well but didn't do a thing to all the ridges and tool marks. It might work better with a different abrasive. I perused all the advice here but sadly didn't have the time to acquire a tool let alone learn to use it well enough to use it on this project, so I ended up getting out my carving gouges and carefully taking the high spots that I could reach off and then hand sanding starting at 80 grit for about 8 hours. It was gruelling and definitely not the most fun i've had in the shop but it worked and the piece is finished! I've attached pictures of the final result.

All of this advice will be invaluable to me for projects in the future and I really appreciate it. Thanks.
 

Attachments

  • 20240930_102656.jpg
    20240930_102656.jpg
    339.3 KB · Views: 29
  • 20240930_102607.jpg
    20240930_102607.jpg
    499.4 KB · Views: 30
  • 20240930_102648.jpg
    20240930_102648.jpg
    325.6 KB · Views: 30
  • 20240930_102639.jpg
    20240930_102639.jpg
    359.8 KB · Views: 29
Wow, so much excellent advice in this thread! I extend many thanks to all of you.

When I made this post, I was halfway through an idea I had: wrapping the form in plastic, filling the form with sand and tumbling it for a few hours, which smoothed up the inside surface to the touch quite well but didn't do a thing to all the ridges and tool marks. It might work better with a different abrasive. I perused all the advice here but sadly didn't have the time to acquire a tool let alone learn to use it well enough to use it on this project, so I ended up getting out my carving gouges and carefully taking the high spots that I could reach off and then hand sanding starting at 80 grit for about 8 hours. It was gruelling and definitely not the most fun i've had in the shop but it worked and the piece is finished! I've attached pictures of the final result.

All of this advice will be invaluable to me for projects in the future and I really appreciate it. Thanks.
Your persistence is admired. I call sanding penance.
 
Nice piece.

Some people say they HATE sanding, REALLY hate sanding; I find sanding relaxing, maybe sort of a zen thing. Same with carving then sanding - patience is often required. Sometimes I'll sit in a chair with the piece on my lap or sit at a stool at the lathe with a piece in a (Best Wood Tools) carving and finishing post. One bowl with much carvings and texturing took me about 100 hours. Bradford pear, so it was hard wood, too.

Now if I were a production turner or driven by the strong desire to sell things and make money, I might resent the time spent sanding and detailing. Fortunately, I've never gone there.

JKJ
 
Wow, so much excellent advice in this thread! I extend many thanks to all of you.

When I made this post, I was halfway through an idea I had: wrapping the form in plastic, filling the form with sand and tumbling it for a few hours, which smoothed up the inside surface to the touch quite well but didn't do a thing to all the ridges and tool marks. It might work better with a different abrasive. I perused all the advice here but sadly didn't have the time to acquire a tool let alone learn to use it well enough to use it on this project, so I ended up getting out my carving gouges and carefully taking the high spots that I could reach off and then hand sanding starting at 80 grit for about 8 hours. It was gruelling and definitely not the most fun i've had in the shop but it worked and the piece is finished! I've attached pictures of the final result.

All of this advice will be invaluable to me for projects in the future and I really appreciate it. Thanks.
Travis,
While in bigtime agreement with John Jordan's post above, I'll further comment that it's the outside finish and presentation that makes the piece - an imperfect interior on a hollow-form, especially the kind you picture, makes for a deserved mulligan. That said, here's an idea: the Toothy Scraper.
Take any old curved scraper for your hollowing tool and score it with a Dremel cut-off tool about every 1/8 " - the scores don't have to be deep - maybe1/32". Sharpen just like any scraper. When moved across the surface, the tooth-corners are the cutters. And it's the radius of the scraper that governs the aggressiveness. It's like super sharp, 5-grit that is easily sharpened.
Keep on keeping on - you do great work.
 
Back
Top