I am thinking of building a homemade kiln. I didn’t see anything in the search. I want to dry long spindle stock. I thinking of using a insulated OSB box and maybe three halogen light bulbs. I would wire a snap disc thermostat ~145 degrees F. An old refrigerator won’t work because of the length of the spindles. Suggestions are welcome.

-
It's time to cast your vote in the March 2026 Turning Challenge. (click here for details) -
Congratulations to Chris Lawrence for "Dragon's Grip" being selected as Turning of the Week for March 30, 2026 (click here for details) -
Welcome new registering member. Your username must be your real First and Last name (for example: John Doe). "Screen names" and "handles" are not allowed and your registration will be deleted if you don't use your real name. Also, do not use all caps nor all lower case.
You are using an out of date browser. It may not display this or other websites correctly.
You should upgrade or use an alternative browser.
You should upgrade or use an alternative browser.
Homemade Klin
- Thread starter William Rogers
- Start date
- Joined
- Feb 28, 2021
- Messages
- 1,812
- Likes
- 1,625
- Location
- Roulette, PA
- Website
- www.reallyruralwoodworks.com
sounds to me like you are on the right track. I planned to build one myself with some scraps of plywood and rigid foam insulation, and use a 100 watt light bulb for heat source and a computer case cooling fan for moving air... then I started over-thinking it and planning on a thermostat and humidistat controller as well... so havent built it yet
Dale Bonertz used to turn, dry and sell bowl blanks. He had a homemade kiln with a capacity of >100 blanks. He told me heat was not the key part, it was a constant and controlled volume of air movement. At least that's how I remember it. Air is more important than heat.
- Joined
- Feb 6, 2010
- Messages
- 3,520
- Likes
- 2,596
- Location
- Brandon, MS
- Website
- threeringswoodshop.square.site
How long of spindles? You might be able to use an upright freezer. Three halogen lights is way to much heat, One 100 watt incandescent is plenty. You do not want it too hot as that will cause case hardening and cracks. You will need a fan inside to circulate air, computer fans work well. , as Brian said. Thermostat control is essential as you will overheat without it. Holes for ventilation also needed. Not positive on this one but logic (and this is what I do) says you need a humidity source to slow drying .
Brian Horais
In Memoriam
Here's a link to an article you may be interested in from 'The Highland Woodturner' on making a 'Quick, Cheap Drying Box' (by Rick Morris)I am thinking of building a homemade kiln. I didn’t see anything in the search. I want to dry long spindle stock. I thinking of using a insulated OSB box and maybe three halogen light bulbs. I would wire a snap disc thermostat ~145 degrees F. An old refrigerator won’t work because of the length of the spindles. Suggestions are welcome.
https://www.highlandwoodworking.com/woodturning/making-a-wood-drying-box.html
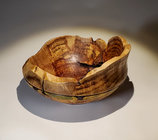
I have used this drying box a number of times to successfully dry chunks of wet poplar burl after I rough turned them. It takes about 6 to 7 days for the moisture and/or weight to go down and level out. After that I have completed the rough turned burl chunks with great success. Here's an image of one of the bowls I made. I have even used it to dry some spindles. Enjoy!
Attachments
I built something like that but i included a 4 inch inline duct fan and some 4 inch foil duct. It pulls air from the far side and blows it across a radiator style oil filled heater set on low. I control the heater with an external digital thermostat. It does a good job of maintaining a consistent temp and moving air across the wood.
You can also incorporate a De-humidifier into the kiln, this will speed up the process when you load a new batch of wet wood
into the kiln. You circulate the air across the wood into the dehumidifier and return the same air back into the wood kiln. Depending
on where you live, and the ambient outdoor temperature and humidity can have a major impact on how well a wood kiln works
if you only use heat and fresh outdoor air to dry the wood.
Make a visit to the Forest Products Laboratory site and start doing some reading. They've got kiln plans (that should be scalable) and more importantly kiln drying schedules for different woods. As others have mentioned drying wood successfully takes more than just cranking the heat and waiting.
Forget the halogen lights, way to much heat for a small kiln and a fire hazard.
I make lots of stools and practice wet/dry joinery. The leg is air dried but the end or tenon that goes into the seat is super dried to less than 4% moisture content in a sand pot. I can run the temperature to no more than 180 degrees and dry the end in a day or two. Sometimes so low I can't get a reading on my moisture meter.

I make lots of stools and practice wet/dry joinery. The leg is air dried but the end or tenon that goes into the seat is super dried to less than 4% moisture content in a sand pot. I can run the temperature to no more than 180 degrees and dry the end in a day or two. Sometimes so low I can't get a reading on my moisture meter.
If you want cheap, air dry for a month, then sticker them in the attic of your house or garage. Plenty of free heat up there. Or build a box outside and send a flexible house up in your home attic. Using electricity just went up 300% here in Peoria.
Larry, have you ever tried this sand pot method on a hollow form or bowl?Forget the halogen lights, way to much heat for a small kiln and a fire hazard.
I make lots of stools and practice wet/dry joinery. The leg is air dried but the end or tenon that goes into the seat is super dried to less than 4% moisture content in a sand pot. I can run the temperature to no more than 180 degrees and dry the end in a day or two. Sometimes so low I can't get a reading on my moisture meter.
View attachment 45123
I'm curious now. I've used silica beads but I use a closed metal can because of the high ambient humidity here in South Texas. This seems like a similar concept. It looks like the moisture just evaporates from the open coffee container. I may try this as I do a lot of green wood turning.
Last edited:
I made a "hot box" to store welding rods and it works. The enclosure is 9 gauge plate steel about 12 x 16 x 30 long. The inside is lined with 1" sheet foam insulation. There is a hinged door on both ends. A single 100w standard light bulb is the heat source. I'm thinking the thin plate steel weighs less than 3/4 sheet material.I am thinking of building a homemade kiln. I didn’t see anything in the search. I want to dry long spindle stock. I thinking of using a insulated OSB box and maybe three halogen light bulbs. I would wire a snap disc thermostat ~145 degrees F. An old refrigerator won’t work because of the length of the spindles. Suggestions are welcome.
I have a friend who made a kiln for drying myrtle wood boards. Dehumidifier, which drained out one part of the room, a small fan, and about a 100 watt light bulb. He had the building framed, so not one of the Tuff Shed or other cloned type buildings. You can make a solar kiln, black plastic, and sticker every thing, it heats up in the day, and cools off at night which 'relaxes' the day time stress. Still takes a month or two, depending on your climate. If totally green, I would cut them first, put them on a concrete slab for a week or month, then up higher in the shop. I would use titebond or Elmers for end sealer, and consider that important. It is next to impossible to get anything over about 2 inch or 8/4 to get to equilibrium. A single light bulb, preferably one of the old incandescent types under the pile of wood will create convection flow, as in hot air rises. Depends on how much you are trying to dry at one time. Probably want to keep a bunch of it in different stages of drying.
robo hippy
robo hippy
- Joined
- Jul 18, 2018
- Messages
- 1,385
- Likes
- 3,075
- Location
- Baltimore, MD
- Website
- loujacobswoodturning.com
Coincidentally, I just began making a small drying box/kiln out of a non-working small chest freezer a few days ago. I did a search here and found an older thread where Mike Brazeau shared his experience. Got in touch with him, and he offered great advice, also referring me to a posting on Cindy Drozda’s site. All very helpful. I’ve just finished putting the box together, standing the chest on end, so it opens in front, and installed a 40 watt incandescent bulb near the bottom. After a couple of hours (empty), the temp inside went from 70° to 95°. Ive got a row of five 1/2” holes near the top on one side, and same near the bottom on the other. I’ll start without a fan, as I’ve been told that natural convection should provide enough air movement. We’ll see.
@Lou Jacobs , can you give links to the posts you mentioned?
- Joined
- Jul 18, 2018
- Messages
- 1,385
- Likes
- 3,075
- Location
- Baltimore, MD
- Website
- loujacobswoodturning.com
Sure! Here’s a link to the previous thread:
 www.aawforum.org
And here is a link to Cindy’s article:
www.aawforum.org
And here is a link to Cindy’s article:
(I hope I’m not violating her copyright by reposting this here, but it is not an article that needed to be paid to access.)
Kiln for Once Turned Green Blanks
My impression is that a lot of pro's like people in AAW are processing so much material that they don't mind air dry times for roughed out forms since they have giant stashes of blanks built up over time. But for amateurs like myself who only turn a few things a month, if you have interest in...
(I hope I’m not violating her copyright by reposting this here, but it is not an article that needed to be paid to access.)
Good information thanks. Some things I had not considered. I did pickup a small fan at the Restore today for $4. I’ll likely build it from wood as I don’t have a chest freezer. A solar kin is interesting, but no place to put one. Tough enough finding a place in the shop.
- Joined
- Jul 18, 2018
- Messages
- 1,385
- Likes
- 3,075
- Location
- Baltimore, MD
- Website
- loujacobswoodturning.com
Roger, this was my biggest challenge! I had a homemade router table sitting on top of a plastic trash can. I’ve substituted the freezer/kiln for the trash can. On end it’s just a bit taller than the trash can was. I’ll just have to watch out for humidity coming out of the vents.Tough enough finding a place in the shop.
Some one mentioned using an attic and I have been using a garage for that purpose for about 12 years and like he said the heat is free.

I have not. No idea if it would work.Larry, have you ever tried this sand pot method on a hollow form or bowl?
My understanding is that the critical variable ain't the heat, it's the humidity. Heat is just a mechanism to build a gradient to drive evaporation. If you want to do it carefully/scientifically, you need to be able to measure/control humidity over time. Bulb, fan, no problem - undoubtedly that works, but if you really want to control it, I'd look for a way to manage humidity over time. And be able to track ambient humidity vs. moisture levels of the wood.
I recently acquired an upright freezer for just this purpose. I have not completed the build yet, I have a thermostat/humidistat I am going to use to control the fans and 100 watt reptile heater (screws into a standard light socket - I am using a porcelain 'keyless' socket). For ventilation, I have a 6" exhaust cap (has a grill to keep critters out) and an automatic damper that is airflow operated. The 6" fan will cycle to exhaust the air when necessary, the heater will cycle as necessary to maintain a consistent temperature in the cabinet. I still have to form the sheet metal shield that will go over the element to keep any drips off, and to mount the 4" muffin fan that will circulate the air. So far, the only build steps I have done is installing a hasp and padlock on the door - this will sit outside the shop. I have all of the parts for it, just need the time to build it now.How long of spindles? You might be able to use an upright freezer. Three halogen lights is way to much heat, One 100 watt incandescent is plenty. You do not want it too hot as that will cause case hardening and cracks. You will need a fan inside to circulate air, computer fans work well. , as Brian said. Thermostat control is essential as you will overheat without it. Holes for ventilation also needed. Not positive on this one but logic (and this is what I do) says you need a humidity source to slow drying .
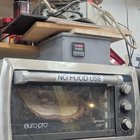
For small pieces, I have a modified toaster oven. The grey box on top has the controller for the oven - I do not use the oven's original temperature controls it is all done by the controller on top. Right now, I have a burl in it that a neighbor gave me. Has a hollow middle, so I am going to fill that with resin. Need to dry it first, as Alumilite and moisture do not go together very well. My next toaster oven mod will be to add a timer to the control box. I have the timer, again need the time. There seems to be a certain irony there......
Attachments
- Joined
- Jul 18, 2018
- Messages
- 1,385
- Likes
- 3,075
- Location
- Baltimore, MD
- Website
- loujacobswoodturning.com
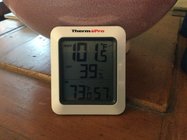
I just received this thermometer/hygrometer with remote sensor from Amazon this morning. Nothing in the box yet, but the 40 watt bulb does a good job of bringing it up to 100° In a few hours. The sensor supposedly sends up to 200’ away. My shop is only about 50’ away, but the sensor is inside the freezer and seems to be sending out a strong signal. Now I just need to lay in a stock of wet bowl blanks and begin real world testing. Oh yeah, also Tim reminded me, I think I better put hardware cloth over the vent holes, as the warm air might be enticing to mice and small snakes.My understanding is that the critical variable ain't the heat, it's the humidity. Heat is just a mechanism to build a gradient to drive evaporation. If you want to do it carefully/scientifically, you need to be able to measure/control humidity over time.
Attachments
I have something similar to that as well that will go inside the unit. Mine is connected to the wireless network in the house/shop/yard so I can pull up the readings with an app on my phone. I only plan to use that for monitoring. It has spent the last month next to a unit in the house that shows temperature and humidity, I have been comparing the two periodically. At first, there was some value tweaking (you can configure error correcting offsets for both temp and humidity), but it is fairly stable now. Within a few degrees and a percent or so.
My current plan is to build the kiln 24” wide, 42” tall, and 48” long. The first shelf will be at 18” and the second shelf will be 12” above that. Heat (light bulbs) and small fan will be below the first shelf. I am using 3/4 particle board for the construction. Not the ideal material, but I have it and should be fine. Insulated on the inside with 3/4” foam board and also on the outside where practice. From research I think the ideal temperature range would be 120-140 degrees F. It will have the option for two light bulbs. I will wire a water heater thermostat set for 130 degrees F to the light bulbs. For venting I have a spare 6” metal dust collector gate to be in the top opposite side of the fan. There will be a temperature/humidity inside and also a temperature gauge readable from the outside.
Comments/suggestions are welcome.
Comments/suggestions are welcome.
Last edited:
I think the function of heat is to allow more water to come out of stuff at a faster rate. Much easier to dry wood in warmer temps than in cooler temps. As always, dry it too fast and you get cracks, dry it too slow, and you get mold, and some times spalting....
robo hippy
robo hippy
Exactly so why have a kilnI think the function of heat is to allow more water to come out of stuff at a faster rate. Much easier to dry wood in warmer temps than in cooler temps. As always, dry it too fast and you get cracks, dry it too slow, and you get mold, and some times spalting....
robo hippy
It is an art. Commercial kiln wood has been called Kill Dried wood. Take a board and rip it on your table saw, and you get dust. Rip a board that has been air dried, solar kiln dried, or vacuum kiln dried and you get shavings. Also, I have noticed that if I cut an 8/4 plank in half to book match it, I get no cupping, warping, or twisting.
robo hippy
robo hippy
A kiln does not necessarily have to be super hot - it is more about maintaining a consistent temperature over a long period of time. Since a kiln represents a (more or less) controlled environment, you can control the heat and humidity. When I use my modified toaster oven to dry small blanks, I set the PID controller to 50c (122f). A pretty low temperature. Since the door does not seal completely tight, that allows for controlled humidity release. In the kiln I am building, I have a similar controller, but also have a humidistat to vent the kiln when humidity goes over a certain value.Exactly so why have a kiln
Drying wood is sort of like barbecuing a hunk of brisket or other meat that lends itself to BBQ - low and slow. Low heat, and a long time to get it done. A proper BBQ can take hours - as in at least a day. Slowly dried wood will also take a long time to get it done - days, weeks, or months depending on what it being dried.
Proportional Integral Derivative I am a retired controls engineer for an industrial oven manufacturer and am very familiar with what those terms mean and it would be way way overkill to use something like that on a low power low temperature kiln. The proportional function is used to control the heat source to maintain the continuous power to the heat source to maintain the exact temperature. The I & D are just used to correct the proportional band when the setpoint is reached or for disruptions like opening door. The simplest way to proportion power to a heater is time proportioning where the controller has a unit of time say 1 minute so if the control determines that the system requires 50% the heat is on for 30 seconds and off for 30 seconds, again overkill.A kiln does not necessarily have to be super hot - it is more about maintaining a consistent temperature over a long period of time. Since a kiln represents a (more or less) controlled environment, you can control the heat and humidity. When I use my modified toaster oven to dry small blanks, I set the PID controller to 50c (122f). A pretty low temperature. Since the door does not seal completely tight, that allows for controlled humidity release. In the kiln I am building, I have a similar controller, but also have a humidistat to vent the kiln when humidity goes over a certain value.
Drying wood is sort of like barbecuing a hunk of brisket or other meat that lends itself to BBQ - low and slow. Low heat, and a long time to get it done. A proper BBQ can take hours - as in at least a day. Slowly dried wood will also take a long time to get it done - days, weeks, or months depending on what it being dried.
As far as drying wood is concerned back in the early 1970's I added a second story to my home which required a stairway and balustrade so in the fall I had a relative with a sawmill cut some red oak 2 x 2's. The 2 x 2s were cut to about 32" long, the ends waxed then stacked with stickers in an unfinished upstairs room and by the following summer were ready to turn into balusters. This is the house that we sold in 2006 and one of the pictures shows the base of the stair case with one baluster showing [ https://www.zillow.com/homedetails/5312-Horizon-Dr-NE-Fridley-MN-55421/1522776_zpid/
I was replying to the second sentence in Robo's commentExactly so why have a kiln
Agreed. Very much. The one on the modified toaster oven is a PID. When I went out to the shop, I checked, and the other is a basic thermostat. The PID is used because I had it at the time, and it provided the function I needed. Absolute overkill, but when you are on a budget.....I need to do some work on the oven anyway to add a timer to it, so I may replace the PID at that point. Need to check the thermocouple on the other temperature control I have to see if it will fit where the current one is to sense the temperature inside the oven. The kiln is all about controlling the drying environment. I have heard of some adapting an electric smoker to dry wood. The most common is a dead refrigerator or freezer with a lightbulb or two for heat and some ventilation to let the moisture out. I am adding a bit more to my build to (ideally) be able to set it and walk away, knowing it will maintain the set temperature regardless of the external envornment. The commercial kilns that dry wood are likely a lot hotter than a home-brew kiln. This is nothing like a kiln you would use for ceramics or an oven for manufacturing processes or environmental testing purposes. One of the buildings I supported while in IT has a number of those - of course they are the test facility for one of our business units. They can crank the temperature way up, or make it really cold - all in the same unit for some of them. Walked past them regularly, since the door to the IT room was at the far end of the environmental test room. Our application here for turning purposes is a low, but managed, temperature operation. Not all of us have space to let items dry naturally for a year or so, the kiln helps speed up that process....way way overkill to use something like that on a low power low temperature kiln....
What I can see of the stairway looks nice. One of the projects I would love to get to here is refinishing our stairway railings. So far, it has been vetoed by the boss - aka the wife
") "When the kids are gone (they are 20 and 25), when we don't have a cat around (not likely), etc....."
"When the kids are gone (they are 20 and 25), when we don't have a cat around (not likely), etc....." 
When I started that project all three of my children were aged in single digits and of course they didn't help at all, but with kids that old you should be able to get some free labor.What I can see of the stairway looks nice. One of the projects I would love to get to here is refinishing our stairway railings. So far, it has been vetoed by the boss - aka the wife
I know, right?When I started that project all three of my children were aged in single digits and of course they didn't help at all, but with kids that old you should be able to get some free labor.
Unfortunately, neither of my girls got the woodworking genes. The youngest is an awful lot like me (as in, a really scary amount. I know me. I am afraid. Very afraid.), except for the woodworking and such. A shame, really, as I would love to have someone to bring in the shop
When my girls were still in girl scouts, I had both of their troops in the shop (when they were old enough) as part of a woodworking patch (forget what they are in girl scouts, boy scouts it would be a merit badge). While I did not have them using any machines directly, everyone had to follow the safety rules. Long hair tied up and back, no dangling necklaces or other jewelry, no loose sleeves or clothing in general that could be caught, no open toe shoes - something thy would wear for a hike would be perfect, or sneakers. And they must be tied. Before having them in, I sent a form with each of them that both the girl and her parent(s) had to sign. Outlined the rules, and made it clear what was expected. I included that there are a number of hazards in the average shop, even when machines are not running, and they should dress appropriately in clothing that if it gets stained or damages will not be a problem. The troop leader added her own emphasis, and when someone would ask about a particular item her response was basically 'What did Mr. Tim say'. I was also a cookie dad for both troops for several years - with 2 girls of my own plus managing the cookie sale for 2 troops, my living room looked like a girl scout cookie warehouse for a while
For that, I had to be a registered girl scout. Threatened my coworkers that I would come in wearing a GS uniform - skirt and all - if they didn't buy cookies. It worked - there are things that should not be seen. Me in a skirt is presumably one of those. Not overly anxious to confirm that. It is not an art. For nearly 100 years the Forest Products Lab has been publishing kiln schedules for drying different species of wood. It's well documented and widely accepted.It is an art. Commercial kiln wood has been called Kill Dried wood. Take a board and rip it on your table saw, and you get dust. Rip a board that has been air dried, solar kiln dried, or vacuum kiln dried and you get shavings. Also, I have noticed that if I cut an 8/4 plank in half to book match it, I get no cupping, warping, or twisting.
robo hippy
To get back on track. Thanks for all the suggestions, but my best option was to build my kiln to the dimensions I wanted. Note I have a secondary use for the kiln that is not drying wood for turning. @Lou Jacobs Thanks for posting the ThermoPro sensor. I bought one after seeing your post and is ideal for this purpose IMO.
I had no idea what temperature I could reach, so I installed three light bases. Planned for worse case. My goals were 120F for drying turning wood and 135-140F for different use for the kiln. I got a small fan from the Restore to circulate air. Interior dimensions as 18” wide 38” long and 40” high. There are two removable shelves made from wire hardware cloth (I couldn’t find any wire racks that would fit). The first shelf is 16” above the lights and the second shelf is 12” above the first shelf. It is on wheels. With the doors closed I left a 3/8"” wide by 3/4" long gap to vent moisture. There is also some small gaps where the thermostat is installed.
Suggestions and comments are welcome.

Gap left in doors for venting about 3/8” wide and 3/4” long. There are also other openings.

Each light is controlled by a switch. I can turn on one, two or all three. They are all wired to the thermostat, if the temperature reaches the set point of 136F it will turn off all three. They turn back on at 135F. The fan is on a separate circuit and will run continuously. For drying turning stock I suspect I’ll only need one light. For my other use I’ll need two lights. Third light would be a spare if I noticed a bulb burnt out, not needed for temperature. Lights are 65 watt incandescent floods. The black cover is over the thermostat.


For testing, I got a small piece of wet walnut (24-27 MC) and turned a small bowl about 5” diameter and 3” tall and 5/8” -3/4” wall as a test piece. Weight was 450 grams (1 lb.) Sealed the end grain and put it in the kiln yesterday. I don t have good luck with walnut bag drying. I’ll see how this works. I’ll take a look and weight tomorrow. Just guessing it will be dry in 4 days because it is small.

This is a screen shot of the data from the sensor. Overnight the temperature remained fairly constant at 126F. You can see a rise this afternoon to 130F as the outside temperature is 97F. I suspect the kiln temperature will drop as it cools off overnight. Humidity is also slightly rising as it gets hotter outside.

I had no idea what temperature I could reach, so I installed three light bases. Planned for worse case. My goals were 120F for drying turning wood and 135-140F for different use for the kiln. I got a small fan from the Restore to circulate air. Interior dimensions as 18” wide 38” long and 40” high. There are two removable shelves made from wire hardware cloth (I couldn’t find any wire racks that would fit). The first shelf is 16” above the lights and the second shelf is 12” above the first shelf. It is on wheels. With the doors closed I left a 3/8"” wide by 3/4" long gap to vent moisture. There is also some small gaps where the thermostat is installed.
Suggestions and comments are welcome.
Gap left in doors for venting about 3/8” wide and 3/4” long. There are also other openings.
Each light is controlled by a switch. I can turn on one, two or all three. They are all wired to the thermostat, if the temperature reaches the set point of 136F it will turn off all three. They turn back on at 135F. The fan is on a separate circuit and will run continuously. For drying turning stock I suspect I’ll only need one light. For my other use I’ll need two lights. Third light would be a spare if I noticed a bulb burnt out, not needed for temperature. Lights are 65 watt incandescent floods. The black cover is over the thermostat.
For testing, I got a small piece of wet walnut (24-27 MC) and turned a small bowl about 5” diameter and 3” tall and 5/8” -3/4” wall as a test piece. Weight was 450 grams (1 lb.) Sealed the end grain and put it in the kiln yesterday. I don t have good luck with walnut bag drying. I’ll see how this works. I’ll take a look and weight tomorrow. Just guessing it will be dry in 4 days because it is small.
This is a screen shot of the data from the sensor. Overnight the temperature remained fairly constant at 126F. You can see a rise this afternoon to 130F as the outside temperature is 97F. I suspect the kiln temperature will drop as it cools off overnight. Humidity is also slightly rising as it gets hotter outside.
120 degrees is a very aggressive temperature goal. That will crack a lot of wood if you start that high!
This first piece was to put the wood in at ambient temperature and bring up to 120F. It took 5 or 6 hours to reach the set temperature. I am still experimenting. One of my experiment is to use a timer to cycle the lights on and off reducing the time to reach 120F. I am not an expert by any means, but everything I have read says 120F to 140F as the drying temperature. Some temperatures are 120 -190F. The type of wood also plays a factor.120 degrees is a very aggressive temperature goal. That will crack a lot of wood if you start that high!
- Joined
- Feb 6, 2010
- Messages
- 3,520
- Likes
- 2,596
- Location
- Brandon, MS
- Website
- threeringswoodshop.square.site
I have had good results with temp at 96 and in two to three days bowl is ready for second turn. I also think adding humidity with a water bowl slows drying and gets better result as I had some cracks without it.
I have decades of experience drying wood. The purpose of kiln drying is to remove the bond water in the cells of the wood. Start too high and it case hardens and the bond water will not come out. Start anywhere you want, I just wanted to warn you based on my experience.This first piece was to put the wood in at ambient temperature and bring up to 120F. It took 5 or 6 hours to reach the set temperature. I am still experimenting. One of my experiment is to use a timer to cycle the lights on and off reducing the time to reach 120F. I am not an expert by any means, but everything I have read says 120F to 140F as the drying temperature. Some temperatures are 120 -190F. The type of wood also plays a factor.